


Load Archive

This feature loads a previously created archive file and supports ZAR and ZPRJ archive formats. Depending on the file format, OpticStudio will open a tailored dialog box that handles either the ZAR or the ZPRJ. When this feature is selected, OpticStudio prompts you to choose the file to restore.
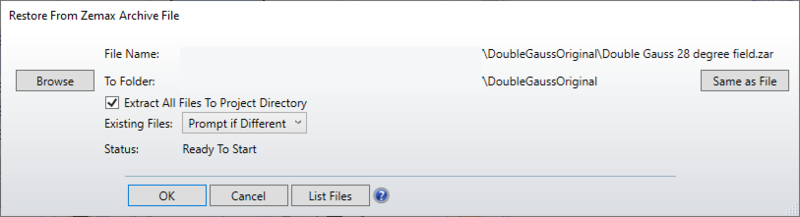
When a ZAR is selected, the following dialog box is shown.
When a ZPRJ is selected, OpticStudio shows a different dialog box. This dialog box is shown below.
Note that these two share some functionality, but some differences apply to the different archive file formats.
File Name: The name of the archive file to be loaded.
To Folder: The master folder in which the archived files will be restored. The initial default folder is the folder where the archive file is stored. However, any valid folder for which the user has permission to read and write can be selected.
For ZAR files, this is the folder where the primary lens file (ZMX), config file (CFG), session file (*.ZDA), and any ray database (*.ZRD) files are stored. Most other files, such as glass catalogs (*.AGF) and Dynamic Link Libraries (*.DLL) are stored in the folders the current OpticStudio uses, as defined by the OpticStudio Folders options. This behavior can be changed by activating the Extract All Files To Project Directory as described below.
For ZPRJ files, this is the folder to be used as the project directory folder by the lens project. See Convert to Lens Project.
Extract All Files To Project Directory: This option is only shown when loading a ZAR archive file. The ZAR content is converted to a lens project when this checkbox is active. The accompanying files are stored in the folder selected in the "To Folder" field and are linked to the ZMX as project files. For more information on lens projects, see the Files In Use and Additional Files below and Convert to Lens Project.
List Files: This option is only for the ZAR archive files. It opens a window listing all the files in the ZAR archive, the file size, and the date. If the file is compressed, the compressed file size but not the original file size is listed.
Existing Files: This feature tells OpticStudio what to do if the archive contains a file of the same name as an existing file. The options are Overwrite All (the file in the archive file will overwrite the existing file without warning or saving the old file), Skip All (the existing files will be retained and the files in the archive file will be ignored), Prompt Every File (OpticStudio will ask you whether to overwrite or skip every single file when a duplicate exists), and Prompt If Different (OpticStudio prompts the user whether to overwrite or skip any file for which a file with the same name and different contents already exists in the destination folder).
OK: Begins the restoration of files from the archive file.
Cancel: Exits the dialog without restoring the files from the archive file.
When the restoration is complete, press Close to close the dialog box. OpticStudio will then immediately load the ZMX file that was just restored.
File tabs and their options
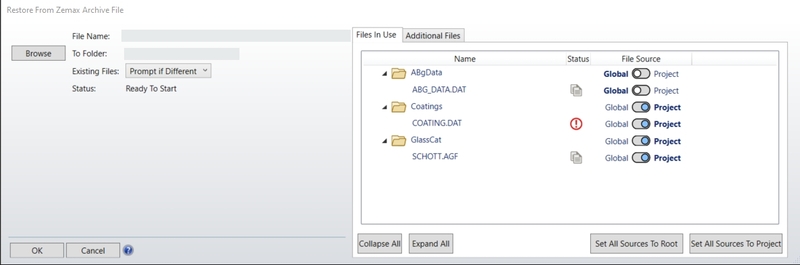
These two tabs only show when loading a ZPRJ archive file.
Files In Use Tab shows the files used by the lens project and are directly employed by OpticStudio to perform related activities such as extracting glass properties. When restoring the ZPRJ archive, files in use that have their file source set as "Project" will be saved in this folder. Files with their file source set as "Root" will be saved as defined by the OpticStudio Folders options.
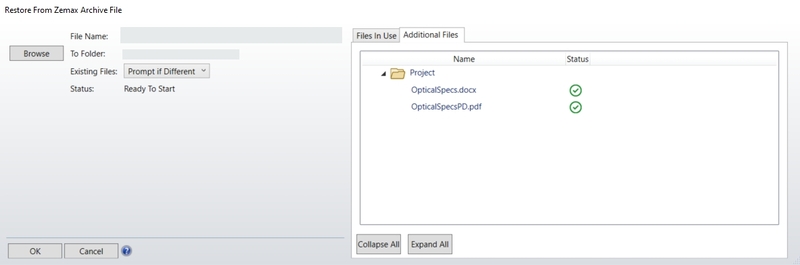
Additional Files Tab shows manually linked files. An example of this tab can be seen below. Note that these files cannot be restored to root and will always be restored to the project directory folder. See Lens Project Settings for more information about how to link files manually.
Collapse All: When clicking this button, all folders collapse, and files in the folders are not shown.
Expand All: When clicking this button, all folders are expanded, and all files in the folders are shown.
Set All Sources to Root: This option is only available in the Files In Use tab. When clicking this button, all files have their file source set as "Root".
Set All Sources to Project: This option is only available in the Files In Use tab. When clicking this button, all files have their file source set as "Project".
Each file has a status icon in the status column, and hovering the pointer over the status will display any relevant messages as described in the table below.
| Status | Overall Usage |
 |
It indicates that no issues were found with the file. |
 |
It indicates that the file exists in the project directory and root folders but contains the same data. |
 |
It indicates that the file exists in both locations but has different contents (Files do not match) or is missing from the selected source. |
Next: