Batchoptions and Analysis Configurations in the Registry
Analysis configurations are used to specify machines and options for local, remote, and distributed analysis, including capabilities that are enabled by HPC licenses.
How Analysis Configurations are Stored in the Registry
A configuration contains information beyond the machine or machines to use for a solution. Examples are the number of processors to allocate to the analysis for each machine in the list, memory limits, directory locations for personal libraries and temporary files, and many other preferences.
- Options are arranged as keys and values (in a
structure similar to the Windows Registry). However, these
options are not a part of the Windows Registry, but are separately
stored and maintained by the Ansys Electronics Desktop software. For more
information concerning the configuration files comprising the options
registry, see the following topics:
Setting Options Via Configuration Files
Setting the Temporary Directory - For access to options and functionality beyond what
is directly accessible via the user interface or batch options, refer
to the documentation of the UpdateRegistry tool. This tool is
discussed in the following help topic and in the topics that follow it
in the same branch of the product help:
Setting or Removing Option Values in Configuration Files: UpdateRegistry Command
General settings are associated with the Desktop application or 3D Editor. "HPCLicenseType" and "tempdirectory" values are at the root level of the registry. Other options are specific to a particular product or design type. For example, certain mesh, boundary, and memory limit settings as well as many other preferences are product-specific and are therefore associated only with the applicable design types. Such options appear with a consistent value name, but in a different registry path for each applicable design type.
Copying a Configuration from One Design Type or Product to Another
To copy a configuration from one design type (or product) to another:
- Click Tools > Options > HPC and Analysis Options. The HPC and Analysis Options window appears.
- On the Configurations tab of the HPC and Analysis Options window, use the Export… button to export the configuration to a file.
- Switch to the destination design type (or product) and use
the Import… button to import the configuration data.
Any data that is not applicable to the destination design type is ignored; any settings present in the destination design type that were not present in the source configuration will be assigned default values. The user may then edit the copy as desired.
Using HPC and Analysis Options for Configurations
Due to the complexity of the registry values for the configurations, directly editing these values using the UpdateRegistry tool is not recommended. Instead, use the HPC and Analysis Options window to edit or create a configuration. (See Setting HPC and Analysis Options.) Configurations created or edited using the interface are stored in the user_machine level of the registry. You can create a configuration for one of the other registry levels the following steps:
- Create the configuration using the Analysis Configurations interface, then export the configuration to a file.
- Delete the configuration using the interface so that it will not be present in the user_machine level. Then exit the software.
- Use the
UpdateRegistrycommand to import the data into the desired registry level using the-FromFileoption to specify the file exported via the software, and using the-RegistryLeveloption to specify the registry level where the configuration is to be stored. For example, an administrator may use this approach to create a configuration at theinstalllevel that may be used by any user on any machine.
Batch Options
There is a large number of both general and product-specific
options supported by the software. These options have evolved over time.
Therefore, older batchoptions
files may no longer be valid, and the options listed in the user
interface of the current software may differ from earlier versions you
have used. Additionally, there are options beyond those listed within
the user interface, which provides a subset of the available
options. You can generate a more complete list of options by running
the UpdateRegistry command with the -GetKeys switch and piping the output
to a text file, as detailed in the following Windows procedure:
- In a command window, navigate to the following folder:
<installation_directory>\v<version>\Win64 - Type and enter the following command:
UpdateRegistry -GetKeys -ProductName ElectronicsDesktop20xx.y > <text_file_path>\Batchoptions.txtSubstitute the last two digits of the installed product version year and the minor release number for xx.y (such as 24.1). Also, substitute the desired text_file_path (such as %UserProfile%\Desktop).
The resulting Batchoptions.txt file will contain a nearly complete list of available options.
This procedure also works from the <installation_directory>/v<version>/Linux64 folder on the Linux platform.
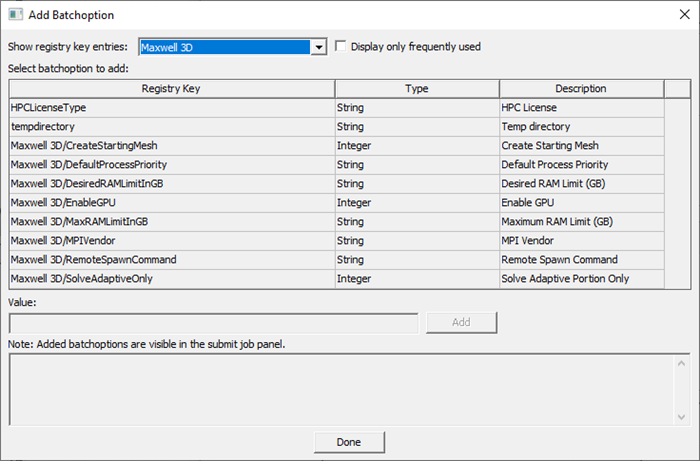
When you submit jobs to a remote computer or cluster, you can specify batch options using the job submission interface. When using the software, you select the batch options from a list and therefore avoid typographical errors. For the most commonly used batch options, there is detailed information about the allowed values. Click Submit on the Simulation ribbon tab to access the Submit Job To window. Then, click Add to access the Add Batchoption dialog box pictured below:
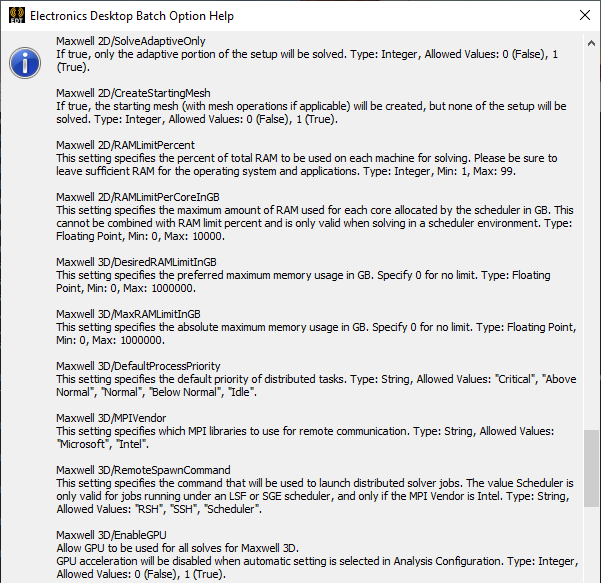
To assist users who need to specify batch options and are unable
to use the job submission interface, a new help option has been added. If the Electronics Desktop application is launched with the ‑batchoptionhelp
command line argument, a message box is displayed that lists and describes
the most common design type-specific batch options: