
Modifying SAR Settings
HFSS uses default specific absorption rate (SAR) settings when creating a local SAR or average SAR field overlay plot. It does use mass density for each material if defined for each material. Otherwise (that is, if the mass density for that library material is 0), the density in the Specific Absorption Rate Setting dialog will be used.
To change the default settings:
- Click HFSS>Fields>SAR Setting.
The Specific Absorption
Rate Setting dialog box appears.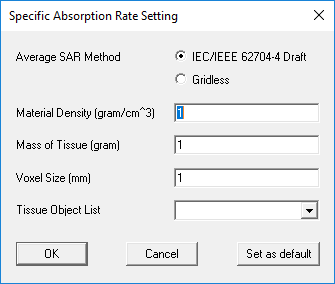
- To select the Average SAR Method, select the radio buttons for IEC/IEEE 62704-4 Draft or Gridless, which is the legacy Average SAR algorithm. Selecting Gridless disables the Voxel Size and Tissue Object list fields.
- In the Material Density text box, enter the mass density of the dielectric material in g/cm3. This provides a default mass density if not specified in the material definition.
- In the Mass of Tissue text box, enter the mass of the material in grams that surrounds each mesh point. The standard values are 1 and 10, corresponding to US or European standards; however, for research purposes you can enter values outside this range.
- In the Voxel Size field, specify a size. The units are millimeters.
The voxelization process takes all elements as rectilinear. So it is better to solve projects with curvilinear off. See Specifying Initial Mesh Settings.
Since the number of voxels depends on the size of the model and the size of the voxel you can expect that computational complexity increases in O(n3) or more as the model size increases and the voxel size decreases. Below are a few suggestion:
- For large models you can set up an average SAR plot before you solve so that the data from the first phase could be generated at solve time. With the tissue setting you can also perform SAR calculation over partial model.
- Set the solver order to 1 for best performance.
- The algorithm takes full advantage of multi-cores. Set the number of processors to use in the desktop performance tab in General Options. If your machine is hyper threaded, you should only use half the number of cores.
- If the Tissue Object List is empty, all conductors are treated as tissues. It is recommended that you create an object list explicitly to be used as tissue objects. This is to ensure that you have considered which objects should be included in the SAR calculation. You can create object lists for the menu by selecting objects and clicking, Modeler>List>Create>Object List. (See Creating an Object List.) After saving the Project, you can then select from available object lists. When you select a list, all objects in the list are treated as tissues.
- Click OK.