
Viewing and Modifying Material Attributes
- From the Select Definition window, select a material to view or
modify, and click View/Edit Materials.
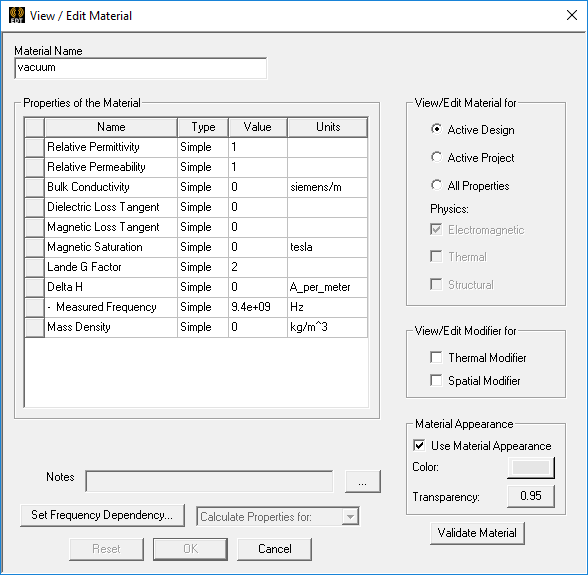
The View/Edit Material window appears. The material name and its property values are listed.
 Note:
Note:By default, not all of the available properties are displayed in the materials table. Only the properties commonly used by the product are displayed.
To view the complete table of properties, see Filtering Materials.
- Under View/Edit Material for, select:
- Active Design to display properties used in the active design.
- Active Project to display properties used in the active project.
- All Properties to display all properties available. This enlarges the table of properties to show all properties possible. You can use the scroll bars or size the dialog to see all properties. When All Properties is selected, the following Physics classification options are enabled to show or hide properties based on simulation type:
- Electromagnetic
- Thermal
- Structural
Note:If a material is edited in a design type for which the Physics type has not been set (e.g., an
- You can modify the material as follows:
- Provide a new name for the material in the Material Name text box.
- Under Type, specify whether a material property is Simple
For Simple, you provide a value or variable.
For Anisotropic, you provide tensor values.
For Vector, you provide a Vector Mag.
For Non-Linear, you provide a Data Set.
- Provide new material property values in the Value boxes.
- Change the units for a material property.
- Enable the Use Material Appearance check box to specify a color and transparency.
Note:Materials stored in the global material library cannot be modified.
- If you want to add descriptive notes for the new material, click the ellipsis button [...] to the right of the Notes field. This opens a dialog box in which you can enter text. Pressing Enter or clicking OK saves the note. To enter multiple lines of notes, use Ctrl+Enter at the start of each new line.
- Click OK on the View/Edit Materials dialog to add the new material to the material library.
- Click OK to save the changes and return to the Select Definition window.
If you modify a material that is assigned in the active project after generating a solution, the solution will be invalid.