
Exporting Array to CSV File
After you have defined an array, the Export Array to CSV File command is enabled for Modal and Driven Terminal problems for the HFSS with Hybrid and Arrays solution types. This option is especially useful for defining large-scale arrays when doing so through the UI would require a lot of manual work.
There are three ways to access the command:
- Select HFSS > Model > Export Array to CSV File.
- From the Project Manager, right-click Model and select Export Array to CSV.
- In the modeling window, right-click the unit cell and select Export Array to CSV.
Performing any of these three actions opens a browser you can use to navigate and select a location for CSV file:

Example CSV File
The exported file looks something like the one below. The imported file will be identical.
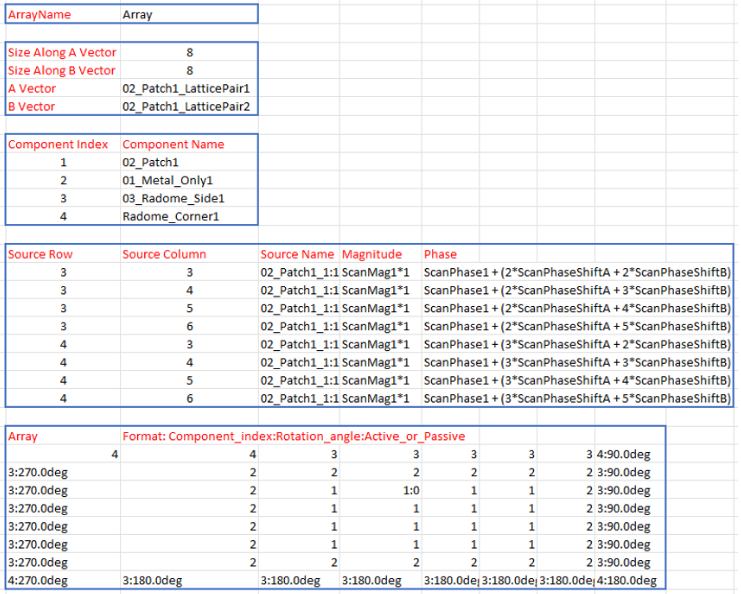
The CSV file contains four blocks:
- The first block provides the array name.
- The second block provides the A and B vector dimensions of the array, as well as vector IDs.
- The third block is for updating/editing source information:
- Each line represents an update
- The Source Row and Source Column fields identify cells that need to be updated.
- The Source Name column shows the name of the source, formatted <SourceName>:<index>
- The Magnitude and Phase columns show the weight of the sources. The default values are 0. If both values are 0, there is no need to list them here. If the magnitude and phase are variable, as in the example below, the units should be input as well:
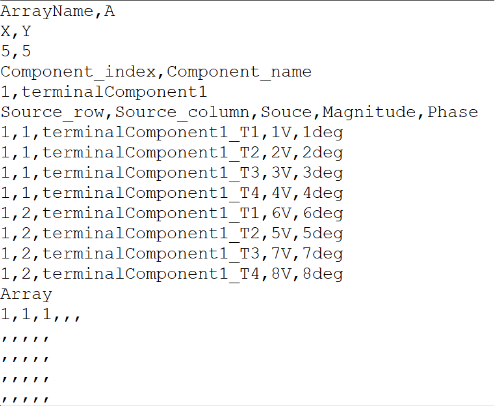
- The fourth block is the array matrix, with dimensions x and y. Each element in the matrix represents the information for one cell. The format for each cell is A:B:C where each value is optional:
- A is the component index. B and C cannot be provided if there is no A.
- B is the rotation angle (default: 0deg). B must always have the unit deg (for example, 1:90deg). Without the unit, A:B will be recognized as A:C.
- C indicates whether a cell is passive. If a cell is passive, C is 0. Otherwise, it is active by default.
You can check scaling and magnitide assignments by using the Edit Source command.