


Ansys Discovery Virtual Desktop
The following is a step-by-step example of setting up and connecting to a Windows virtual desktop with Ansys Discovery installed. Use the example as a guide when configuring your own resources.
To be able to add resources to a project space, you must be a tenant administrator or have Admin permission in the project space. To be able to use resources in a project space, you must have a basic set of permissions in the project space (View, Start, Connect, and Stop). For more information see Setting User Permissions in a Project Space in the Administration Guide.
Create a virtual desktop. A project space administrator creates a Windows virtual desktop with Ansys Discovery installed. See Creating a Virtual Desktop in the Administration Guide.
Use the following guidelines:
Operating system: Windows Server 2022
Application: Ansys Discovery
Note: Ansys recommends that you create the virtual desktop without any applications, and then add the application after the virtual desktop has been created. See Adding Applications to a Virtual Desktop in the User's Guide. Sometimes, Windows updates are triggered on newly created virtual machines, causing application installation to fail.Hardware:
Ansys Discovery is the newest generation geometry preparation (Model) and upfront simulation (Explore + Refine) tool from Ansys. The instance type that you select must have a dedicated graphics card.
Ansys recommends g6, g5, and g4dn instance types with one GPU (Discovery supports only one GPU).
In the GPU driver options, select GPU display/compute (GRID drivers).
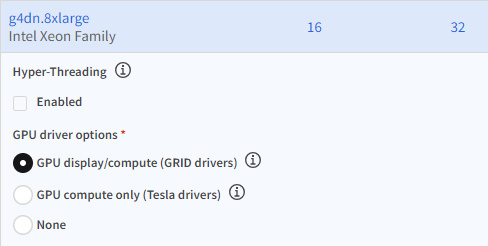 Note: Discovery will not start unless a GPU driver is installed. For information about GPU driver options, see NVIDIA GPU Driver Support.
Ansys SpaceClaim is the predecessor to Ansys Discovery, but does not require a dedicated hardware graphics card. For end-to-end workflows with smaller geometries, c6i and m5 instances can be used in most cases. For larger geometries, g4dn and g5 instances are recommended.
All recommendations are summarized in Recommended Hardware for VDI Workflows.
Launch a virtual desktop session. Users with access to the project space connect to the virtual desktop to start a virtual desktop session. See Launching a Virtual Desktop Session in the User's Guide.
Run the remote application. Once the desktop is open you can launch and run Discovery on the virtual desktop just as you would on your local desktop. For information about Discovery, refer to the Discovery Documentation.
If you need to transfer files to the virtual desktop, see General Guidelines for Transferring Files in the User's Guide.