


Creating an Autoscaling Cluster
Prerequisites: You must be a tenant administrator or have Admin permission in the project space.
Autoscaling cluster workflows are supported for select Ansys applications. These include Ansys Electronics Desktop, Fluids, LS-DYNA, Lumerical, Mechanical, Semiconductor, and Speos applications. Sample configurations are available in Recommended Configurations by Application in the Recommended Usage Guide.
Only one autoscaling cluster can be present in a project space at one time. However, the cluster can have multiple job submission queues, and each queue can have a different application associated with it.
To create an autoscaling cluster, follow these steps:
In the project space, select . A Create an Autoscaling Cluster page is displayed.
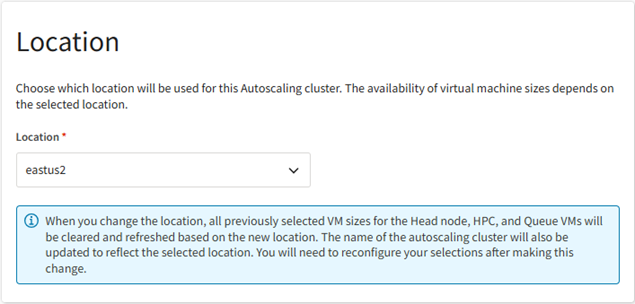
In the Location section, select the location where the autoscaling cluster will be created. The selection you make here determines which virtual machine sizes will be available for selection when defining cluster node settings.
In the Licensing section, review or specify the licensing settings for Ansys applications.

By default, the global licensing settings that are configured for your tenant will be used. To view them, expand the Global licensing settings panel.
If global licensing settings have not been configured, or you want to override the global licensing settings for this particular resource, enable Use custom licensing settings for this cluster and then configure the settings of the licensing type(s) you want to use.
Note:If you proceed with using the global licensing settings, and the global settings are later changed, the changes will be applied to the cluster when it is restarted.
If you enable Use custom licensing settings for this cluster, the cluster can only ever use custom settings (the global settings will never apply, even if you do not specify any custom settings). If you do not specify at least one licensing type, Ansys applications installed on the virtual desktop will not function.
To use Shared Web Licensing, click Configure next to Shared Web Licensing and then upload a shared web token file.
To use FlexNet licensing, click Configure next to FlexNet licensing.
In the Configure custom FlexNet licensing dialog:
Specify the IP address and optionally the port of a FlexNet server that you want to use. If a port is not specified, 1055 will be used by default.
To add another server to the list, click Add FlexNet license server and specify the server's settings.
When multiple servers are listed, use the arrows in the Priority column to arrange the servers in the order they should be used.
To provide licensing for the LS-DYNA application, specify license server settings in the LSTC license server (optional) area. This is a server where LSTC License Manager is hosted.
Note: Only one LSTC license server can be specified.
- To use Ansys Elastic Licensing, click Configure next to Ansys Elastic Licensing and then specify the Elastic License server ID and Elastic License server PIN.
If you have configured more than one licensing type, use the arrows in the License Priority area to arrange the list in the order in which you would like licensing types to be used. If the first type is not available when licenses are requested, the next type in the list will be used.
Note: Ansys Elastic licensing cannot be moved up in priority. It is always used last.
Note:Once the autoscaling cluster has been created, you cannot change its license settings. To use different license settings, you must create a new cluster.
If you choose to use global license settings, and the global license settings are changed after the cluster is created, the changes will be applied to the cluster when it is restarted.
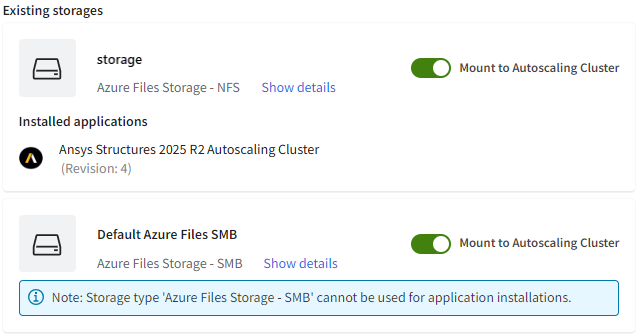
In the Storage section, specify any existing Azure storage(s) to be mounted to the cluster for application installation and/or simulation files (if applicable). Simulation files include input and output files and may also include scratch files generated during a solution if local scratch is not used.
Existing storages may include an Azure Files SMB storage if one was created during project space creation as well as any Azure Files or Azure NetApp Files storages created for previous autoscaling clusters in the same project space. Storages created for previous clusters may already have cluster application packages installed on them, eliminating the need to install those applications on the new cluster.
To mount a previously created storage to the cluster, enable the Mount to autoscaling cluster toggle next to the storage in the Existing storages panel.
To create a new storage, click Create storage. A form is displayed:
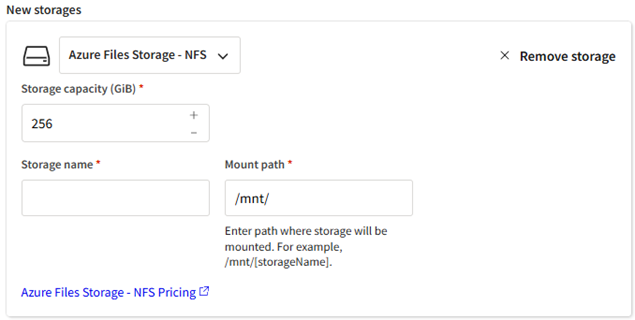
Define the following.
From the drop-down, select the desired storage type:
- Azure Files Storage - NFS. Recommended for the installation of Autoscaling Cluster packages.
- Azure Netapp Files Storage - NFS. Recommended for high-performance, latency-sensitive workloads that require advanced data management capabilities.
- Azure Files Storage - SMB. Recommended for file sharing when files need to be accessed on a Windows virtual desktop. Note that this storage type cannot be used for application installations.
For an overview of storage types see Types of Shared Storage. For more detailed information see the comparison in the Microsoft Azure documentation.
Select a Storage capacity that will adequately support the application(s) that you want to install on this storage as well as simulation files (input and output files, and potentially any scratch files generated during a solution if local scratch is not used).
Note: If this is the first time that Azure NetApp Files storage is being created in the region associated with this project space, an Azure NetApp capacity pool with a default of 1 TiB of storage will be created. This capacity pool will be available to all project spaces in this region. You will be billed based on the size of the capacity pool and can resize the capacity pool in Azure portal if desired. Any storages that you create will be volumes within the capacity pool. Volume size is determined by the size chosen in this step. Note that volume creation will fail if the selected size exceeds the storage available in the capacity pool.Specify a Storage name.
Confirm or specify the Mount path of the storage on the cluster. By default, the mount path is automatically populated with the storage name that you specify in the Storage name field.
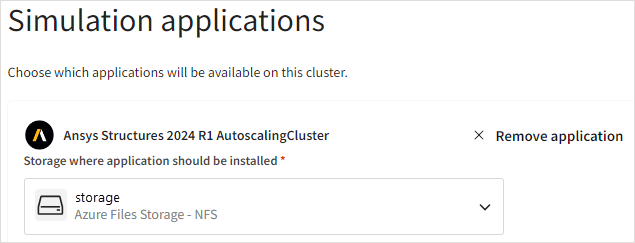
To install one or more applications on the cluster, go to the Simulation applications section and follow the steps below.
Note: If an existing storage containing the desired application(s) is selected to be mounted to the cluster, you can skip this step. The installed application(s) will be detected by the system upon cluster creation. This will speed up cluster creation time as there is no need for application installation.- Click Add an application.
In the Add an application dialog, select the autoscaling cluster application package to install.
Note: You can select more than one application to install. However, you should be cautious about the number of applications you select as there is a 4-hour time limit on cluster creation. If applications do not get installed within this time frame, cluster creation will fail.Specify the Storage where application should be installed. This dropdown lists the existing and new storages selected for mounting in the Storage section of the wizard.
Optionally, you can create a new storage for application installation by selecting Create new storage in the dropdown.
Note: Application installation is not supported on SMB storage.In the Application configuration area, specify application configuration settings if applicable.
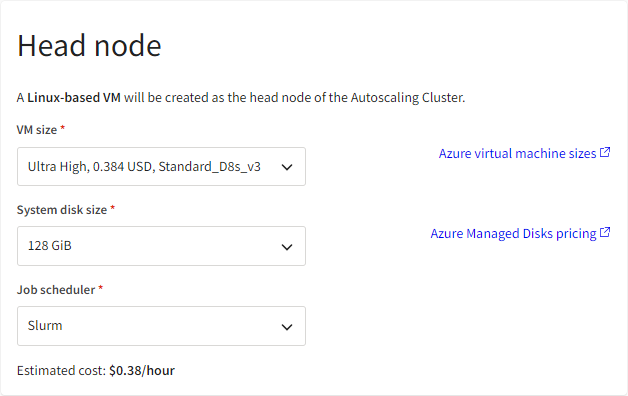
In the Head node section, review the default head node configuration. To change the VM size or system disk size, click Edit head node configuration and make the desired selections for the head node.
For quick application installation, Ansys recommends the 'Ultra High' size.
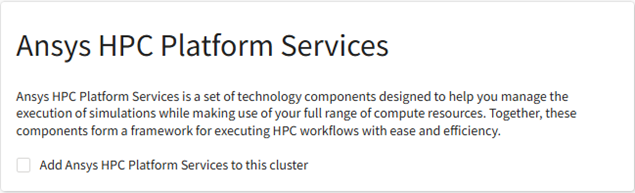
In the Ansys HPC Platform Services section, specify whether you want to add Ansys HPC Platform Services to this cluster.
Ansys HPC Platform Services is recommended for the following application workflows:
Ansys Electronics Desktop
Ansys Mechanical
Ansys Workbench LS-DYNA
If you are adding Ansys HPC Platform Services to the cluster, specify the following:
Specify where you would like Ansys HPC Platform Services to be installed. Select one of the following:
Create a new VM with Ansys HPC Platform Services. A virtual machine with Ansys HPC Platform Services will be created automatically. This is the recommended option as it allows Ansys HPC Platform Services to run on a machine where it has full use of that machine's resources.
If you select this option, specify the desired instance size and system disk size for the virtual machine to be created.
Install Ansys HPC Platform Services on the same VM as the head node. This option is not recommended because Ansys HPC Platform Services could consume all available system resources on the machine, causing the Slurm controller to hang, or vice versa.
HPS application. The revision of Ansys HPC Platform Services (HPS) to be installed.
Storage where cluster applications are installed. Select the storage that you selected for application installation in the Simulation applications section. Or, if you have chosen to mount an existing storage that already contains the applications to be used with Ansys HPC Platform Services, select that storage.
Provide docker credentials? Specify whether you want to use Docker anonymously or provide Docker credentials (for environments that restrict Docker usage).
Ansys HPC Platform Core Services are delivered via containers. Docker is the engine used to run the containers. When Ansys HPC Platform Services (HPS) is selected for installation on a virtual machine, Docker container images are pulled from Docker Hub.
Note: Ansys recommends that you access Docker Hub using a Docker account instead of anonymously to avoid potential HPS connection issues. For details, see Do I Need a Docker Account to Install HPC Platform Services? in the Recommended Usage Guide.
In the Queues section, define at least one queue for the autoscaling cluster. You can define up to 10 queues.
To define a queue:
- Click Add queue.
Specify a Queue name with no spaces. The name must start with a letter and can only contain lowercase letters, numbers, and dashes.
From the Application dropdown, select the application to run when jobs are submitted to the queue.
Applications such as Ansys Electronics Desktop and Fluids have queue templates available which are tailored specifically for the application being run. To apply a pre-configured template to the queue, select a template from the Queue template dropdown. The queue settings populate automatically with the values defined in the template.
In the Node options specify the number of nodes as described below.
Static nodes. Virtual machines that are provisioned right away and remain constantly available throughout the life of the cluster. Static nodes are not a requirement for autoscaling clusters. A value of 0 is acceptable. A non-zero value should only be specified when you need persistent, reliable access to a certain number of virtual machines.
Dynamic nodes (maximum). Virtual machines that are provisioned as needed to meet workload demands. Dynamic nodes are what support autoscaling functionality. Specify the maximum number of nodes that can be provisioned.
Note: When you select a virtual machine size, a Maximum number of nodes value is displayed in the Node options area. This value lets you know the maximum number of nodes (static + dynamic) that can be specified based on the quota available for the selected virtual machine size.If the number of nodes specified exceeds the available node quota, an error message is displayed:

In the Advanced node options you can specify the following:
Enable InfiniBand. When running applications in a highly iterative fashion (CFD, for example), data must be distributed globally over the cluster for frequent recalculation. InfiniBand is a network interface that enhances performance of inter-node communication for lower latency and higher throughput.
Create all nodes in the same Placement Group. A placement group ensures that compute resources are physically located close to each other. Deploying virtual machines within a placement group ensures the lowest possible latency between cluster nodes.
System disk size. The capacity of the operating system disk.
Note:- When Create all nodes in the same Placement Group is enabled, a queue can have a maximum of 100 nodes.
- If InfiniBand is enabled, a placement group will be used even if you disable the Create all nodes in the same Placement Group setting in the queue definition. The 100-node maximum still applies in this case.
Click Select virtual machine size and select a VM size for the nodes in this queue.
For a quick reference on the hardware to choose for each application, see Recommended Virtual Machine Sizes for Cluster Workflows in the Recommended Usage Guide.
In the Additional cluster options section, select a time for dynamic nodes to be terminated after nodes become idle. The default is 10 minutes.
As submitted jobs finish, the nodes that were dynamically provisioned to do the work become idle and remain available for a specified period of time before being shut down. This setting determines how long dynamic nodes can remain available before being shut down.
In the Autoscaling Cluster name field, specify a name for the autoscaling cluster as you would like it to appear in the resource list in the project space.
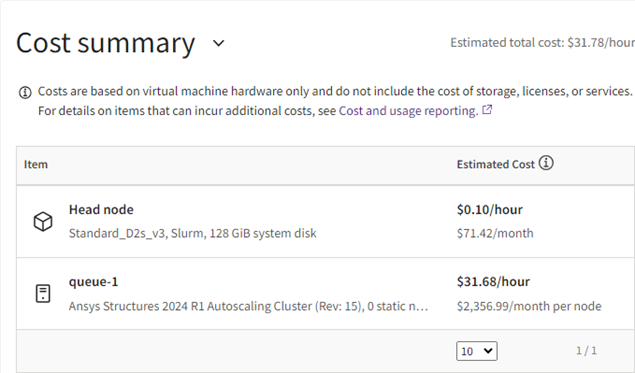
In the Cost summary section, review the estimated cost of running the cluster. If desired you can go back and change the head node and queue configurations.
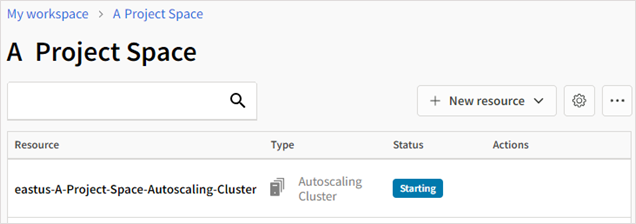
When all settings have been defined, click Create autoscaling cluster. The cluster is started.
 Note:
Note:If any fields are incomplete, an error message is displayed. Go back through the form and fill out any missing information. At least one simulation application must be installed. Also, make sure that you have fully defined the head node and created at least one queue. Each queue must have an application specified.
Cluster creation can take more than 30 minutes depending on the number of applications being installed.
Restarting a stopped cluster can also take more than 30 minutes.
When the cluster is in the Running state, users can use a virtual desktop in the same project space to copy input files to the shared storage and submit jobs to it from a virtual desktop in the same project space. See Submitting a Job to an Autoscaling Cluster in the User's Guide.
The Slurm client application is automatically installed on Linux virtual desktops. When you create an autoscaling cluster in a project space that contains a Linux virtual desktop, a connection between the autoscaling cluster and virtual desktop is automatically established, enabling you to submit jobs to the cluster from the virtual desktop. If for some reason the connection becomes broken, you can reestablish it by following the instructions in Restoring a Connection to a Slurm Autoscaling Cluster in the Troubleshooting Guide.
Once an autoscaling cluster has been created, you should only interact with it via Ansys Access on Microsoft Azure, not Azure portal.