


Ansys medini analyze provides a variety of native tool connectors for requirements exchange. The requirements inside a medini project can be imported, exported, and updated via these connectors in order to provide a seamless exchange and traceability with your favorite Requirement Management Solution (RMS). Adapters for the following requirements tool are available[13]:
DOORS from IBM, see DOORS Integration,
DOORS Next Generation (DOORS NG) from IBM, see DOORS NG Integration,
Windchill RV&S from PTC, see PTC Windchill RV&S Integration,
Jama from Jama Software, see Jama Integration,
Polarion from Siemens PLM Software, see Polarion Integration, and
Codebeamer from Intland Software, see Codebeamer Integration.
These integrations follow the same style for data exchange which is described in Common Integration Features.
Beside the direct RM tool adapters medini supports ReqIF file exchange (see ReqIF based Requirements Exchange) as well as import/export to and from Microsoft Excel (see Import and Export with Excel).
All integrations with external Requirement Management (RM) tools, such as DOORS NG or Jama, basically follow the same philosophy and support import, export, and requirement updates from and to the respective RM server. All work in the same way based on a generic mapping definition for types, attributes, and relationships.
Note that when importing or updating a requirements model, relationships to requirements that reside in another model in medini are imported or updated, too. More precisely: if there is a requirement A in the RM system and it has a relationship R to requirement B in the same RM system and requirement A is imported or updated as A' in medini and B was imported already before as B', then the relationship R' is created between A' and B' in medini based on the used mapping (and only if there is a mapping for that relation type). If B' does not exist or cannot be found, no relationship is created. Note that this is not treated as a problem so no issue is reported to the user.
Ansys medini analyze searches for the requirement B' in all available other requirement models in the same project. If B' occurs multiple times, the first occurrence is used, or more precisely: it is assumed that B' exists only one time in the medini analyze project and can be used without searching for other instances of B'. Note that not all relationships support cross-model import and export, but Contribution, Dependency, and Trace do. A Decomposition relation cannot be created between requirements of different models since a decomposition relation can only be created with an element in the containment of a requirement.
On export, cross model-relationships are created in the remote RM system if source and target of the relationship exist in the system, or are part of a recent export operation. More precisely, if requirement A is exported to a RM system having a relationship R to requirement B in another medini model, the relationship R is also exported if B has been exported to the RM system or was imported from the RM system before. Otherwise, no relationship is exported and no issue is reported.
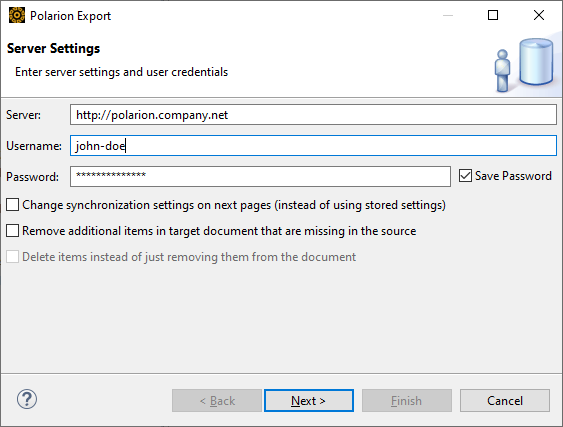
A very sensitive topic with RM systems is the deletion of work items or requirements. Each RM system has different means and rules to grant or deny the removal or full deletion of requirements. To cope with the different tool approaches but also with various company rules, the export wizard offers different synchronization options during export, depending on the connected tool capabilities. Some tools, such as PTC and Polarion, have a "document" concept that aggregates work items. These work items can be added to but also removed from a document. In these cases, a remove from document only option is provided. If the RM tool offers a real work item deletion--as for example in Jama and Polarion--an additional delet work items option is offered, as shown in the screenshot below. Both options are disabled by default, which means no removal or deletion is done by default on an export operation. For more details, see the individual tool connector sections.
The DOORS integration connects directly to any (installed, configured, and running) IBM Rational DOORS 9.x database and imports requirements from there. A navigation from imported requirements to the DOORS client for editing requirement details is supported. In addition, you can push changes you make to the requirements in medini analyze to the DOORS database.
To use this integration, you must have an appropriate license (see License Configuration for details on licensing).
Note: Before you execute any DOORS action, make sure that the DOORS client is running on the local machine, and that you have properly configured the connection to the DOORS database in the DOORS client.
The data format when importing from DOORS was changed in Ansys medini analyze version 2025 R2. To continue using DOORS modules from previous versions of medini analyze, you must first migrate your medini analyze project, then migrate the DOORS requirements modules. Each DOORS module can be migrated separately. After migration, you must update the corresponding mapping files.
Note: During migration, any profile properties you defined for DoorsRequirement and DoorsRequirementModel are lost. You can still see them in the Profiling editor, but they are not used in the migrated module. To have these profile properties in your migrated module, you must recreate them there.
To migrate a legacy DOORS requirement model to medini, complete these steps:
In medini analyze, select one or more imported DOORS modules, then right-click and select DOORS > Migrate DOORS Model.
Note that this option is only available if you have not yet migrated the module.
Save your project.
The migration option is no longer available.
In addition, you must update your DOORS mapping file(s). You can do this by deleting existing mapping files and then executing a DOORS > Pull Updates... to import the default DOORS mapping file. Note that this will overwrite any customizations you have made to the mapping file. Alternatively, you can update your mapping file manually.
To manually update a mapping file, complete these steps:
To enable scripting in medini analyze, navigate to Windows > Preferences > Scripting and select Enable script development support. Click the Apply and Close button.
In the project in the Model Browser, find the config > mappings > doors folder and expand it.
Open the .mapping file in an editor, and in the
typeMappingssections, make these changes:Change
mediniType="DoorsRequirementsModel"tomediniType="SafetyRequirementsModel".Change
mediniType="DoorsRequirement"tomediniType="SafetyRequirement"
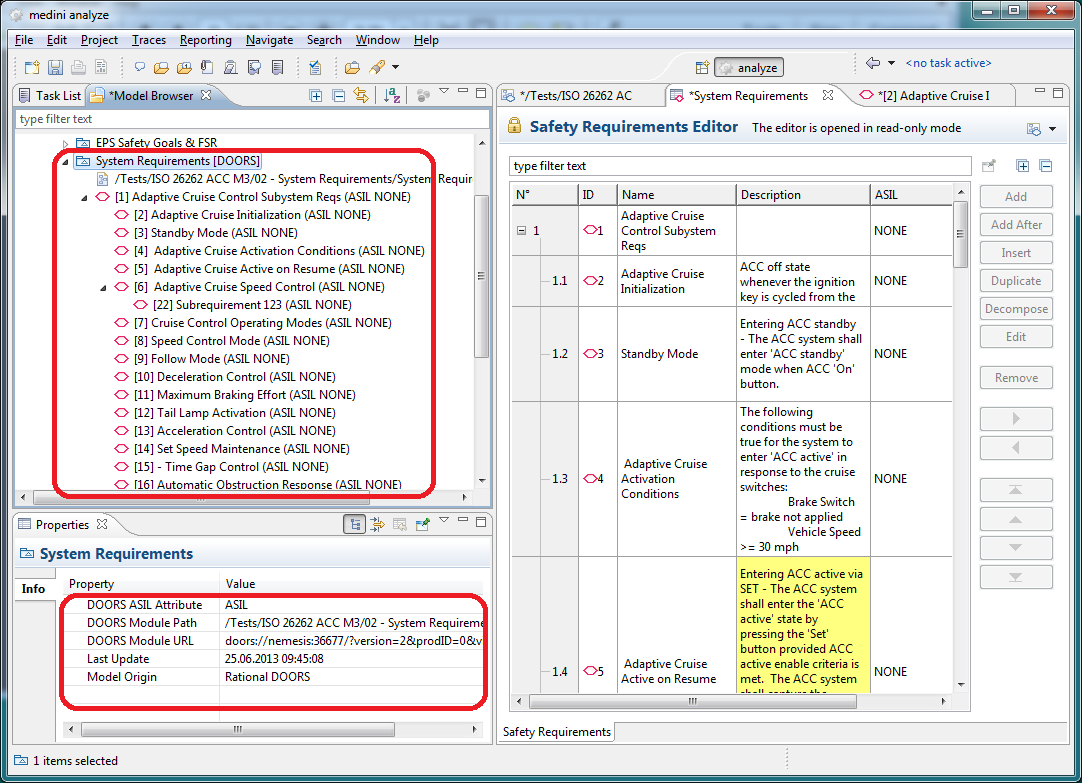
When you import a DOORS module, a new requirements model is created in medini analyze, in the package where the import was triggered. The package has the same name and contains the same requirement hierarchy as the imported DOORS module. After import, some metadata are stored in medini analyze. See Metadata of Imported Models for details.
You can modify the imported requirements in medini analyze. For example, change the Name, ID, or Status, or any other requirement property. You can also define relations to other elements in the medini analyze project, for example, establish an allocation of the imported requirements to architectural elements. You can modify a relation type inside the mapping file. For more information, see DOORS Mapping Files.
To import a DOORS module, complete these steps.
In the Safety Goals and Requirements package or in one of its subpackages, right-click and select Import >Requirements from DOORS....
The wizard that appears lists all available modules.
Select a DOORS module for import and click Next. Note that you must import each module separately.
If a module has baselines, they appear as child nodes or as part of baseline groups. You can import requirements directly from baselines by selecting the appropriate baseline node.
Select a mapping file to specify how attributes from the DOORS requirements should be mapped to the requirements properties in medini analyze. Click Next.
If no specific mapping information is available, medini analyze applies a default mapping file with the minimum attribute mappings. For more information about mapping files in DOORS, see DOORS Mapping Files.
The Import Results dialog lists the results of the import. Click Next.
Click Finish to complete the import.
You can create custom mapping files and either add them in the file location <workspace directory>\<project folder>\config\doors, or drag them to the model browser and drop them in the config > mappings > doors folder in the project. Each mapping file must be named with the .mapping extension, for example, doors.mapping.
The mapping file is an XML file, as shown in this example of the default DOORS mapping file:
<?xml version="1.0" encoding="UTF-8"?>
<mapping:MappingDefinition
    xmi:version="2.0"
    xmlns:xmi="http://www.omg.org/XMI"
    xmlns:xsi="http://www.w3.org/2001/XMLSchema-instance"
    xmlns:mapping="de.ikv.medini.metamodel.mapping"
    xsi:schemaLocation="de.ikv.medini.metamodel.mapping mapping.xcore#/EPackage"
    name="Default Doors Mapping File"
    description="Mapping file for import from Doors with default rules">
  <typeMappings
      mediniType="SafetyRequirementsModel"
      mappedType="FormalModule"/>
    <attributeMappings
      mediniAttribute="name"
      mappedAttribute="modulePath"/>
  </typeMappings>
  <typeMappings
      mediniType="SafetyRequirement"
      mappedType="Object">
    <attributeMappings
        mediniAttribute="name"
        mappedAttribute="objectHeading"/>
    <attributeMappings
        mediniAttribute="description"
        mappedAttribute="objectText"/>
    <!-- Sample asil mapping configuration
    <attributeMappings
        mediniAttribute="asil"
        mappedAttribute="ASIL Class">
        <valueMappings
        	mediniValue="A"
        	mappedValue="[A]"/>
        <valueMappings
        	mediniValue="B"
        	mappedValue="[B]"/>
    </attributeMappings>
     -->
  </typeMappings>
</mapping:MappingDefinition>
Note that, by default, the first mediniAttribute name is mapped to the mappedAttribute modulePath. This setting ensures that the full path of the DOORS module is displayed in medini analyze. To see only the name of the module without its path, change the mappedAttribute to name, then complete a Pull Updates or an Import.
For more information about mapping file elements, see Mapping Definition.
You can make changes to the DOORS requirements, and then update the corresponding DOORS database or corresponding requirements model in medini analyze with your changes. In addition, you can open a requirement from medini analyze directly in DOORS and make changes there.
Pull Updates
When you make changes to the DOORS requirements in DOORS, you can pull these updates from the DOORS database to your requirements model in medini analyze. For the update, you can use the same mapping file that was used for the original import, or select another one. The update preserves any relations that have been created for imported requirements to other elements of medini analyze.
Note: To include relations from DOORS, you must have a relation mapping in your .mapping
file in medini analyze. The mediniRelation can be set to
Contribution, Correlation, or
Independency.
<relationMappings
    mediniRelation="Contribution"
    mappedRelation="Link"/>
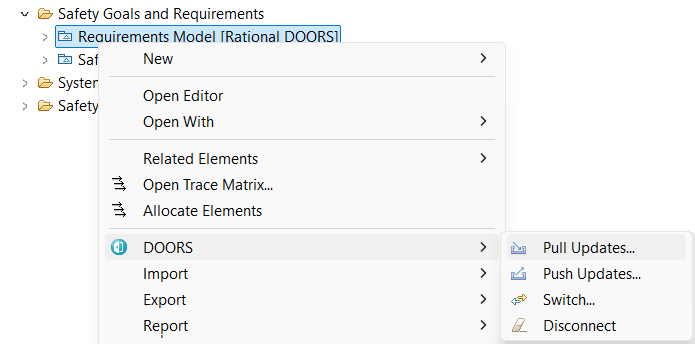
To run the update, in the model browser in the requirements model node, right-click and select DOORS > Pull Updates.... Note that you can pull to one or more models by selecting these models in the model browser.
The DOORS menu is only available for requirement models that contain imported DOORS modules.
Push Updates
Likewise, when you make changes to your DOORS requirements model in medini analyze, you can push these changes to the DOORS database.
To push updates to the DOORS database, complete these steps.
In the model browser, in the requirements model node, right-click and select DOORS > Push Updates....
In the Export to DOORS dialog, make your selections:
Change synchronization settings...
Select this checkbox to select a different mapping file than the default one for this model.
Delete additional items...
If you have deleted items from your requirements locally and want to delete the corresponding items in the DOORS database, select this checkbox.
Make Changes Directly in DOORS
You can open requirements from medini analyze directly in DOORS and edit them there.
In medini analyze, right-click the requirement you want to open and select DOORS > Open.
DOORS opens the requirement in read-only mode. You can now switch to an editing mode and make changes.
Save your changes in DOORS.
To update the change in medini analyze, complete a Pull Updates as described above.
You can create a requirements model in medini analyze and then export it to DOORS.
To export requirements to DOORS, complete these steps.
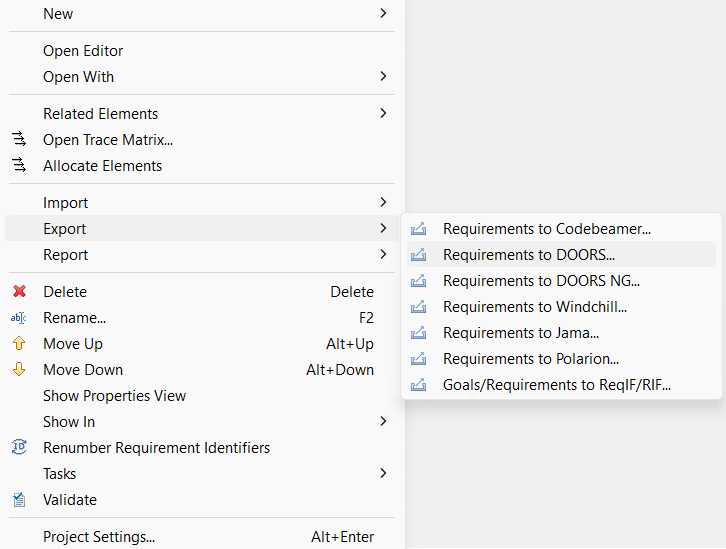
In medini analyze, right-click the requirements model you want to export and select Export > Requirements to DOORS....
After making sure that your DOORS client is connected and running, click Next.
From the list of modules available in DOORS, select the one you want to export the requirements to and click Next.
Select the mapping file to apply and click Next.
A dialog lists the results of the export.
Click Finish to complete the export.
An imported requirements model can be switched for synchronization with a different DOORS module or baseline. This feature is helpful if you move your module to a different server, rename it, or copy your medini project (including the DOORS module).
You can switch from the module to a baseline, or from a baseline to another baseline, or from a baseline back to the main module. The switch preserves any relations you have created from imported requirements to other elements of medini analyze.
The action is available in the DOORS context menu of the respective model. The action is only available for requirement models that contain imported DOORS modules. A DOORS client must be running at the local machine and must be connected to the DOORS database containing the targeted DOORS module or baseline.
During the switch, you can change the mapping file. Make sure that the mapping fits both the existing medini model and the new DOORS module.
The objects from the existing medini analyze model and the new DOORS module are by default matched by the DOORS Absolute Number. If you select a custom DOORS attribute storing the original Object Identifier, this will be used for matching instead.
To switch a DOORS module, complete these steps.
In medini analyze, right-click the requirements model you want to switch and select DOORS > Switch....
After making sure DOORS is running, click Next.
In the next pane, select the DOORS module to switch to. Click Next.
Select the mapping file you want to use and click Next.
The next pane of the wizard displays a summary of changes made by the switch. Review it thoroughly.
You can revert the transformation using the Back button.
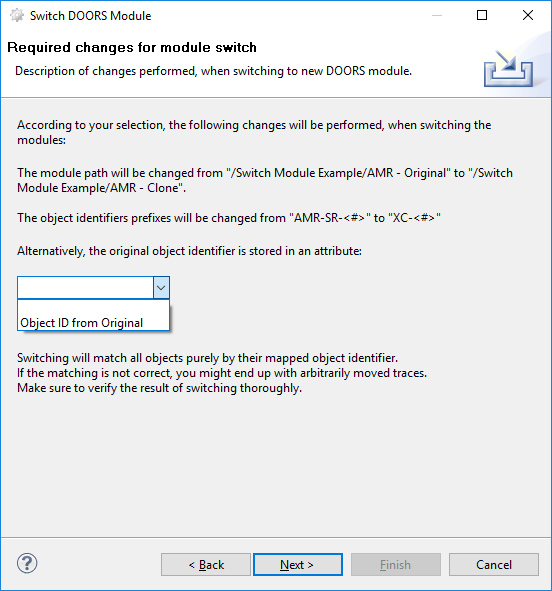
If you are satisfied with the changes, click Next.
The final pane of the wizard lists the changes that will be made after a re-sync. Click Finish to complete the switch.
During an export to DOORS, you can
leave any work item that is missing in medini analyze but available in DOORS untouched (Delete additional items... option not selected)
remove any such work item completely, also from DOORS (Delete additional items... option selected)
You can disconnect a requirements model from its DOORS model. Removing the connection deletes the DOORS metainformation from the requirements model creates a standard medini analyze requirements model.
To disconnect a requirements model from DOORS, select the model in medini analyze, then right-click and select Disconnect.
The DOORS decorator and menu item disappear. You can now export the model to DOORS and other requirements models, and import requirements from CSV/Excel.
The PTC Windchill RV&S integration supports importing, exporting, and updating requirements from and to PTC Windchill RV&S (formerly Integrity).
Due to the flexibility of Windchills's data model which can be different from installation to installation, you first need to define how the elements and relations in medini analyze are mapped to items and relations in Windchill. This mapping is defined in a .mapping file. During import and export of a safety requirements model the wizard will list all available mapping files for selection. If no mapping file exists, the tool creates an initial mapping file that you can modify later. These files are stored in the config/integrity folder of a project (for example, config/integrity/ptc_export.mapping) and must have a structure similar to this:
<?xml version="1.0" encoding="ASCII"?>
<mapping:MappingDefinition
    xmi:version="2.0"
    xmlns:xmi="http://www.omg.org/XMI"
    xmlns:xsi="http://www.w3.org/2001/XMLSchema-instance"
    xmlns:mapping="de.ikv.medini.metamodel.mapping"
    xsi:schemaLocation="de.ikv.medini.metamodel.mapping mapping.xcore#/EPackage"
    name="Example Windchill Mapping File"
    description="Mapping file for export to Windchill with some example rules">
  <typeMappings
      mediniType="SafetyRequirementsModel"
      mappedType="Requirement Document"/>
  <typeMappings
      mediniType="SafetyRequirement"
      mappedType="Requirement">
    <attributeMappings
        mediniAttribute="name"
        mappedAttribute="Text"/>
    <attributeMappings
        mediniAttribute="kind"
        mappedAttribute="Category">
      <valueMappings
          mediniValue="UNSPECIFIED"
          mappedValue="User Requirement"/>
      <valueMappings
          mediniValue="FUNCTIONAL"
          mappedValue="Functional Requirement"/>
      <valueMappings
          mediniValue="NON_FUNCTIONAL"
          mappedValue="Non-Functional Requirement"/>
      <valueMappings
          mediniValue="TECHNICAL"
          mappedValue="Technical Requirement"/>
      <valueMappings
          mediniValue="HARDWARE"
          mappedValue="Component Requirement"/>
      <valueMappings
          mediniValue="SOFTWARE"
          mappedValue="Component Requirement"/>
    </attributeMappings>
    <relationMappings
        mediniRelation="Contribution"
        mappedRelation="Decomposed From" />
  </typeMappings>
</mapping:MappingDefinition>
The mapping definition consists of three different kinds of mappings:
-
typeMappings A mapping is required for each metaclass you want to export from medini analyze. In the mapping, the attribute
mediniTyperefers to the metaclass in analyze, andmappedTyperefers to the corresponding type in Windchill.-
attributeMappings A mapping is also required for each attribute or reference of a metaclass you want to export. In the mapping, the attribute
mediniAttributerefers to the attribute name in analyze, andmappedAttributerefers to the corresponding field in Windchill. Note that you can also define the attributedirection="in"if you want to read fields from Windchill back into medini analyze. TheattributeMappingsshould be contained in the mapping of the type to which the attributes belong.-
valueMappings For each attribute mapping, you can optionally specify a mapping of discrete values where
mediniValuerefers to the value in medini analyze, andmappedValuerefers to the corresponding value in Windchill.-
relationMappings A mapping is required for each relation you want to export or import. In the mapping, the attribute
mediniRelationrefers to the relation name in medini analyze, andmappedRelationsrefers to the corresponding relation in Windchill. On the medini analyze side, there are currently four names supported,Contribution,Decomposition,IndependenceandTrace. The first three are relationships of the requirements and goal models, while the latter is the generic trace concept of medini analyze. Note that you can also define the attributedirection="opposite"if you want to reverse the direction compared to the Windchill definition. TherelationsMappingsshould be contained in the mapping of the type to which the relations belong.
For a description of medini analyze's metaclasses and attributes, see the medini analyze Metamodel Documentation. To explore the available types and fields in your Windchill installation, you can use the Windchill/Integrity Administration GUI client or the CLI tools im types and im fields. For more information, refer to the Windchill/Integrity documentation.
The import from PTC Windchill RV&S is available via the context menu of the Safety Goals and Requirements package in the model browser. Invoke Import > Requirements from PTC Windchill to start the import wizard. In the wizard, at first all connection settings and authentication data have to be given, including server address and user credentials. Note: you may tunnel the communication through the local PTC Windchill client (the default) or connect directly to the server in case you face connection or performance problems.
Optionally - and only in rare cases really required - you can specify a "Prefix" value in the "Connection Settings" section. A prefix value is only required if your PTC Windchill solution was installed with a prefix. If you are unsure, or face any issues with unknown default attributes, ask you system or PTC Windchill administrator about any used prefix. It typically looks like "XYZ_".
The next step is to select a mapping file which specifies a mapping of the attributes from PTC requirements to the properties of requirements in medini analyze according to the medini analyze metamodel. (There is a default mapping file in case that no specific mapping information is available).
Mapping files can be created and provided in the following location: <workspace directory>\<project folder>\config\integrity. It shall be named <my mapping file name>.mapping.
The mapping file elements are explained in Mapping Definition.
As a result of the import, a new model is created in the package from which the import was triggered in medini analyze with the same name as the imported PTC document. It contains the same requirement hierarchy as it is in that document.
medini analyze stores details of imported data. See Metadata of Imported Models for details.
In order to start the export, open the context menu on any Goal model and select "Export > Requirements to Windchill". In the wizard, at first all connection settings and authentication data have to be given, including server address and user credentials. Note: you may tunnel the communication through the local PTC Windchill client (the default) or connect directly to the server in case you face connection or performance problems.
Optionally - and only in rare cases really required - you can specify a "Prefix" value in the "Connection Settings" section. A prefix value is only required if your PTC Windchill solution was installed with a prefix. If you are unsure, or face any issues with unknown default attributes, ask you system or PTC Windchill administrator about any used prefix. It typically looks like "XYZ_".
On the next page, you can define a mapping file to be used for the export (see Mapping Definition). If no such mapping exists, a default file will be created on the fly.
On the "Target Document" page, you can either select an existing target document in Windchill, or create a new Target document by clicking on the "New.." button which opens up the Windchill Client.
To start the actual export, click the "Next" button. Finally, an export status is displayed.
When exporting to Windchill, medini analyze stores the Windchill ID of the elements so that these same elements can be updated with changes in medini analyze when you trigger the export again later.
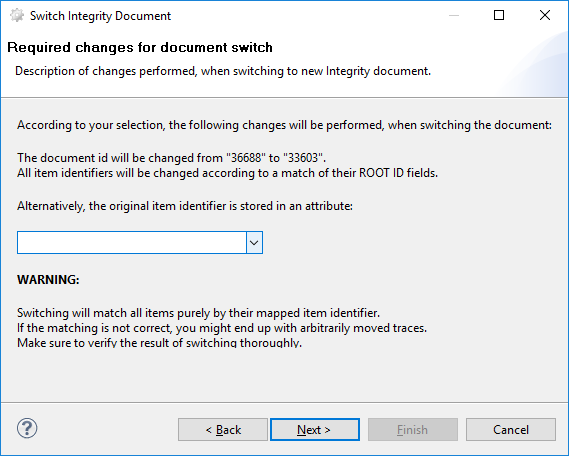
Exported requirements models can be switched for synchronization with a different Windchill document. This feature is helpful if you branch your document on the Windchill server and want to work against the branched version.
The switch will preserve any relations that have been created for exported requirements to other elements of medini analyze.
The action is available in the Export context menu of the resepctive model. Note, the action is only available for medini analyze requirement models that contain exported Windchill documents.
When switching, the mapping file can be changed. Make sure that the mapping fits the existing medini model and the new Windchill document.
The objects from the existing medini model and the new Windchill document are by default matched by the Windchill attribute 'Root ID'. If you select a custom attribute storing the original item ID, this will be used for matching.
After relocation, the final page of the wizard will display a summary of changes induced by the switch, please review thoroughly. You can revert the transformation by using the Back button.
It is possible to disconnect (remove the relation) a requirements model from its PTC model. This deletes the meta-information from the requirements model and creates a clear model again.
PTC Windchill RV&S has a dedicated document concept, that means that documents in Windchill may aggregate work items but work items may also exist outside of documents. To support all kind of work flows, the connector supports to
leave any work item that is missing in medini but available in Windchill untouched (no option enabled)
remove any such work item from the connected document but do not delete it from Windchill (remove option checked)
remove any such work item completely and not recoverable from Windchill (both options are checked)
The Jama integration supports importing and exporting of requirements from Jama.
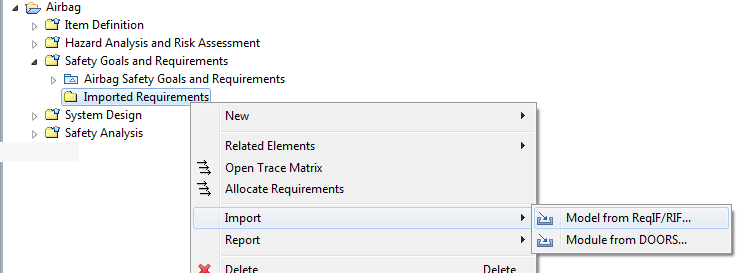
In order to import a Jama module, the import wizard is used which is available via the context menu of the Safety Goals and Requirements node in the model browser. Invoke "Import->Requirements from Jama". Note that the import can also be triggered from each contained package of that node.
In the upcoming wizard, the Jama server and user credentials need to be specified.
On the next step of the import it is possible to select a mapping file which specifies a mapping of the attributes from Jama requirements to the properties of requirements in medini analyze according to the medini analyze metamodel. (There is a default mapping file in case that no specific mapping information is available).
You can create mapping files and you can provide them in the following location: <workspace directory>\<project folder>\config\jama. It shall be named <my mapping file name>.mapping.
The mapping file elements are explained in Mapping Definition.
As a result of the import, a new model is created in the package from which the import was triggered in medini analyze with the same name as the imported Jama module. It contains the same requirement hierarchy as it is in the Jama module.
medini analyze stores details of imported data. See Metadata of Imported Models for details.
In order to export requirements from analyze to Jama, the export wizard is used which is available via the context menu of a safety requirements model.
In the upcoming wizard, the Jama server and user credentials need to be specified.
On the next step of the export it is possible to select a mapping file which specifies a mapping of the attributes from Jama requirements to the properties of requirements in medini analyze according to the medini analyze metamodel. (There is a default mapping file in case that no specific mapping information is available).
Mapping files can be created and provided in the following location: <workspace directory>\<project folder>\config\jama. It shall be named <my mapping file name>.mapping.
The mapping file elements are explained in Mapping Definition.
Once the target location in Jama is selected, all requiremenst are exported there.
medini analyze stores details of exported data. See Metadata of Imported Models for details.
Once a connection of requirements in medini analyze and Jama has been established by either importing from Jama or exporting to Jama, the requirements can be synchronized on demand. Invoke "Jama->Pull Updates..." to pull the latest updates from Jama to analyze, or "Jama->Push Changes..." to update the requirements in Jama with your latest changes in analyze. Note that there is no conflict detection - changes on the target side will be overwritten.
It is possible to disconnect (remove the relation) a requirements model from its Jama model. This deletes the meta-information from the requirements model and creates a clear model again.
Jama has no document concept at all, that means, work items can either exist in a project structure or they get deleted from the server. Consequently, the connector supports to
leave any work item that is missing in medini but available in Jama untouched (no option enabled)
remove any such work item completely and not recoverable from Jama (delete option is checked)
The integration with IBM Rational DOORS Next Generation (or short DNG) supports importing, exporting, and updating requirements from and to any Rational Collaborative Lifecycle Management server. It works similarly to the PTC Windchill RV&S Integration and the Jama Integration.
To use the import wizard to import a DOORS NG module, complete these steps:
In the Model Browser, select the Safety Goals and Requirements node.
Note that you can trigger the import from any package contained in the node.
From the context menu, navigate to Import > Requirements from DOORS NG.
In the Import from DOORS NG dialog, enter the OSLC link to the DOORS NG module as well as the user credentials. Click Next.
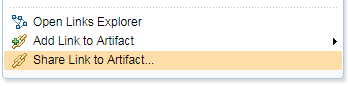
Note that you can obtain the link from the DOORS NG web interface or from the Jazz server. Select the module, then right-click and select Share Link to Artifact. Or, simply drag the hyperlink from the browser to the input field for the link in the dialog.
Ansys medini analyze supports the use of an application token for DOORS NG. For more information, see the IBM Jazz site.
Select a mapping file that specifies a mapping of the attributes from the DOORS NG requirements to the properties of requirements in medini analyze according to the medini analyze metamodel. Note that there is a default mapping file if no specific mapping information is available.
You can create mapping files and provide them in the following location: <workspace directory>\<project folder>\config\doorsng. The file should be named <my mapping file name>.mapping.
Mapping file elements are explained in Mapping Definition. Note that the DNG connector currently supports mappings for text and rich text attributes, enumerations, multi-value attributes, and Boolean attributes. Relationships can be mapped but must be always mapped on the source element of the relationship.
The import creates a new model in the package from which the import was triggered in medini analyze with the same name as the imported DOORS NG module. It contains the same requirement hierarchy as in the remote module.
Ansys medini analyze stores details of imported data. See Metadata of Imported Models for details.
To export requirements from medini analyze to DOORS NG, complete these steps:
In the Model Browser, in a safety requirements model, right-click and select Export > Requirements to DOORS NG.
In the Export wizard, specify the target model and user credentials. Click Next.
Note that medini analyze supports the use of an application token for DOORS NG. For more information, see the IBM Jazz site.

Select a mapping file that specifies a mapping of the attributes from DOORS NG requirements to the properties of requirements in medini analyze according to the medini analyze metamodel. Note that there is a default mapping file if no specific mapping information is available.
You can create mapping files and provide them in the following location: <workspace directory>\<project folder>\config\doorsng. The file should be named <my mapping file name>.mapping.
The mapping file elements are explained in Mapping Definition. Note that the DNG connector currently supports mappings for text and rich text attributes, enumerations, multi-value attributes, and Boolean attributes. Relationships can be mapped but must be always mapped on the source element of the relationship.
Note that in contrast to PTC, a relation can be addressed not only by its name, but also by relationship labels, either incoming or outgoing ends. If a relation label has the same name as another relation, name has precedence over labels, as shown in the graphic below.

Be aware that DNG allows ambiguity even among relation names. In this situation, warning icons appear in the DNG project properties as shown below.

Ansys medini analyze stores details of exported data. For more information, see Metadata of Imported Models.
Note that before version 2023 R2, newly exported requirements were always created in the root folder of the DNG project. Starting with 2023 R2, they are created in the artifacts folder corresponding to the module, which is the same way that the DNG application creates them.
After you have established a connection between a requirements model in medini analyze and a DOORS NG module (using import or export), you can synchronize requirements at any time.
To synchronize requirements between medini analyze and DOORS NG, in the Model Browser, select the requirements model and from the context menu, select either:
DOORS NG > Pull Updates... to pull updates from the server, or
DOORS NG > Push Changes... to update the requirements in DOORS NG with your latest changes.
Note: There is no conflict detection during these actions. Changes on the target side will be overwritten.
You can switch requirements models for synchronization with a different module. For example, if you branch your module on DOORS NG and you want to work against the branched version, you can use the switch function to redirect the local model in medini analyze to the new module.
To switch your module, simply select the corresponding action in the DOORS NG context menu of the model. The wizard guides you through the process. Note that the action is only available for medini analyze requirement models that have been previously synced with DOORS NG.
You can change the mapping file during a switch. Make sure that the mapping fits the existing model as well as the new DOORS NG module.
The switch preserves any relations that have been created for requirements to any other element inside the medini analyze project.
You can disconnect a requirements model from its DOORS NG model to remove the relation between them. This action deletes only the meta information from the requirements model and results in a clean model.
The integration with Siemens Polarion PLM supports bi-directional requirements import and export including pull/push updates and dynamic type and field mapping. The integration works with any Polarion cloud or on-prem server starting with version 19.x.
Requirements can be imported from any existing Polarion document. That document has to be mapped to a single medini requirements model. An import can be launched on any package that support requirements modeling. The upcoming wizard requires connection settings and user credentials. The wizard offers an interactive browsing and selection of available document later. As with all other integrations, a type, field and value mapping can be used to map between document and model as well as between work items and requirements, resp. goals. The integration is able to map any native and custom tracker field of all types offered by medini and Polarion.
Requirements can be also exported from medini to an existing Polarion document in the same way. The export can be launched at any requirements model that is not bound to any external RM system. Similar to import, the document can be selected interactively. After the export (and import) the requirements model is linked to the Polarion document and updates can be pulled or pushed.
Once a requirements model is linked to a document, updates can be pushed from medini to Polarion or pulled from Polarion to medini. The pull/push is triggered on the requirements model directly using the "Polarion" menu. Tracker and mapping information are automatically selected from the previous import/export.
It is possible to disconnect a requirements model from the Polarion document at any time, i.e. to remove the relation between the imported model and the external model. This action just deletes the meta-information from the requirements model and results in a clear model again. The user can navigate from any requirement to the polarion work item and open it in the Polarion app.
Polarion has a dedicated document concept, that means that documents in Polarion may aggregate work items but work items may also exist outside of documents. To support all kind of work flows, the connector supports to
leave any work item that is missing in medini but available in Polarion untouched (no option enabled)
remove any such work item from the connected document but do not delete it from Polarion (remove option checked), this removal can be undone in Polarion
remove any such work item completely and not recoverable from Polarion (both options are checked)
Headings of documents are somewhat special in Polarion as they are of a different work item type "heading" and do not appear in the work item list of a project. Headings are ignored durign import and exports as long as they are not mapped in the mapping file. However, they can be imported and exported by using "heading" as special mapped type (supported since 2023 R1). Note further that ID should be used instead of the Name attribute.
The integration with Intland Codebeamer ALM supports bi-directional requirements import and export including pull/push updates and dynamic type and field mapping. The integration works with any Codebeamer cloud or on-prem server starting with version 20.x.
Requirements can be imported from any existing Codebeamer tracker. That tracker has to be mapped to a single medini requirements model. An import can be launched on any package that support requirements modeling. The upcoming wizard requires user credentials and optionally a tracker id. If no tracker id is entered, the wizard offers an interactive browsing and selection of available trackers later. As with all other integrations, a type, field and value mapping can be used to map between tracker and model as well as between work items and requirements, resp. goals. The integration is able to map any native and custom tracker field of all types offered by medini and Codebeamer.
Requirements can be also exported from medini to an existing Codebeamer tracker in the same way. The export can be launched at any requirements model that is not bound to any external RM system. Similar to import, the tracker id can be either given or selected. After the export (and import) the requirements model is linked to the codebeamer tracker and updates can be pulled or pushed.
Once a requirements model is linked to a codebeamer tracker, updates can be pushed from medini to codebeamer or pulled from codebeamer to medini. The pull/push is triggered on the requirements model directly using the "Codebeamer" menu. Tracker and mapping information are automatically selected from the previous import/export.
It is possible to disconnect a requirements model from the Codebeamer tracker at any time, i.e. to remove the relation between the imported model and the external model. This action just deletes the meta-information from the requirements model and results in a clear model again. The user can navigate from any requirement to the codebeamer work item and open it in the Codebeamer app.
The most basic import and export of requirements as via ReqIF (Requirements Interchange Format, formerly RIF) files. Since Ansys medini analyze supports various native adapters to DOORS, DOORS NG, Jama, PTC Windchill RV&S, etc. these should be preferred over the ReqIF file exchange, since they provide a more flexible mapping of requirement types during import/export.
Ansys medini analyze allows to import documents that are formatted according to ReqIF 1.0.1 as well as the former version RIF 1.1 and 1.2.
Note for DOORS users : Since DOORS tool version 9.4 produces a non-standard compliant ReqIF format, the RIF format should be used instead for exchanging requirements with this specific version. From DOORS version 9.5 upwards the new ReqIF is supported (including proprietary tool extensions for DOORS).
The import is initiated via the "Import -> Requirements from ReqIF/RIF..." action of the context menu. The action is available on the package "Safety Goals and Requirements" and each of its sub-packages.
The invocation of this action opens the RIF/ReqIF import dialog where the name of the new model can be entered and the RIF/ReqIF file has to be selected.
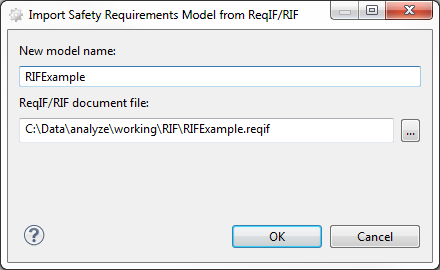
By pressing the "OK" button the import is executed and a new model is created containing all (safety) requirements of the import.
During the import, medini analyze tries to map attributes of elements in RIF to properties of medini analyze requirements. The matching is done based on the names. If a corresponding property does not exist in medini analyze, the attribute is not imported. Properties created in profiles are considered in this process (see Profiling mechanism).
In the case that a previously imported set of requirements shall be updated, the context menu entry "Update Requirements from ReqIF/RIF..." on the model can be selected in the Model Browser. This will bring up the following dialog:
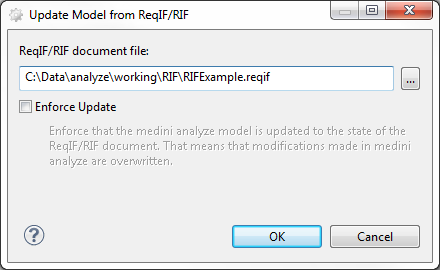
Now the externally changed RIF/ReqIF file can be chosen. An option controls the import function, so that either all changes can be enforced or local changes will be preserved. If the option is not enabled, you will be informed about elements that are being removed:
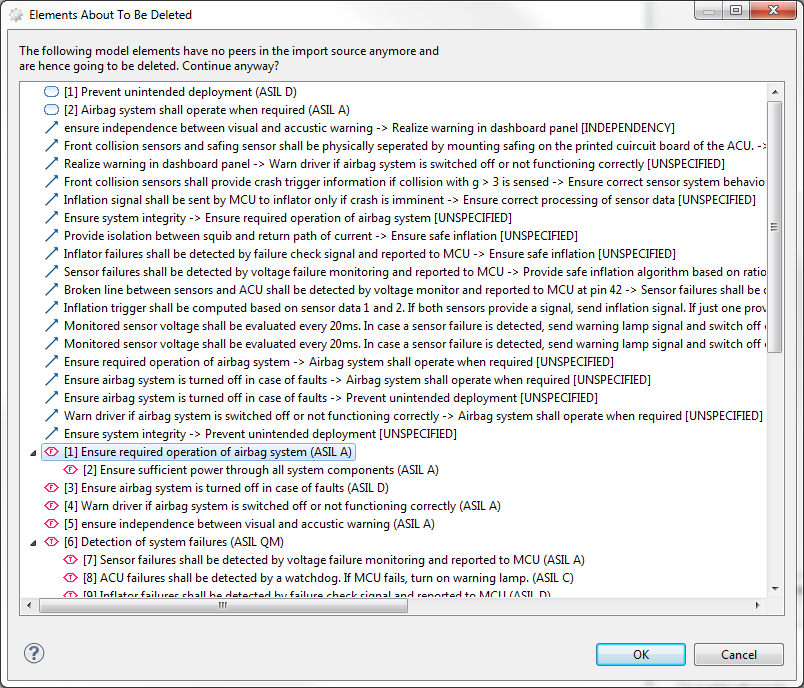
This dialog allows you to check which safety goals, requirements and connections are being removed before updating your model.
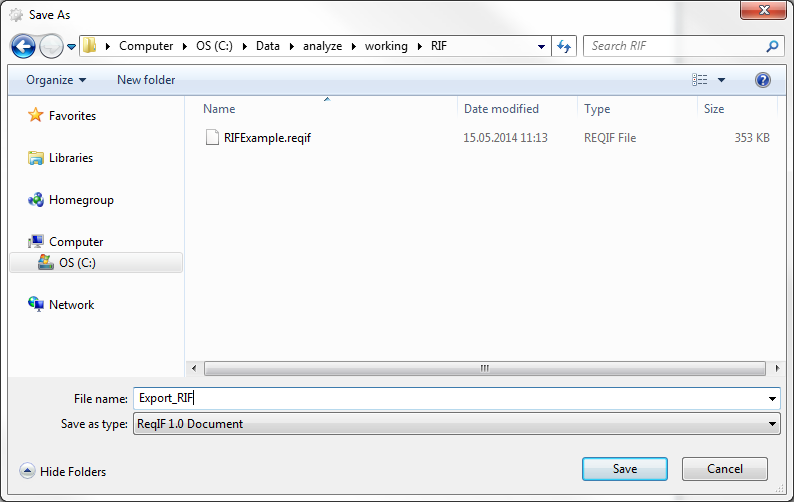
Ansys medini analyze is able to export safety goals and requirements to XML documents formatted according to ReqIF 1.0.1 and RIF 1.2. These documents may be imported into a number of requirement management solutions like DOORS and PTC Windchill RV&S.
The export is triggered via the context menu action "Export -> Goals/Requirements to ReqIF/RIF...". This action is available at safety goal and requirement models only.
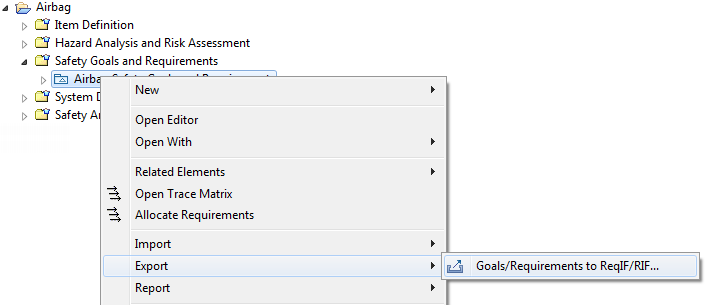
When triggered, a dialog is opened which makes it possible to select the target file for the export.
During the export, medini analyze also exports the properties of the requirement and/or goal. This includes the export of profile properties that are of type String and are activated at the time of export (see Profiling mechanism). Furthermore, all relations between requirements and/or goals (see Relation Creation and Modification) are also exported.
Note that medini analyze maintains identifiers for requirements exchanged via ReqIF/RIF. If requirements are exchanged the first time, these identifiers have to be created. If a requirement management tool such as DOORS is used, the identifiers of DOORS are taken during first import. In the case of exporting a safety requirements model that has been created in medini analyze, they are generated during the export. Hence, a subsequent import into a copy of the same project on a different computer can only benefit from the "update merge" feature of ReqIF/RIF if the first export was done on the same "baseline" of the project, i.e. the project was distributed AFTER the first export. In any case, a new import into other projects works always.
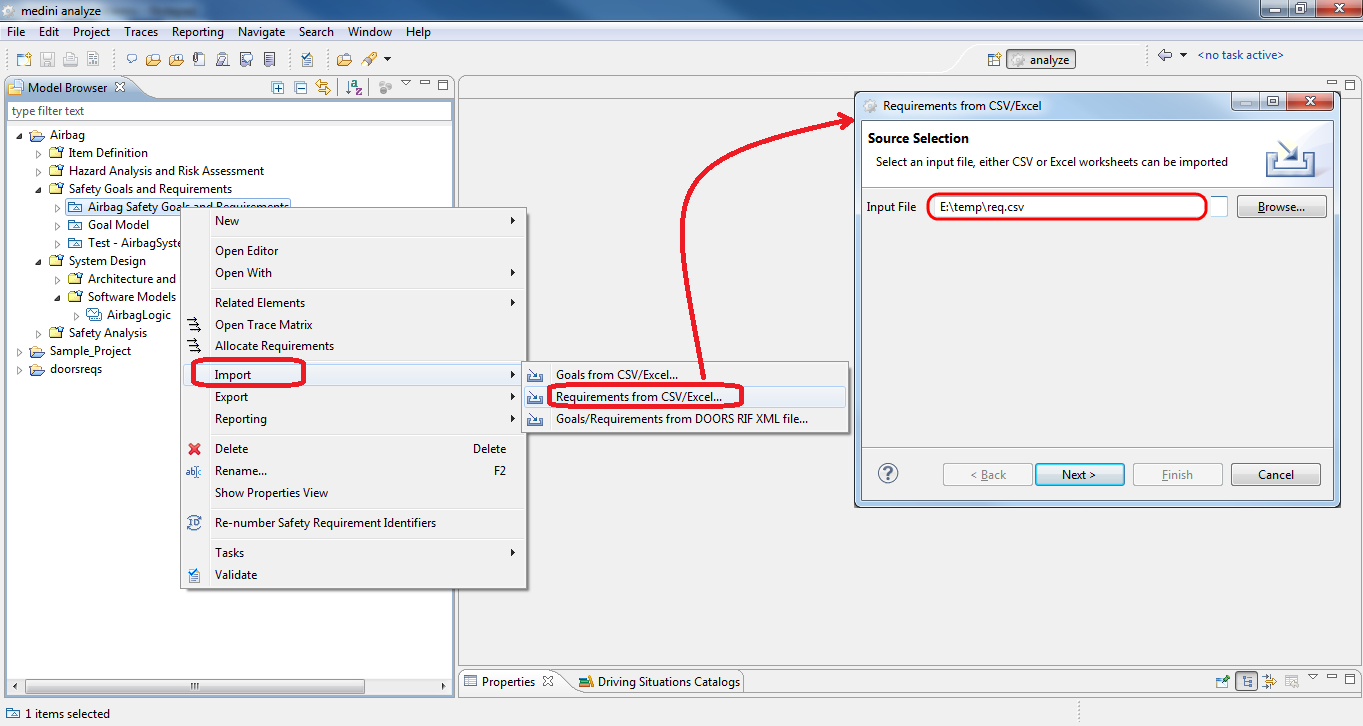
For the import of safety requirements or safety goals in CSV/Excel format select the requirement model in the Model Browser and choose "Import -> Goals from CSV/Excel ..." or "Import -> Requirements from CSV/Excel ..." from the context menu. The CSV/Excel-import wizard will appear. For more details on this wizard see Import of data in Excel/CSV-Format.
All the imported information will be added to the selected requirement model and be shown in the Model Browser. Use the appropriate table editor to see their details or drag&drop the goals from the Model Browser into a requirement model diagram to modify them or to add relations to goals and other requirements.
In order to export requirements or safety goals to Excel please use "Report -> Generate Safety Requirements Report ..." resp. "Report -> Generate Safety Goals Report ..."from the context menu of a requirement model in the Model Browser and choose MS Excel as output format (see Reporting and Document Generation).