


To view and edit Watch Zone properties, open the Details panel by selecting the Watch Zone object in the Outline:
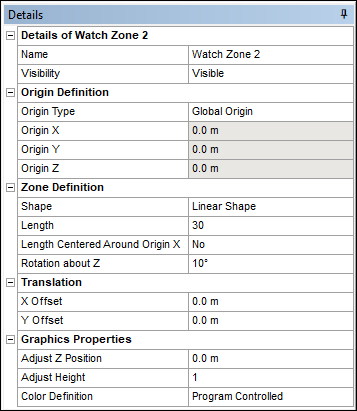
Details of Watch Zone
The Name of the Watch Zone can be edited and the Visibility amended.
Origin Definition
Defines the position of the origin point where the zone position should be calculated from.
Origin Type can be defined as:
Global Origin: Matches the Global Axes origin.
Manual Definition: Allows you to enter user-defined values directly into the Origin X/Y/Z fields.
Vertex Selection: Based on the position of a Vertex, which is selected from the geometry in the Graphical window.
Origin X, Origin Y and Origin Z show the location of this origin point in the Global Axes.
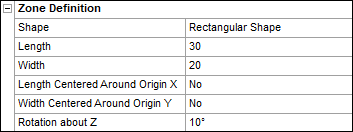
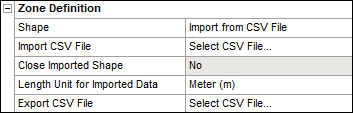
Zone Definition
The Shape option allows you to select from a list of predefined shapes or import a custom shape using a CSV file. The following options are available:
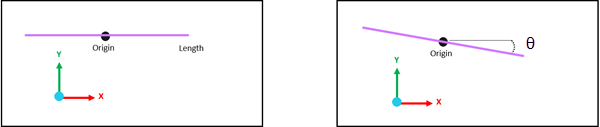
Linear Shape: Creates a straight-line border, which is an open zone. Only the Length of the line must be defined. Use Length Centered Around Origin X to define whether the line is centered around the origin point (set to 'Yes') or starts from the origin point toward the positive X axis (set to 'No'). If needed, the line can be rotated about Z at the origin point by using Rotation about Z.
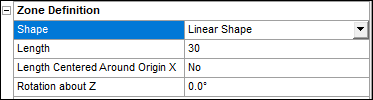
Note: It is possible for a tracked point to travel around an open zone without the system detecting it as crossing. For more information, see Design Considerations.
Circular Shape: Define the Radius to draw a circle from the Origin X/Y/Z.

Rectangular Shape: You must define the Length along the positive X axis and the Width along the positive Y axis of the rectangle. The rectangle can also be centered around the Origin X/Y/Z point along the X direction and/or Y direction if Length Centered Around Origin X and Width Centered Around Origin Y are set to 'Yes' respectively. Subsequently, the rectangle can be rotated about Z from the Origin X/Y/Z point if a non-zero value is provided for Rotation about Z.
Import from CSV File: Allows you to define a custom shape by providing a list of points that represent the vertices of the Watch Zone.
Click Select CSV File... to select a CSV file from a location on your machine. The selected file must have a .csv extension and contain 4 columns (a point name or index, Position X, Position Y and Position Z). Values must be separated by commas, tabs, or single spaces (not multiple spaces). Note that Position Z is used for the graphical display.
If the first and last points in the CSV file are different, an open zone is created. However, you can set Close Imported Shape to 'Yes' to create a closed zone. If the first and last points are the same, the zone is automatically closed and the option is read only.
To specify the length unit for the CSV file, use Length Unit for Imported Data.
Note: You must ensure the list of points reflects the zone you are trying to describe. There is no automatic check for overlapping segments, which result in poorly designed Watch Zones. For tips on how to create a well-designed Watch Zone, see Design Considerations.

Export CSV File: Allows you to export statistical results to a CSV format. For a decription of the exported results, see Exported CSV Results.
Translation
X Offset and Y Offset are used to translate the zone along the X and Y axis. Note that the position of the Z axis is controlled in the Graphics Properties section as it is purely a graphical representation.
Graphics Properties
Fully defined Watch Zones with valid properties are visible in the Graphical window and the Graphics Properties allow you to change how they are displayed.
The derived Statistics Results only consider properties in the XY plane, meaning Z positions of the Watch Zone and tracked point do not affect the results. However, for ease of visibility, the zone appears as a 3D object in the Graphical window and can be moved up and down the Z axis.
Use Adjust Z Position to move the zone up and down. This is helpful when focussing on different areas of interest such as cables under the water, or parts on the water surface.
The zone height can be changed using Adjust Height.
You can use Color Definition to change the color of the zone, which is useful when working with multiple zones.