


This node allows you to use COMSOL inside optiSLang. It requires a prepared COMSOL model (.mph) with defined input parameters and supported result objects. There is no need for additional manual work, for example, to export Java or MATLAB code inside COMSOL.
Note: Users of COMSOL 6.3 - see the COMSOL 6.3 Known Issue for information about how to correct the behavior of COMSOL 6.3.
Setup
There are two methods for setting up the COMSOL integration.
Solver Wizard Setup
Drop the Solver wizard onto the Scenery pane to set up new process chain or onto an existing subsystem to extend a solver chain, as described in Solver Wizard in the optiSLang User's Guide.
From the list of solvers, select .
Select your COMSOL model file (.mph) and click .
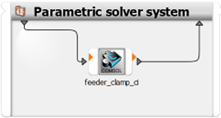
The parametric system containing the COMSOL node is created automatically.
Double-click the COMSOL node to open the integration dialog box and define parameters and responses using the inputs and outputs of the COMSOL model.
Manual Setup
In the Modules pane, expand > .
Drop a Parametric System onto the Scenery pane to set up new process chain or onto an existing subsystem to extend a solver chain.
In the Modules pane, expand > .
Drop the COMSOL node onto the Parametric System.
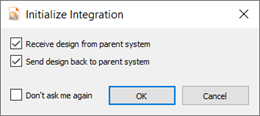
Confirm the initialization settings by clicking .
Double-click the COMSOL node to open the integration dialog box.
Select your COMSOL model file (.mph) and click .
The inputs and outputs of the COMSOL model are extracted automatically.
Define parameters and responses using the inputs and outputs of the COMSOL model.
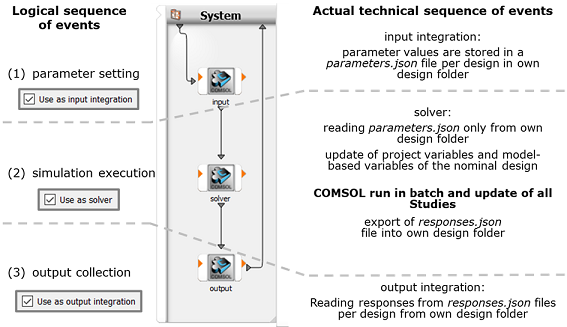
The COMSOL node serves as input, solver, and output node by default (see the settings in the following image).
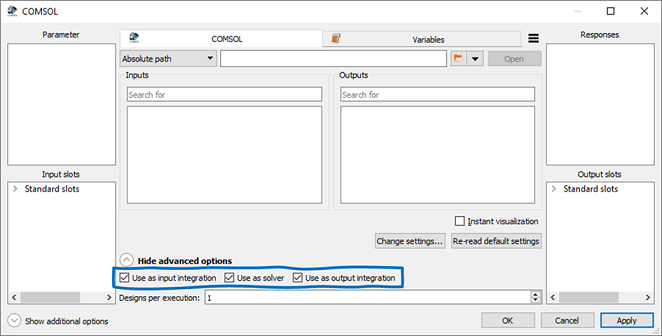
However, you can create different workflows using nodes with other combinations of input, solve, and output nodes. The functionality of each usage mode is described in the following image.
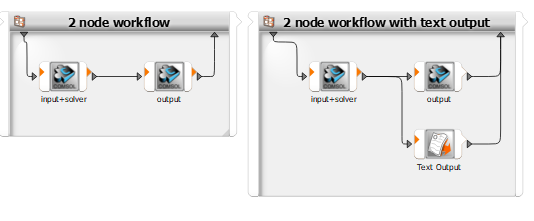
Combining nodes with different usage modes allows you to create complex custom workflows. Two typical examples are shown in the following image:
Parameters
Only COMSOL input parameters defined in objects Parameters under object Global Definitions (see the following image) are supported by the COMSOL integration node.
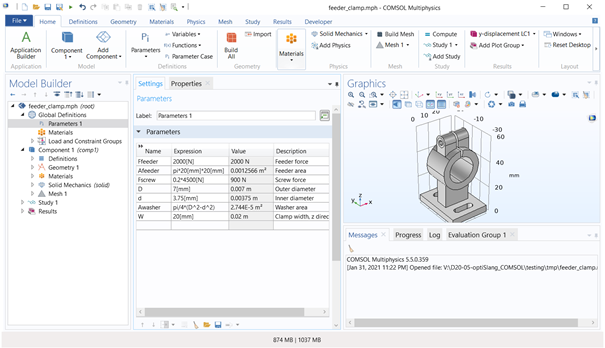
Only parameters with scalar values without mathematical expression are imported to the COMSOL node. As demonstrated in the example in the previous figure, only the parameters D, d, Ffeeder and W are imported as parameters to the COMSOL node.
Responses
The following outputs are automatically extracted from a COMSOL model:
Dependent parameters: COMSOL parameters with expression.
Evaluation groups: The columns are extracted from the table data and provided as vectors.
1D Plot groups: x-y data is extracted as vectors from Line Graph and Point Graph.
The structure of the output is illustrated in the following image:
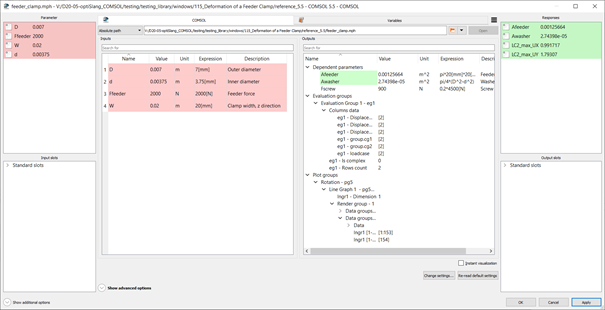
The vectors can be defined as internal variables and further used with standard optiSLang functionality such as scalar responses, x-y data, or signals.
If the table data in Evaluation Group contains complex numbers, both real and imaginary values are provided.
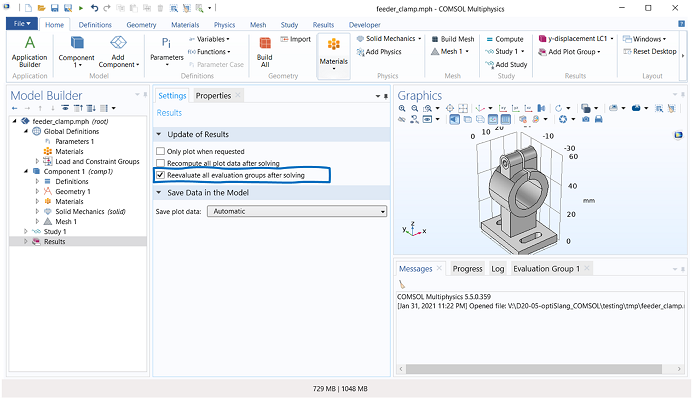
To ensure that the data in Evaluation Group is updated after each design is solved, select the Reevaluate all evaluation groups after solving check box in the Results object settings. Another possibility for updating the Evaluation Group is the utilization of Sequences in Study > Job Configurations. See the Solver section for more information.
Solver
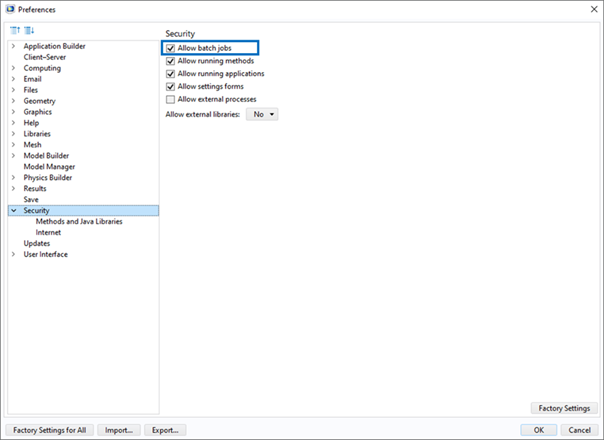
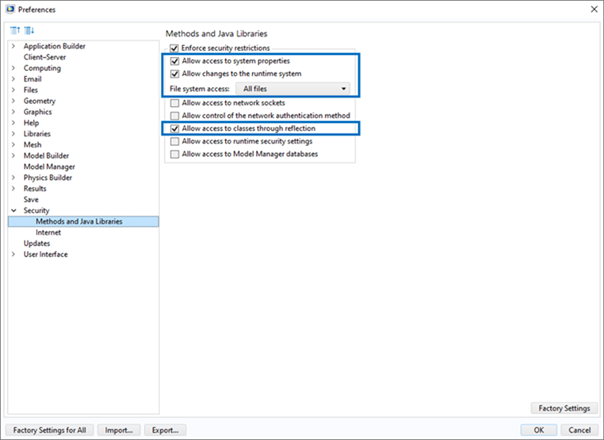
The following security permissions must be enabled in the COMSOL Preferences to run the COMSOL node using the comsolbatch command:
Allow batch jobs
Allow access to system properties
Allow changes to the runtime system
File system access: All files
Allow access to classes through reflection
The integration node with solver capability automatically updates all studies in the COMSOL project including Solver configurations and Job configurations. All objects in the study must be correctly configured to run the solution properly. Use Sequences to perform the following actions automatically after the solution:
Update of the child objects of the Results object (for example, Evaluation groups, Plots, and Tables).
Export of data to text files
Export of images or animations
The export of images is demonstrated in the example 20401 Beam with a Traveling Load.
Parallelization
Parallelization is supported.
Settings
Settings for the COMSOL integration node are shown in the image below:
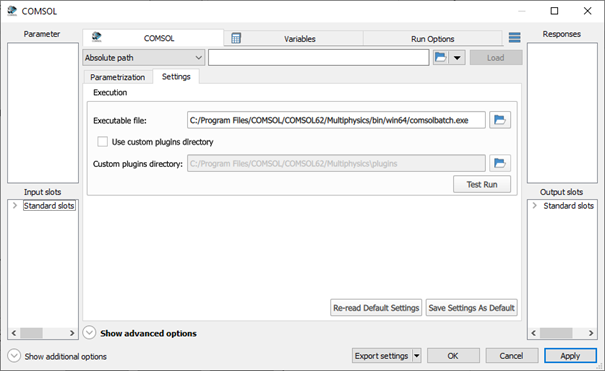
The following execution settings can be specified:
Executable file - path to the comsolbatch executable. If not specified, the default path is used.
The standard Windows path looks like:
C:\Program Files\COMSOL\COMSOL[version]\Multiphysics\bin\win64\comsolbatch.exe
where [version] is your COMSOL version. For example, for COMSOL 6.2, the default path is
C:\Program Files\COMSOL\COMSOL62\Multiphysics\bin\win64\comsolbatch.exe.
The standard Linux path looks like:
/usr/local/comsol[version]/multiphysics/bin/glnxa64/comsol
where [version] is your COMSOL version. For example, for COMSOL 6.2, the default path is
/usr/local/comsol62/multiphysics/bin/glnxa64/comsol.
During the COMSOL installation, there is an option to create a symbolic link in /usr/local/bin/ directory to the COMSOL executable. Created a symbolic link has the following path:
/usr/local/bin/comsol-[version]
where [version] is your COMSOL version in dot-separated format. For example, for COMSOL 6.2, the default path of the symbolic link is:
/usr/local/bin/comsol-6.2.0.
There is also a symbolic link
/usr/local/bin/comsol
pointing to the executable file of the most recently installed COMSOL.
Use custom plugins directory - enables Custom plugins directory setting for custom plugins directory specification.
Custom plugins directory - path to the COMSOL plugins directory. If disabled or empty, the default path is derived from the specified Executable file setting.
The standard Windows path looks like:
C:\Program Files\COMSOL\COMSOL[version]\Multiphysics\plugins
where [version] is your COMSOL version. For example, for COMSOL 6.2, the default path is
C:\Program Files\COMSOL\COMSOL62\Multiphysics\plugins.
The standard Linux path looks like:
/usr/local/comsol[version]/multiphysics/plugins
where [version] is your COMSOL version. For example, for COMSOL 6.2, the default path is
/usr/local/comsol62/multiphysics/plugins.
Note: The Executable File setting supports specifying the path to a command-line script instead of the comsolbatch executable. See the Special use cases of COMSOL execution section for more information. An example of command-line script usage is also provided in the Known Issues - COMSOL 6.3 listing.
Special use cases of COMSOL execution
If you have a special use case that cannot be handled by a COMSOL node in a standard way, you can write your own command-line script to fully customize the COMSOL execution. The command-line script can be specified as the Executable File setting, instead of the comsolbatch executable file, as outlined in the Settings section. The arguments used for the comsolbatch command are also passed to the command-line script.
Your intention may be to modify only some of the processing steps of a COMSOL node. For example, you may want to customize solver execution or parameters extraction, etc. In fact, COMSOL is executed in the cases listed in Table 1; see column "Intent of COMSOL execution". Listed COMSOL execution intents can be customized separately using the following approaches:
Split the COMSOL node to input, solver, and output nodes and specify different command-line scripts or executable files for each node,
Use a single COMSOL node and detect current execution intent within the command-line script.
| Intent of COMSOL execution | Node usage modes** | Java class name |
|---|---|---|
| To extract parameters and responses | input, output | ExportParametersApp.class |
| To update parameters, solve a model, and extract responses | solver | ModelSolverApp.class |
| To run a test* | all | TestRunApp.class |
*listed for completeness and would not be considered in the text
** input = Use as input integration option is checked; solver = Use as solver option is checked; output = Use as output integration is checked
Split COMSOL node to input, solver, and output nodes and specify different command-line scripts or executable files for each node
Each intent of COMSOL execution is associated with specific usage modes of the COMSOL node; see column "Node usage modes" in Table 1. For example, if usage mode of COMSOL node is "input" or "output", the COMSOL will be executed only to extract parameters and responses. Based on that, a COMSOL node can be divided into three distinct nodes, each with its own usage mode: input, solver, and output. Consequently, different command-line scripts or comsolbatch executables can be specified for each node.
Use a single COMSOL node and detect current execution intent within the command-line script
As mentioned earlier, the arguments passed to the comsolbatch command are also passed to the command-line script. The second argument is a path to the Java (.class) file. Name of the Java (.class) file is associated with each COMSOL execution intent, as shown in Table 1; see column "Java class name". As a result, you can determine the intent of the COMSOL execution based on the Java file name and adjust the script accordingly.
It is important to note that your custom command-line script must perform required actions for each COMSOL execution intent. Otherwise, the COMSOL node process chain will fail.
The required actions for customization of parameters and responses extraction are:
Export model parameters to parameters.json file.
Export model responses to responses.json file.
The required actions for customization of parameters update, model solution, and responses extraction:
Update model parameters based on parameters.json file.
Solve model.
Export model responses to responses.json file.
Note: The working directory is in the folder [COMSOL_MODEL_FILE_NAME].optislang folder located in the same directory as the reference file, where COMSOL_MODEL_FILE_NAME is the name of the COMSOL model (or reference) file.
Example
An example of a special use case can be the requirement to execute COMSOL method-call instead of solving the model in the standard way. As mentioned earlier, there are two general approaches. First approach is to split COMSOL node into three nodes with different usage modes and the second approach is to use a single COMSOL node and handle all logic inside one command-line script.
Split COMSOL node to input, solver, and output nodes and specify different command-line scripts or executable files for each node
The workflow consists of the three COMSOL nodes with usage modes input (COMSOL input), solve (COMSOL solver), and output (COMSOL output) as shown on the image below:

Executable file setting of the input and output nodes is set to the path of the standard comsolbatch executable. However, the Executable file setting of the solver node is configured to the path of the custom command line file shown below:
"C:\ProgramFiles\COMSOL\COMSOL62\Multiphysics\bin\win64\comsolbatch.exe" -inputfile "%9" -methodcall methodcallX
The command-line script file (batch file) is written for a Windows operating system. It contains comsolbatch command with custom arguments. The
-methodcallargument specifies the method to be executed by COMSOL. The-inputfileargument is set to nineth argument passed to the script which is the COMSOL model file (.mph). For more details about the comsolbatch command arguments, see the COMSOL documentation.Make sure that Custom plugins directory setting is set to a valid COMSOL plugins directory path, and that the method-call meets the requirements defined in the Requirements section.
Use a single COMSOL node and detect current execution intent within the command-line script
The workflow has only one COMSOL node with the Executable file setting configured to the path of custom command-line script shown below:
for %%f in (%2) do set inputFileName=%%~nxf
echo input file name "%inputFileName%"
echo model file path "%9"

if %inputFileName%==ModelSolverApp.class (
    "C:\Program Files\COMSOL\COMSOL62\Multiphysics\bin\win64\comsolbatch.exe" -inputfile "%9" -methodcall methodcallX
) else (
    "C:\Program Files\COMSOL\COMSOL62\Multiphysics\bin\win64\comsolbatch.exe" %*
)
The command-line script file (batch file) is written for a Windows operating system. The determination of whether the solver phase is in progress is based on the name of the Java (.class) file passed as a second argument to the script. Java (.class) file name is extracted from the file path on the first line of the script. An
ifstatement checks if the input file is ModelSolverApp.class. If it is, the execution is in the solver phase and the comsolbatch command with custom arguments is executed. Otherwise, the comsolbatch command with standard arguments is executed (%* represents all arguments passed to the script).Make sure that the method-call meets the requirements defined in the Requirements section.
Test Run
The test run functionality allows users to perform several verifications to ensure that most aspects are functioning correctly before node execution. The test run can be performed by clicking the Test Run button. After the test is complete (it may take a few minutes), a new dialog with the test results will appear:
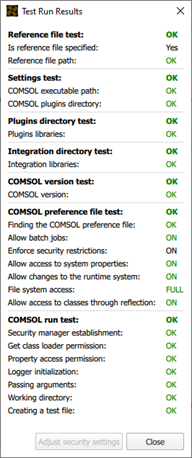
The test consists of the following steps:
Reference file test - Verifies the reference file, if specified, and defines the working directory for the test run. If the reference file is specified, the working directory is set to the [COMSOL_MODEL_FILE_NAME].optislang folder located in the same directory as the reference file, where COMSOL_MODEL_FILE_NAME is the name of the COMSOL model (or reference) file. Otherwise it is set to a new folder created in the operating system's temporary directory.
Is reference file specified - Indicates whether the reference file is specified or not.
Reference file path - If the reference file is specified, checks whether the reference file exists.
Settings test - Verifies that settings are specified correctly.
COMSOL executable path - Verifies that the COMSOL executable path exists.
COMSOL plugins directory - Verifies that the COMSOL plugins directory exists.
Plugins directory test - Verifies the COMSOL plugins directory.
Plugins libraries - Verifies that required libraries are present in the COMSOL plugins directory.
Integration directory test - Verifies the COMSOL integration node directory.
Integration libraries - Verifies that required libraries are present in the COMSOL integration node directory.
COMSOL version test - Verifies the COMSOL version. This step is performed if the previous steps are successful.
COMSOL version - Verifies that the COMSOL version can be obtained using the COMSOL executable and that it is supported by the integration node.
COMSOL preference file test - Verifies required security settings in the COMSOL preference file (comsol.prefs). This step is performed if the previous steps are successful.
Finding the COMSOL preference - Try to find COMSOL preference file at the default location: [user's home directory]/.comsol/v[comsol version]/comsol.prefs
Allow batch jobs - Verifies that batch jobs are permitted.
Enforce security restrictions - Checks whether the following security restrictions are enforced.
Allow access to system properties - Verifies that access to system properties is allowed.
Allow changes to the runtime system - Verifies that the changes to the runtime system are allowed.
File system access - Verifies that access to the "All files" is permitted.
Allow access to classes through reflection - Verifies that access to classes through reflection is allowed.
COMSOL run test - Verifies that COMSOL can be executed and can perform some required tasks. This step is executed if the "Integration directory test" and its previous steps are successful.
Security manager establishment - Verifies that instance of Java SecurityManager class has already been established for the current application.
Get class loader permission - Verifies that getClassLoader RuntimePermission is granted.
Property access permission - Verifies that it is allowed to access or modify the system properties.
Logger initialization - Verifies that logger instance is initialized successfully.
Passing arguments - Verifies that application arguments are passed successfully.
Working directory - Verifies that working directory exists.
Creating a test file - Verifies that test file can be created successfully.
The failure of the COMSOL preference file test or COMSOL run test can be caused by the COMSOL security settings. These settings can be changed manually in COMSOL; see the Solver section for more information. For user convenience, the COSMOL security settings can be adjusted directly in COMSOL integration node by clicking the Adjust security settings button. This functionality adjusts the desired security settings in the COMSOL preference file.
Note: IMPORTANT:
Adjust security settings may not take effect if the modification of security settings is not permitted in the COMSOL, that is, the COMSOL was installed with the Security Policy set to Permanent. See the COMSOL documentation for more information.
Run Options
This node has general Run Options. The number of supported options is individual for each node.
Examples
The following examples are available for the COMSOL integration. You can download the example files here:
| Example / Model | Additional information | Parameters | Responses | Modification of COMSOL project |
|---|---|---|---|---|
| Deformation of a feeder clamp | https://www.comsol.com/model/deformation-of-a-feeder-clamp-115 | Dimensions of model, load | Max. displacements in X, Y and Z, directions | Evaluation Group 1 with object Volume Maximum 1 to evaluate responses max. displacements in X, Y and Z directions |
| Tuning fork | https://www.comsol.com/model/tuning-fork-8499 | Dimensions of model | First eigen frequency | Parametric sweep from Study 1 was removed |
| https://www.comsol.com/model/beam-with-a-traveling-load-20401 | Speed | 1D point graph | Parametric sweep from Study 1 was removed | |
| Busbar | https://www.comsol.com/model/electrical-heating-in-a-busbar-8484 | Dimensions of model, load, material parameter. | Volume Temperature | Evaluation Group 1 with object Volume Integration 1 and Volume Maximum 1 |
These examples were taken from the COMSOL Multiphysics® Application Gallery.
Version and Requirements
Supported operating systems:
Windows
Linux
See the Supported Integration Versions table for a list of supported COMSOL versions.
Troubleshooting
The optiSLang logging system provides useful information about the solution process (for more information, see Logging Management in the optiSLang User's Guide).
Logging level can be specified using the
ANSYS_OPTISLANG_VERBOSE_LEVEL environment variable:
ANSYS_OPTISLANG_VERBOSE_LEVEL = 0- Only error messages are logged (default).ANSYS_OPTISLANG_VERBOSE_LEVEL > 0- Error messages are logged along with stack traces.
The COMSOL custom Integration provides additional logging files for detailed information about:
Parameter extraction from the COMSOL model:
cmd_Export_params_stdout.log (standard output)
cmd_Export_params_stderr.log (standard error)
Solution of the COMSOL model:
cmd_Solve_model_stdout.log (standard output)
cmd_Solve_model_stderr.log (standard error)
These files can be found in each design directory (see Project Directory Structure in the optiSLang User's Guide) in the [COMSOL_MODEL_FILE_NAME].optislang folder.
Known Issues
COMSOL 6.3 always fails to run successfully. This issue was observed in COMSOL Multiphysics 6.3 (Build: 335) but may persist in future releases.
The workaround for this issue involves the following steps:
Modify the following options in COMSOL preferences:
Enable Allow external processes:

Completely disable Java security, that is, uncheck Enforce security restrictions.

Add the following arguments to the comsolbatch command:
-disablemodelclassmethodexec on -clientsidemodelclass on
Arguments can be added to the comsolbatch command using the custom command-line script:
For Windows, the command-line script (batch file) should contain the following line:
"[comsolbatch]" -disablemodelclassmethodexec on -clientsidemodelclass on %*
where [comsolbatch] should be replaced with the path to the comsolbatch executable file. See Settings for more information.
For Linux, the command-line script (shell script) should contain the following lines:
#!/bin/sh
"[comsolbatch]" -disablemodelclassmethodexec on -clientsidemodelclass on "$@"
where [comsolbatch] should be replaced with the path to the comsolbatch executable file. See Settings for more information.
The path of the created command-line script must be set to Executable file setting. Also, the plugins directory of the COMSOL 6.3 must be specified explicitly:
Check Use custom plugins directory.
Set Custom plugins directory to the path of COMSOL 6.3 plugins directory. See Settings for more information.
Limitations
Parameters determined by complex mathematical expressions cannot be used.
Only COMSOL parameters defined in the Parameters objects under the Global Definitions object are supported by the integration.
There are some limitations when it comes to separating input, solver, and output usage modes. For example, the input node cannot set parameters to a COMSOL .mph file, and the output node cannot read results from a COMSOL .mph file. The usage of a single node for input, solve, and output combined is recommended.