


The Angle feature is used to measure the angle between three points. The feature is operated in three steps as follows.
Figure 2.23: Operation steps for the Angle feature
| Step | Operation |
| 1st step | Define three points by using the Point Picker as shown in Figure 2.22: Properties of the Angle feature. |
| 2nd step | After step 1, check the angle that is automatically calculated and enter the value in the Angle field as shown in Figure 2.22: Properties of the Angle feature. |
| 3rd step | Click the to exit the operation. |
The feature supports various options as summarized in the following table.
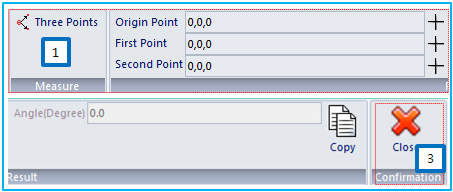
Figure 2.24: Properties of the Angle feature
| Symbol | Name | Description |
 | Three Points | Set three points by using the Point Picker. First, the origin point is defined and then the first and second points are defined sequentially. |
 | Origin Point | Set the origin point by using the Point Picker. |
 | First Point | Set the first point by using the Point Picker. |
 | Second Point | Set the second point by using the Point Picker. |
| N/A | Angle | Display the angle between the three points. |
 | Copy | Copy the angle to the clipboard and paste it into another field. |
 | Close | Exit the operation. |
The angle  can be calculated as follows.
 | (2–6) |
where,  ,
,  and
and  are the positions of the origin, first and second points,
respectively.
are the positions of the origin, first and second points,
respectively.