


If you have an Ansys Cloud (portal.ansys.com) account with a positive balance, you can take advantage of cloud computing from directly within the Ansys Fluent interface, where you can submit your Ansys Fluent session(s) to the Ansys Cloud Burst Compute resource in order to run and/or monitor your CFD simulations remotely.
From your Ansys Fluent session you can:
Select cloud resources
Submit solver jobs to a cloud environment
Select files for solver jobs (case, data, journal, etc.)
Specify the location to search for the external files (as required to read and solve cases)
Specify various resources (such as precision, cores, queues, etc.)
Track jobs
View a list of previously submitted jobs
Interrupt running or queued jobs
Download output files of completed jobs
To solve remotely using the Ansys Cloud, your company must subscribe to an Ansys Cloud plan. Each plan includes a pool of cloud compute credits and provides cloud access to a limited number of users. Your company's Ansys administrator manages cloud user access in the Ansys Admin portal at https://admin.ansys.com/. For more information, refer to the Ansys Admin Guide.
Before you can make use of Ansys Cloud, you will need the following:
Ansys ID (can be created during sign-in)
Membership in your company's Ansys Cloud plan (an administrator must add you)
Assignment of a cloud user seat
Sufficient credits available in your company pool
Use the Ansys Cloud (https://portal.ansys.com) to gain access to the web interface capability and view and manage simulation jobs that you submitted to the Ansys Cloud. For more information, see the Ansys Portal Guide.
Note: If you have an ASC or Admin role in the Ansys Admin portal, see the Ansys Cloud Subscription Quick Start Guide for instructions on setting up your Ansys Cloud plan.
Once you have established an account, you can sign into the account directly in the Ansys Fluent interface:

When signing in, your default web browser will display a panel to authenticate your account. As soon as the login is successful, Fluent displays the the Select Account To Use For Ansys Cloud Burst Compute dialog box.
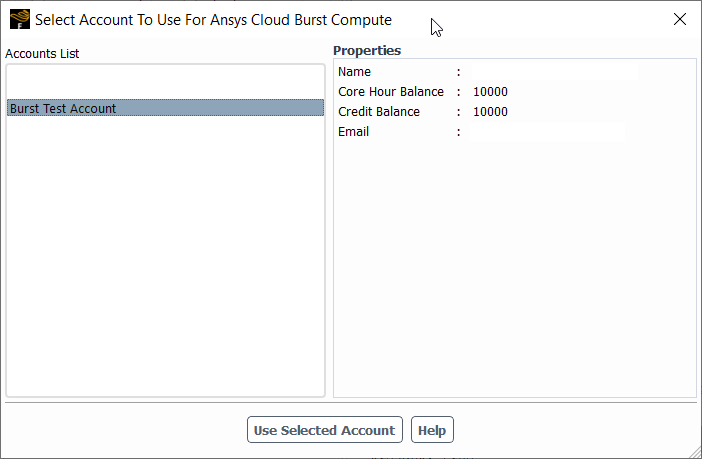
From here, you can view a listing of available accounts and their properties when selected. You can select the account that you wish to use, view its properties such as the balance of hours and credits and so forth. Once an account is selected, provided you have an adequate balance, you can then click the Use Selected Account button.
Note: Once closed, you can always later open the Select Account To Use For Ansys Cloud Burst Compute dialog box using the Sign-In > Account Details menu option.
From within your Ansys Fluent session, to submit a job to Ansys Cloud, you can use either the Run Calculation task page, or the Solution tab of the ribbon.
In either case, under Solution Advancement, in the Compute Resources drop down list, select Ansys Cloud Burst and click Submit... to open the Ansys Cloud Burst Compute dialog box.
In the Ansys Cloud Burst Compute dialog box, you can set various properties of your job prior to submitting the job.
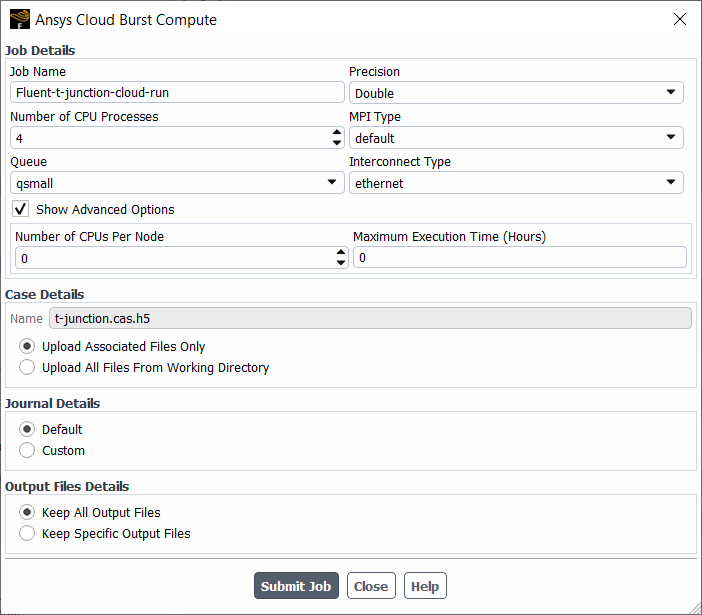
Once all settings are complete, click the Submit Job button to send your work to Ansys Cloud. You can then remotely view and monitor your jobs in the cloud environment (see Viewing Your Job on Ansys Cloud for more information).
Once you have saved your settings and connected to the cloud, you can then specify the Job Details for the Ansys Fluent session.
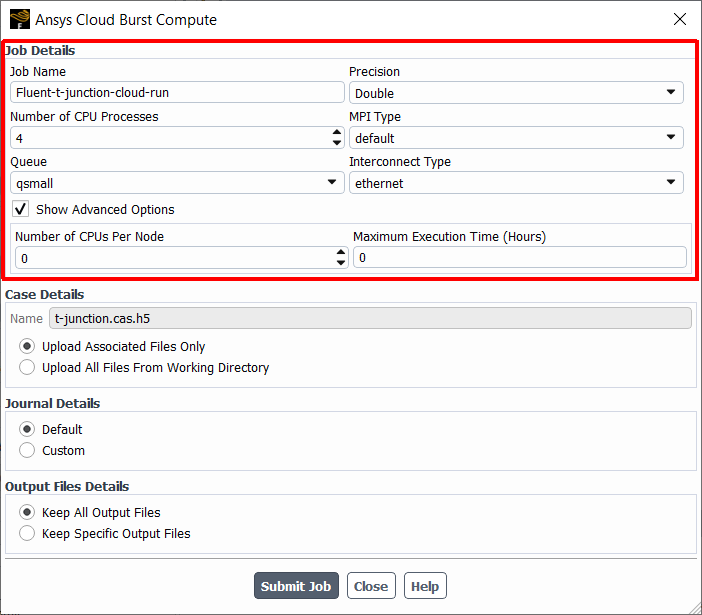
Many of these settings are initially populated from the current Ansys Fluent session, but can be adjusted here accordingly. Some settings described here are available only for cloud job submissions, while others are only available when specifying remote job details when submitting concurrent design point updates for parametric studies (Submitting Concurrent Parametric Jobs to Remote or Local Compute Resources).
- Job Name
The name of the job that will be sent to the cloud. The default value is "case_name-cloud-run" and can be changed accordingly. This is available only for cloud job submissions.
- Capability Level
The license level (either Enterprise or Premium). This is available only for specifying remote or local job details when submitting concurrent design point updates for parametric studies.
- Precision
The precision of the Fluent solver (either Single or Double). This is available only for remote or cloud job submissions.
- Number of CPU Processes
The total number of cores.
- MPI Type
The type of message passing interface (MPI) you require for the parallel computations. The list of MPI types varies depending on the selected release and the selected architecture. There are several options, based on the operating system of the parallel cluster. For more information about the available MPI types, see Table 43.1: Supported Interconnects for the Windows Platform - Table 43.2: Available MPIs for Windows Platforms.
- Queue
The name of the queue where this remote or cloud-based job resides. Once connected, you can choose from a variety of available queues.
Fluent will automatically choose a queue that is capable of running a job with the specified Number of CPU Processes. If no queue is found, then a corresponding message is displayed in the console and the job cannot be submitted. When queues are available to choose from, detailed properties of the selected queue are displayed in the console and as a tool-tip when you hover over a selected queue name.
- Interconnect Type
Specify the interconnect type from drop-down list. The default setting is recommended. Based on the queue selected, Fluent will determine whether or not the Elastic Fabric Adaptor (EFA) is enabled on the queue. If enabled, Fluent selects the
ethernet.efaoption as the Interconnect Type, otherwise, Fluent selects theethernetoption.See Starting Parallel Ansys Fluent Using Fluent Launcher for more information.
- Use GPU Solver
You can choose to use the native GPU-powered Ansys Fluent solver and assign the Number of GPUs per Node accordingly. This is available only for specifying remote or local job details when submitting concurrent design point updates for parametric studies (see Submitting Concurrent Parametric Jobs to Remote or Local Compute Resources and Running Locally Concurrent Design Point Updates with GPUs). For more details about the Fluent GPU solver, see Using the Fluent Native GPU Solver.
- Start Web Server
Starts the Ansys Fluent web interface using the Web Server Token from the current session. This is available only for specifying remote or local job details when submitting concurrent design point updates for parametric studies. For more details about the Fluent web interface, see Remotely Accessing Your Simulations Using Ansys Fluent's Web Interface.
- Show Advanced Options
Use this option to have access to the following advanced features. This is available only for specifying cloud-based job details or for remote job details when submitting concurrent design point updates for parametric studies.
- Number of CPUs Per Node
The number of CPUs assigned to each compute node.
- Maximum Execution Time (Hours)
The maximum amount of time (hours) needed to execute this job.
- Exclusive
Useful for allocating resources. This is available only for specifying remote job details when submitting concurrent design point updates for parametric studies.
Your remote or cloud-based job submission consists of the currently loaded case or mesh file. In addition, under Case Details, you can choose to Upload Associated Files Only to the cloud, or you can Upload All Files From Working Directory to the cloud. In addition, if there is a valid data file for the current session, Fluent will ask whether or not you would like to use (and upload) the data file.
When you choose Upload Associated Files Only, Fluent attempts to determine the dependent files for the loaded case and locate those files in the current working directory. Fluent will notify you if any of the dependent files are not available in the current working directory.
Your remote or cloud-based job submission file type requires a journal file. For Journal Details, you can select Default where a basic default journal file (using case settings to initialize and solve the case) is created as part of the job submission to the cloud. Alternatively, you can select Custom to choose a journal file of your own to be submitted to the cloud.
Note: When using custom journals, to make sure that the Fluent session is
closed properly if any error in encountered during journal replay, you
should set a batch option in the custom journal and set "exit on
error" to a value of "yes".
For Output File Details, you can choose whether to Keep All Output Files or to Keep Specific Output Files. When you desire to keep specific output files, you can provide their names (separated by commas) in the List Of Files field.
From within your Ansys Fluent session, to view existing jobs on the cloud, in the Solution tab, under Ansys Cloud, click View Jobs.
![]() Solution → Ansys
Cloud → View Jobs
Solution → Ansys
Cloud → View Jobs
This displays the View Jobs dialog box where various jobs can be reviewed and managed accordingly.
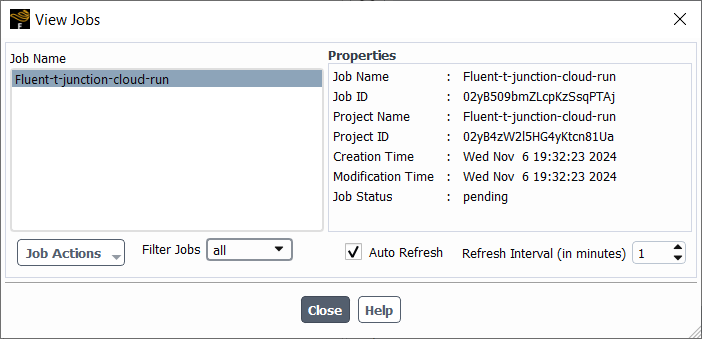
Select from various jobs using the Job Name list, and view their corresponding Properties. For any selected job, you can choose to:
- Job Actions
Perform various actions upon the selected job, such as:
- Open Job in Web Portal
Opens the current job in the Ansys web portal (portal.ansys.com).
- Interrupt Job
Interrupt the selected job execution.
- Abort Job
Stop the selected job execution.
- Download All Files
Download all files associated with the selected job.
While downloading files, progress can be tracked in the progress bar. Downloading files is a separate process and the main Fluent session remains useable. Consequently, when downloading multiple files, the files are downloaded sequentially (and separately) for all selected jobs.
- Download Specific Files
Download certain specified files associated with the selected job.
- Delete Job
Removes the selected job and its corresponding files.
- Filter Jobs
Provides a means to filter various types of jobs, such as those that are pending, prolog, running, evaluated, failed, timeout, aborted, or all.
- Auto Refresh
With the View Jobs dialog box still open, this field allows you to obtain the status from the Cloud of the jobs displayed in the dialog according to the number of minutes set in the Refresh Interval field.
When you save your job submission settings and submit your Ansys Fluent job(s) to the cloud, your work can be monitored using Ansys Cloud (portal.ansys.com).
From here, you can view a tabulated collection of cloud projects and their associated jobs. To view the details of a particular project, select it in the table to display more information related to the selected project.
For more information about Ansys Cloud Burst Compute, refer to the Ansys Cloud online documentation.