


In order to send RSM jobs or transfer job files to a remote Linux machine using SSH, you must configure SSH to allow access from a Windows machine. SSH configuration involves creating a cryptographic key on the Windows RSM client and placing public portions of the key on the Linux machine.
Note: SSH configuration must be completed by your IT administrator. This section provides instructions for a PuTTY SSH implementation. Other SSH implementations are possible, and your IT administrator can determine which one is best for your site.
Download and install PuTTY.
Download and install PuTTY from the following location: http://www.chiark.greenend.org.uk/~sgtatham/putty/download.html
If this link is invalid, perform a web search for "PuTTY".
Create a cryptographic key.
Create a cryptographic key using PuTTYGen (puttygen.exe) as follows:
On the PuTTY Key Generator dialog box, click .
Change the Key comment to include your machine name and Windows username.
Do not enter a key passphrase.
Save the private key file without a passphrase.
For example, <drive>:\Program Files\Putty\id_rsa.ppk.
If you use a pass phrase, jobs will hang a prompt for you to enter the pass phrase. Be sure to secure the private key file using some other means. For example, if only you will be using the key, save it to a location where only you and administrators have access to the file, such as your My Documents folder. If multiple users share the same key, allow the owner full control, then create a group and give only users in that group access to this file.
If your Linux cluster uses OpenSSH, convert the key to OpenSSH format by selecting in the PuTTY Key Generator dialog box.
Move the public portion of the key to the Linux machine. This requires you to edit the ~/.ssh/authorized_keys file on the Linux machine as follows:
Open an SSH session to one of your cluster nodes, cd into ~/.ssh, and open the authorized_keys file in your favorite editor (for example,
viorEmacs).Copy all the text from the box under Public key for pasting and paste it into ~/.ssh/authorized_keys. All of this text should be one line.
If the authorized_keys file does not exist, create one. Alternatively, paste it into a text file and move that file to the Linux machine for editing.
Modify system environment variables.
Open the Windows System Properties dialog box.
On the Advanced tab, select Environment Variables. The Environment Variables dialog box appears.
In the Environment Variables dialog box, locate the Path variable in the System variables pane.
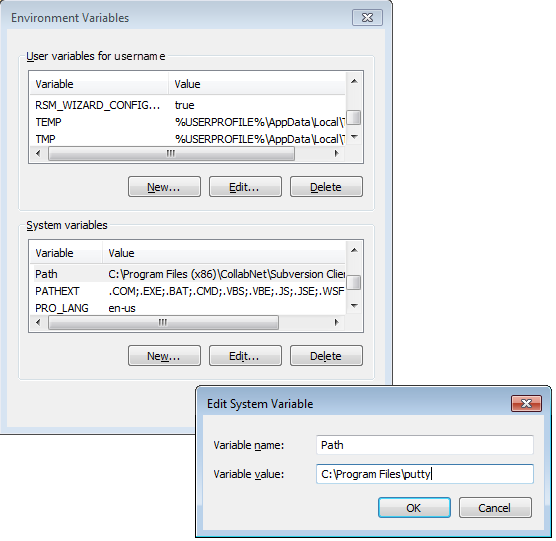
Select the Path variable and then click the button. The Edit System Variable dialog box appears.
Add the PuTTY install directory to the Variable value field (for example, C:\Program Files\putty) and then click .
In the System variables pane, click the button. The New System Variable dialog box appears.
In the New System Variable dialog, create a new environment variable named KEYPATH with a value containing the full path to the private key file (for example, <drive>:\Program Files\Putty\id_rsa.ppk).
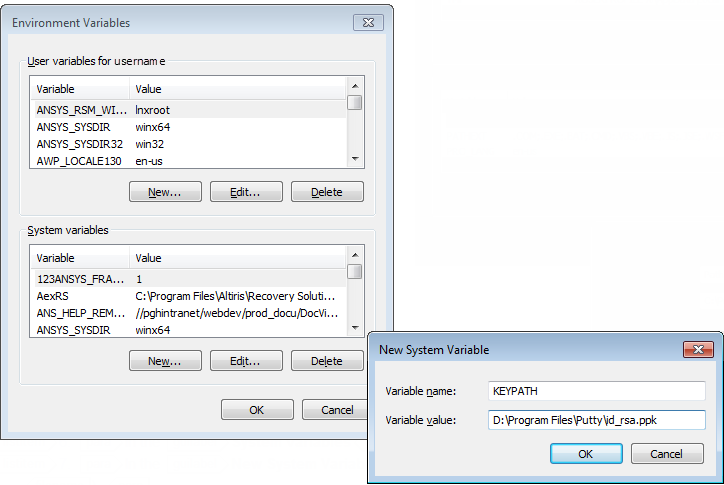
Use a user variable if the key file is used only by you. Use a system variable if other users are sharing the key file. For example, if a Windows 7 user has a key file in My Documents, the variable value should be %USERPROFILE%\My Documents\id_rsa.ppk (this expands to <drive>:\Documents and Settings\<user>\My Documents\id_rsa.ppk).
Click .
Reboot the computer for environment changes to take effect.
Perform an initial test of the configuration.
Run the following from the command prompt (quotes around %KEYPATH% are required):
plink -i "%KEYPATH%" unixlogin@unixmachinename pwd
When prompted by plink:
If plink prompts you to store the key in cache, select .
If plink prompts you to trust the key, select .