


Creating a Circular Pattern
-
Click the
 Circular tool in the
Insert group on the Design
tab.
Circular tool in the
Insert group on the Design
tab.
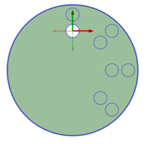
Example:
The image below shows the preview for a two-dimensional pattern. For
one-dimensional, only the Angular direction is displayed. Clicking the arrows
flips their direction 180-degrees.
You can create circular patterns on cylindrical faces, both around the face and along the axis.