

To configure RSM to integrate with the cluster, you will perform the following steps:
Perform the following steps to create a configuration for the custom cluster in RSM:
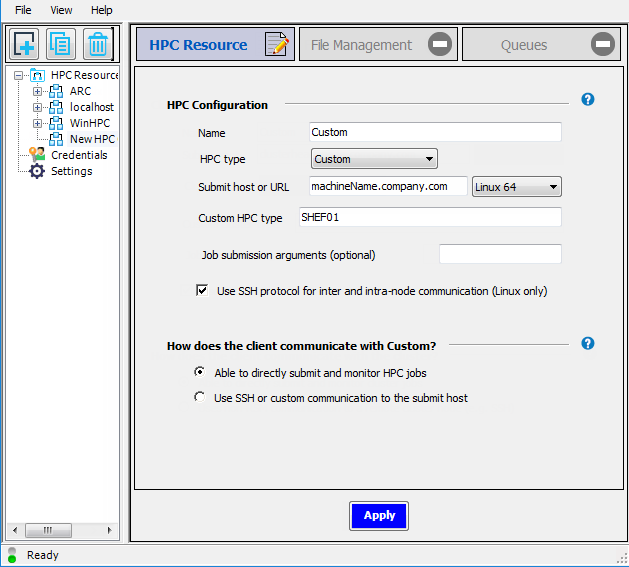
Launch the RSM Configuration application.
Click
 to add a new configuration.
On the HPC Resource tab, in the Name field, give the new cluster configuration a unique name, such as
Custom.From the HPC type dropdown, select .
In the Submit host or URL field, enter the full domain name of the cluster submit host (for example,
machineName.company.com), then select the OS of the submit host from the adjacent dropdown.In the Custom HPC type field, enter
SHEF01(or your custom keyword).Optionally enter any Job submission arguments that you would like RSM to pass to the cluster. Refer to your specific cluster’s documentation for the exact commands that can be used here.
If you do not have RSH enabled on the cluster, then check Use SSH protocol for inter and intra-node communication (Linux only). This means that the remote scripts will use SSH to contact other machines in the cluster.
A “custom cluster integration” means that you are running in non-SSH mode. Therefore, select Able to directly submit and monitor HPC jobs.
Click .
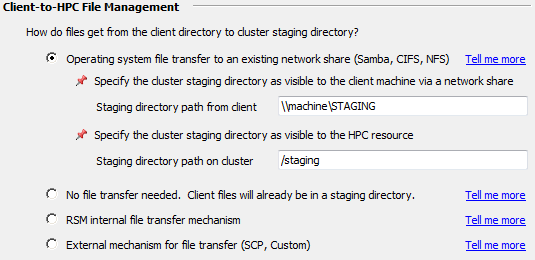
Select the File Management tab.
In the Client-to-HPC File Management section, select the file transfer method that is appropriate for your setup:
- Cluster Staging Visible
If a client can “see” the Linux cluster staging area via a network share, Samba share, or mapped drive, select Operating system file system transfer to existing network share (Samba, CIFS, NFS). With this option, RSM will (attempt to) copy jobs to and from the cluster staging directory using native OS “copy” commands.
In the Staging directory path from client field, specify the path to the shared file system as the RSM client sees it. A Windows client will see the shared file system as a UNC path (for example,
\\machine\STAGING). A Linux client will mount the cluster staging directory (for example,/mounts/cluster1/staging).In the Staging directory path on cluster field, specify the path to the shared file system as the cluster sees it (for example,
/stagingon a Linux machine). This maps the client-visible path to the cluster-visible path. For example, the Windows client sees\\machine\STAGINGwhich is a Linux Samba share of/staging.All of the nodes and the client machine (the one submitting the job) should be able to access this share.
- Cluster Staging Not Visible
If a client cannot “see” the Linux cluster staging area, select RSM internal file transfer mechanism, then specify the path to the staging area in the Staging directory path on cluster field (for example,
/path/to/shared/cluster/directory). With this option, RSM will use TCP sockets to stream files from the client machine to the submit host machine.When transferring files to a single node cluster, it may not be necessary for the staging directory to be a shared path.
This directory must be visible to all cluster nodes.
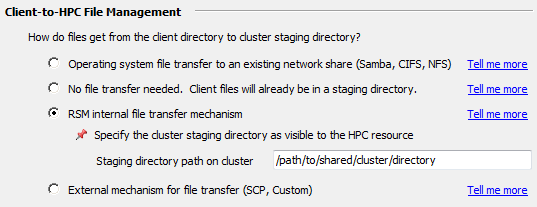
You will need to copy an example transfer script (or modify/write your own) such as transfer_<YourKeyword>.py.
In the HPC Side File Management section, specify the working directory in the cluster where job (or solver) commands will start running.
If jobs will run in a Scratch directory local to the execution node(s), specify the path of the desired local scratch space on the cluster. This local scratch directory must be exactly the same location on all of the nodes, should not be shared, and should be in the form of
/path/to/cluster/nodes/individual/scratch.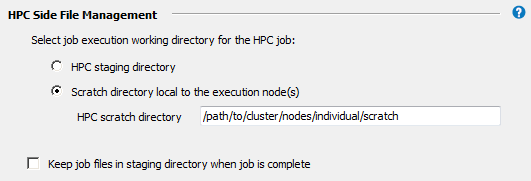
By default, job files will be deleted from the cluster staging directory after the job has run. Choosing Keep job files in staging directory when job is complete may be useful for troubleshooting failed jobs. However, retained job files will consume disk space, and require manual removal.
Click .
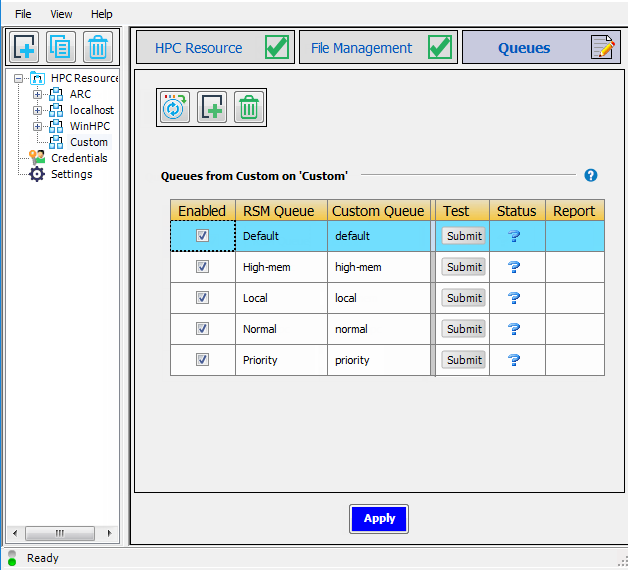
Select the Queues tab.
Click
 to import the cluster queues that are defined on the cluster submit
host.
to import the cluster queues that are defined on the cluster submit
host.By default, the RSM Queue name, which is what users will see when submitting jobs to the cluster, matches the cluster queue name.
To edit an RSM Queue name, double-click the name and type the new name. For example, in the sample queue list below, you could change the name of the
Priorityqueue to High Priority to make the purpose of that queue more clear to users. Note that each RSM queue name must be unique.For each RSM Queue, specify whether or not the queue will be available to users by checking or unchecking the Enabled check box for that queue.
If you have not done so already, click to complete the configuration.
This step is a test to verify that RSM is working correctly. If the test fails, you must resolve any errors before continuing with this tutorial. Administrative privileges are required to perform these steps.
To ensure that RSM can submit jobs to the cluster, submit a test to an RSM queue by
clicking  in the queue's Test column.
If the test is successful, you will see a check mark ( ) in the Status column once the job is done.
If the test fails ( ):
):
Check to see if any firewalls are turned on and blocking the connection between the two machines.
Make sure you can reach the machine(s) via the network.
Add RSM ports to the firewall as needed. If you have a local firewall turned on, you will need to add port 9242 to the firewall exceptions for launcher.exe.