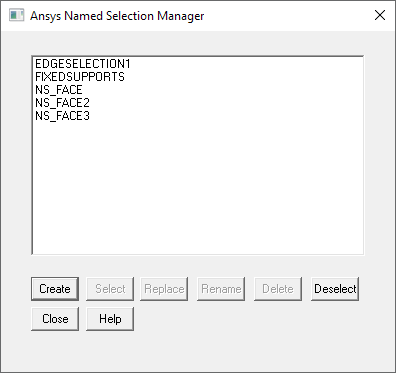
Use the Ansys Named Selection Manager to create custom attributes with CAD systems for modeling, meshing and performing analysis within Ansys Workbench.
This mechanism is activated by selecting the Named Selection Manager menu item from the current Ansys release menu inside the CAD system (with the exception of Creo Elements/Direct Modeling and CATIA).

The Named Selection Manager displays groups created only in this tool but the Plug-in will continue to support those previously imported in earlier Ansys releases. The Named Selections are always listed alphabetically. The Named Selection Manager supports defining Name Selection Groups within CAD through the following operations.
Create: Pre-select entities to designate for the NS Group, click "Create" button and designate a name for the group. Some CAD systems (for example Solid Edge and NX) allow the selection between the Create and Naming operations.
Delete: Select a group from the Named Selection Manager list followed by clicking the "Delete" button. The Delete option allows you to delete the chosen named selection. Note that a confirmation dialog box does not appear before that deletion.
Rename: Select an entry from the Named Selection Manager group list, click "Rename" and supply a new group name. The Rename option allows you to change the name of the selected group.
Replace: Pre-select entities to compose the Named Selection, click "Replace". The newly selected set will replace the entities in the Named Selections. No previous entities will remain except those which were selected at the time of the "Replace" operation.
Select/Deselect: Help tools which allow for verification of a Named Selection Group’s contents.
Close: Closes the existing Named Selection Manager dialog.
Help: Opens Ansys Workbench help.
Note that in the case of NX, the geometry selection dialog box will prompt you when to click the Select option. To modify a named selection, select the entry in the list and click the Replace option. The geometry selection dialog box will pop up again to let you modify the selection created earlier.
Named Selection Import based on Entities
A check mark represents entities that are supported by the CAD system in the first column.
| CAD System | Vertex | Edge | Face | Body | |
|---|---|---|---|---|---|
| Autodesk Inventor | Part Level | √ | √ | √ | |
| Assembly Level | √ | √ | √ | ||
| DesignModeler | √ | √ | √ | √ | |
| CATIA V5 | Part Level | √ | √ | √ | √ |
| Assembly Level | √ | √ | √ | √ | |
| Creo Parametric | Part Level | √ | √ | √* | |
| Assembly Level | √ | √ | √* | ||
| Solid Edge | Part Level | √ | √ | √ | |
| Assembly Level | |||||
| SOLIDWORKS | Part Level | √ | √ | √ | √ |
| Assembly Level | √ | √ | √ | ||
| NX | Part Level | √ | √ | √ | |
| Assembly Level | √ | √ | √ | ||
* Supported for Creo 7 and 8 (by implication not 6).
To create named selections within a CAD system for importation into Ansys Workbench:
From an active CAD session, select the element (for example faces) of the model to which you want to apply a named selection to the Named Selection Manager.
Select Named Selection Manager from the Ansys drop-down menu to display a dialog box.
Select Create to display a second dialog box (Name Input Dialog).
Enter a name for the selected element. Select OK to list the name in the Ansys Named Selection dialog box.
Highlight the Named Selection to activate the Select, Replace, Rename, and Delete options in the dialog box. Choose an option, and select Close.
Import the active model into the desired application making sure to set the Named Selections preference on and the Named Selections Key matching the desired sets for import.
Select Workbench from the Ansys drop-down menu to start an Ansys Workbench session.
The CAD system icon in the Geometry cell of the Project Schematic indicates the model is loaded. Right-click the Geometry cell to select Edit, or double-click cell.
Choose desired length in the Units dialog box, and select OK. An object named "Attach1" appears in the tree outline.
In the Details View, select Yes to Import Named Selections.
In the Details View, the Named Selection Key must match the CAD system prefix.
Select Generate on the 3D features toolbar to complete the Attach feature. The Named Selection created in the CAD system appears under the "Attach1" object in the tree outline.


