


After unpacking the demonstrator package into a convenient location,
you need to put that folder on optiSLang’s scan list of
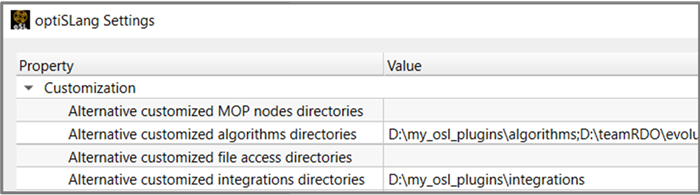
integration plugins. This can be done by adding the folder path under
Customization – Alternative customized
integration directories in global settings. (This corresponds
to the key SC_AlternativeCIDirectories in the optiSLang
configuration file.) An alternative way to control the reach of the
plugin scan exists via setting an environment variable
OSL_ALT_CI_SEARCH_DIRS.
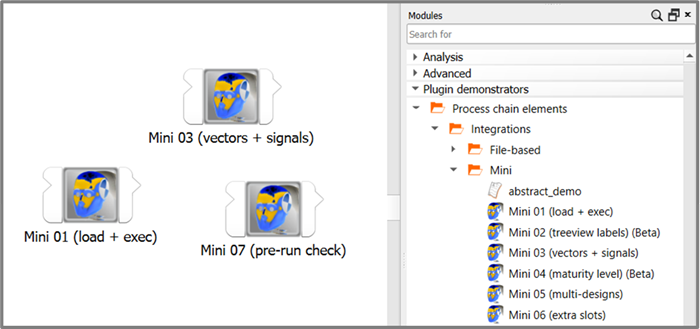
Please note that, as optiSLang scans plugin folders only during startup, it may be necessary to close all running instances and restart the program. After being scanned and loaded, the demonstrator nodes will appear in the modules library, and you will be able to instantiate nodes by drag-and-dropping them into the scenery.
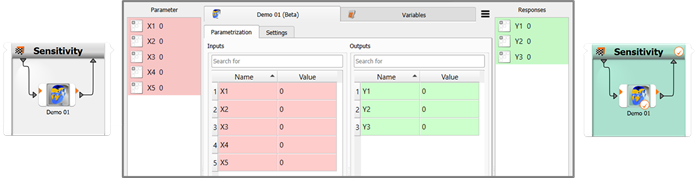
For many demos it is in principle only necessary to register parameters on the input side. Registering outputs is generally optional for integration nodes. Once required inputs are registered, the nodes can be successfully executed.
Using a node for running only one single design is always a weaker test than running multiple parameter variations. In practice, it makes therefore sense to skip the plain parametric system and pick some algorithm system. Either a sensitivity or a robustness system will make a lot of sense for most prospective plugin authors as the default toy during development work because a small sample size can be configured (dynamic or as start designs table) and wait and process times for subsequent algorithm iterations avoided. Another important drag factor which should be switched off: the auto-save function in project settings.
Once a demo node has proven to be able to produce successful designs, you're invited to conduct further experiments. Some ideas: unregistering parameters, reregistering them as slots, increasing the degree of parallelism (DoP) or the multi-design group size, packing more nodes into the parametric system, creative wire connections, conditional execution options, computing derived output quantities in a calculator tab of a node edit window, and so on.
The additional steps have to do with putting in place a useful work folder structure with contents representing a "solved reference project with output data" to which a file-based node can be linked.
For working with the demo nodes in the second series labeled "file-based", a possible folder structure with a freshly created optiSLang project besides the full reference folder can look like this:
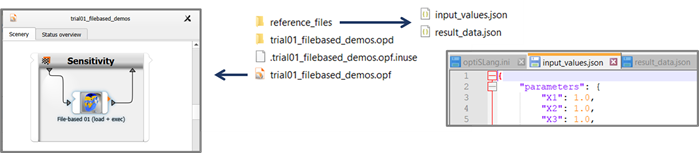
The two files in the reference folder are representing a "solved project" with output data being available. The file input_values.json represents a project file or input deck. The file result_data.json represents output of a solved project. If you set up a demo node by linking it with a matching input deck, you will generally be able to see the listings of detected inputs and outputs.
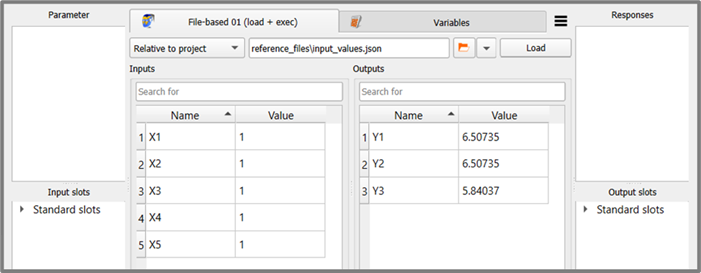
Now you are ready to register parameters and responses (or also slot connections) and start experimenting with the demo nodes.
Once you add the line print('Hello!') anywhere in the
code of a demo node, you become an optiSLang plugin developer. Taking
one of the demo nodes and starting with incremental modifications is
indeed an easy way to start developing own integration plugins.
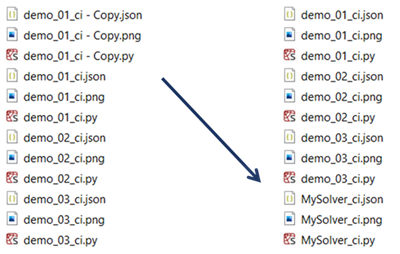
If you want to systematically derive your own plugin node from one of the demo nodes, the sequence of steps could begin with copying the files, renaming them, and setting up a dedicated new plugin folder for your work.
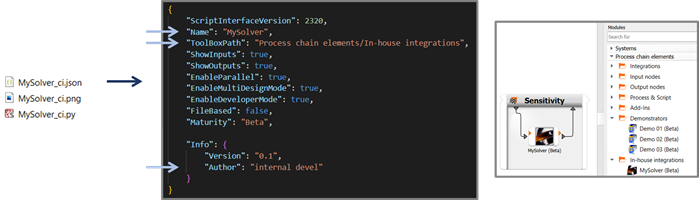
As a next step, you should open the JSON configuration file and update all relevant entries. By using a new icon and coining a useful new value for the entry ToolBoxPath in the config file, you can make it easier for your colleagues and yourself to spot and pick the new plugin in the modules library.
Now you are all set for starting your own plugin development. You have a functional integration node, and by incremental small step-by-step modifications you can bring it closer and closer to your final application needs. The advantage of this approach is that incremental changes are easier to debug than a plugin written from scratch.