


Fluent can be coupled with Ansys Maxwell within Workbench in order to perform either a one-way or a two-way electromagnetic-thermal interaction problem. Coupling between Maxwell and Fluent applications within Workbench can be used for applications such as simulating fluid flow around or inside electromechanical (EM) devices, when the temperature of the device is influenced by electromagnetic or electrical losses.
Maxwell is supported for one–way and two-way coupling between Maxwell and Fluent in Workbench.
Additional information can be found in the following sections:
The coupling involves solving an electromagnetic problem in Maxwell, and mapping the resulting volumetric and/or surface loss information into Fluent. Volumetric loss is mapped onto the cell zones as a heat source (load) at the cell centroids that is then added to the energy equation. Surface loss is applied to the adjacent cells of the solid zones that contribute to the source terms of these cells.
Note: Surface loss is highly concentrated near the surface of the solid zone, so it is recommended that you have a layer of good quality hexahedral or prism mesh elements located where surface loss occurs.
Note: You can analyze the results of volumetric/surface losses using the following postprocessing variables:
Volumetric loss: Temperature EM Source (
 )
)Surface loss: Temperature EM Surface Source (
 )
)
The overall workflow for an Maxwell-Fluent analysis is as follows:
Create and solve the electromagnetic application using Maxwell.
Drag and drop a Fluent–based system and import a case or mesh file into Fluent, and then double-click the Setup cell to start Fluent.
Note: If you import a mesh into Fluent that was generated using non-SI units, then you should scale and/or translate the mesh before you perform any coupling with Maxwell.
Drag and drop the cell of the Maxwell system onto the Setup cell of Fluent system to enable the data transfer.
Update the Solution cell of the Maxwell system.
Refresh the Setup of Fluent system.
Specify the EM settings in Fluent (File/EM Mapping).
Set up the Fluent analysis as you normally would (for example, specify boundary conditions, solution settings, and so on).
Solve the Fluent analysis.
During EM mapping, Fluent automatically turns on the energy model, if you have not already done so.
Note: In 2D axisymmetrical cases only, Maxwell uses the RZ (or XZ) plane while Fluent uses the XY plane by default. Therefore, when you export a geometry from Maxwell, you need to rotate the geometry in order for Fluent to mesh the geometry before EM mapping can take place properly. This is not a concern for regular 2D or 3D cases. If you use Ansys DesignModeler, rotate the geometry exported from Maxwell by performing the following steps:
Define a new plane based on the XY plane, applying a 90 degree rotation along the X axis, and a 90 degree rotation along the Y axis.
Move the geometry from the XY plane to the new plane.
If you use SpaceClaim (Windows only), follow the steps below:
Make sure that the world origin is displayed ( > > > ).
In the Design ribbon tab, select the Orient tool (Assembly group).
Select an edge of the geometry you want to rotate and then select a global axis.
The geometry will be rotated so that the selected edge is aligned along the selected global axis.
Two-way coupling enables thermal feedback to be provided between the systems so that you can exchange temperature data from Fluent to Maxwell within Workbench.
Aside from the basic workflow described in Performing Fluent and Maxwell Coupling in Workbench, to enable two–way coupling between Fluent and Maxwell, you should perform the following steps:
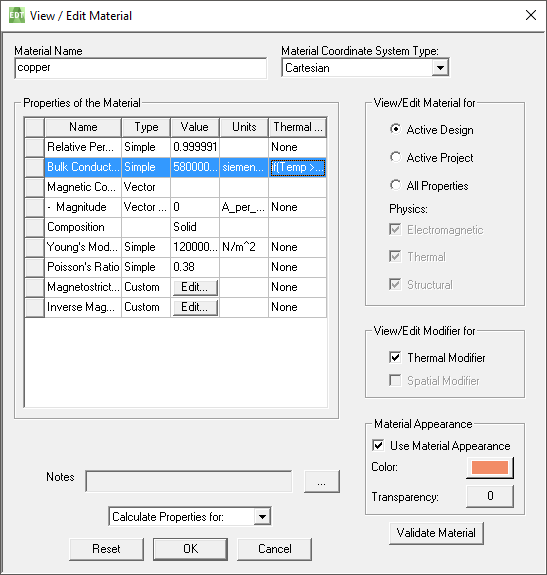
Open the Maxwell project and define temperature–dependent material properties (enabling the Thermal Modifier field in the View/Edit Material dialog box and editing the material’s thermal property definition). This makes sure that the Maxwell and Fluent applications generate the temperature–dependent data.
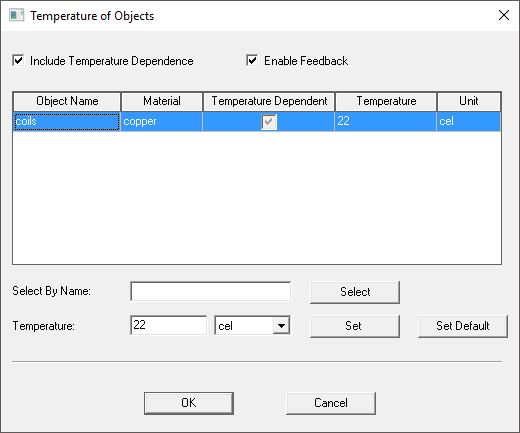
Select the Enable Feedback option in the Temperature of Objects dialog box.
Maxwell 3D → Set Object Temperature...
Once Maxwell generates the centroid file, Fluent detects the centroid file, and generates the temperature file as feedback data and places the file in the appropriate location. An example of what Fluent displays in the console window is presented below:
Starting Thermal feedback for EM ...

Reading centroid file... Number of Nodes = 4031
Writing mechanical.ths...
Note: In Maxwell, you can have different losses (Ohmic loss, Core loss, Hysteresis loss) depending on the type of simulation. Maxwell can also compute the "total loss" which is the sum of all the losses when appropriate. All the different losses mentioned above including the "total loss" are a function of space and they are also a function of time in the Maxwell transient solver. When doing the coupling simulation, the "total loss" is mapped to Fluent for the temperature calculation. For transient simulations, the total loss is time averaged between two times that you specify before it is mapped to Fluent.
You can perform automatic system updates (coupling iterations) using the Maxwell Feedback Iterator. Refer to the Maxwell help documentation for more information on Feedback Iterator.
You can also perform manual cyclic updates of individual system components until the solution stops changing within a desired level of tolerance. For example:
Coupling Iteration 1
Update Maxwell Solution cell
Perform EM Mapping on solid zones in Fluent
Update Fluent Solution cell
Perform Enable Update on Maxwell Solution cell
Update Maxwell Solution cell
Coupling Iteration 2
Update Fluent Setup cell
Update Fluent Solution cell
Perform Enable Update on Maxwell Solution cell
Update Maxwell Solution cell
Coupling Iteration 3
Update Fluent Setup cell
Update Fluent Solution cell
Perform Enable Update on Maxwell Solution cell
Update Maxwell Solution cell
Coupling Iteration 4
Update Fluent Setup cell
Update Fluent Solution cell
Perform Enable Update on Maxwell Solution cell
Update Maxwell Solution cell
and so on
Within the Workbench environment, you can create a script to accomplish these tasks. Workbench scripts are written in the Python programming language and can be created, modified and executed with tools available in Workbench. For more information on writing scripts in Workbench, see Workbench Scripting Guide in the Workbench Scripting Guide. You can contact your support representative to obtain a sample script.