If a Viewport is in Camera Mode (see Tie Viewports to Camera in Global Transform) the viewport will be viewed through the camera chosen. Any global transforms that have been created for the viewport are ignored and any transforms performed will be for the camera selected.
Also see View a Viewport Through a Camera.
- Rotate Toggle
- Interactive Rotation
When transform action selected is rotate, then clicking the left mouse button and dragging horizontally in a viewport that is being viewed through a camera will rotate the camera about the Camera Y axis. Holding Ctrl down and then clicking the left mouse button and dragging will rotate the camera about the Camera Z axis.
- Precise Rotation
When the Transformation Editor is open under Camera and the Rotate toggle is selected, the dialog will be configured to permit precise Rotation of the selected camera(s). You may rotate the selected camera(s) selected precisely about the X, Y, Z, or All camera axis by clicking on the appropriate axis of rotation toggle and entering the desired rotation in (+ or -) degrees in the Increment field and pressing Enter, or by clicking the stepper buttons at each end of the slider bar (each click will rotate the camera by the number of degrees specified in the Increment field), or by dragging the slider in the positive or negative direction to the desired number of degrees you wish to rotate.
Note: The Limit Field specifies the maximum number of degrees of rotation performed when the slider is pulled to either end of the slider bar.
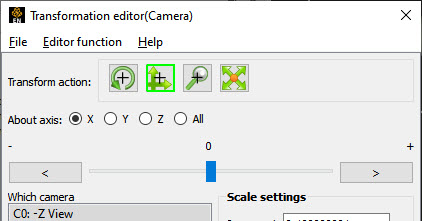
- Translate Toggle
- Interactive Translation
When the transform action is translate and the translate icon is highlighted, then, clicking the left mouse button and dragging in a viewport that is being viewed through a camera will translate the camera left/right, or up/down (or by holding Ctrl, in/out).
- Precise Translation
When the Transformation Editor is open under Camera and the Translate toggle is selected, the dialog will be configured to permit precise Translation of the selected camera(s).
You may translate the camera(s) selected precisely about the X, Y, Z, or All camera axis by clicking on the appropriate axis of translation toggle and entering the desired translation in (+ or -) model coordinate units in the Increment field and pressing Enter, or by clicking the stepper buttons at each end of the slider bar (each click will translate the camera by the number of units specified in the Increment field), or by dragging the slider in the positive or negative direction to the desired number of units you wish to translate.
Note: The Limit Field specifies the maximum number of units in model coordinates performed when the slider is pulled to either end of the slider bar.
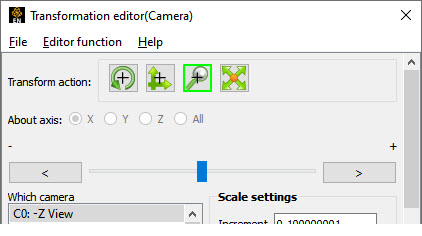
- Zoom Toggle
- Interactive Zooming
When the transform action is zoom then clicking the left mouse button and dragging in a viewport that is being viewed through a camera will move the camera in the camera z-direction. The result is exactly the same as if you translated the camera in the z-direction using the Translate Toggle.
- Precise Zooming
When the Transformation Editor is open under the Camera and the Zoom toggle is selected, the dialog will be configured to permit precise Zoom operations of the selected camera(s).
You may zoom the camera(s) (moving the camera in the camera z-direction) selected precisely by entering the desired camera z-axis movement in (+ or -) model coordinate units in the Increment field and pressing Enter, or by clicking the stepper buttons at each end of the slider bar (each click will translate the camera in the z camera axis direction by the number of units specified in the Increment field), or by dragging the slider in the positive or negative direction to the desired number of units you wish to move
Note: The Limit Field specifies the maximum number of units in model coordinates performed when the slider is pulled to either end of the slider bar.
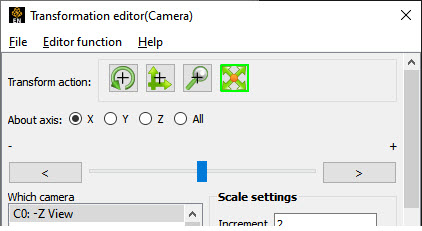
- Scale Toggle
When the Transformation Editor is open under Camera, and the Scale toggle is selected, the dialog will be configured to permit Scale operations of the selected camera(s).
A Scale operation of a camera does not affect the transformations that are occurring in the viewport - they affect the size of the camera glyph. You may modify the size of the camera glyph by selecting the X, Y, Z, or All axis (they will all perform the same camera resize operation) toggles and then entering the desired camera glyph scale factor in the Increment field and pressing Enter (values < 1 will make the camera glyph smaller while values > 1. will make it larger), by clicking the stepper buttons at each end of the slider bar (each click will scale the camera glyph up/down by the factor specified in the Limit field), or dragging the slider in the positive or negative direction to scale the camera up or down
Note: The Limit Field specifies the maximum scale factor performed when the slider is pulled to either end of the slider bar
.
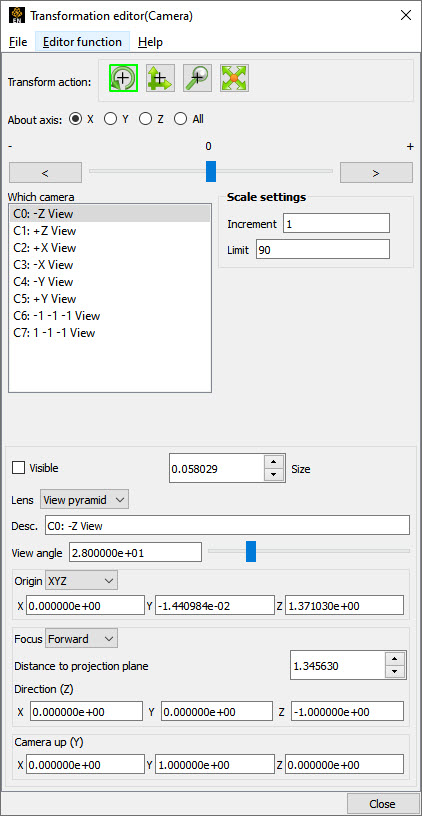
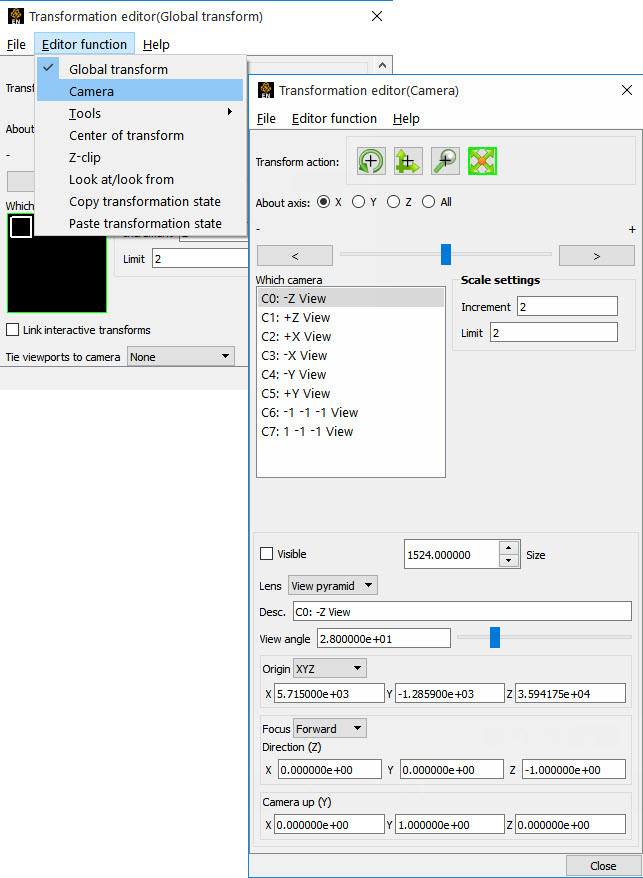
- Which camera
Selects the camera(s) being modified
- File → Restore Camera Position
This opens the Restore camera dialog which allows you to specify the name of a file in which a camera location and orientation is specified Camera Orientation File Format.
- Visible
Sets the visibility of the camera(s) selected
- Size
Sets the size of the camera glyph for the selected camera(s). Size is in model coordinates.
- Desc
Description of the camera.
- Lens
View pyramid will show the view constraints if the camera were used to view the viewport. Classic shows a classical lens on the camera with no hint of the view volume.
- View Angle
The view angle in degrees that will be used with the camera. Small values decrease the view angle and simulate a telephoto lens while large values increase the view angle and simulate a wide angle lens. Current limitation is 5 < view angle < 120
- Origin
Sets the camera origin
- XYZ
The model coordinates of the camera
- Node
Sets the Camera origin at a specific part node id number
- Spline
Set the Camera origin to lie on a defined spline
- Offset
If the Origin is set to Node or Spline it is possible to offset the origin from the node or spline by a XYZ value
- Focus
Defines the orientation of the camera
- Forward
If the origin is Spline then focus is forward on the spline. If the origin is not Spline then the focus is defined by the Direction(Z) fields.
- Node
Set the focus to a specified part and node id
- XYZ
Set the focus to a specific location
- Camera up (Y)
Sets the vector defining the tilt of the camera. Will be adjusted if the Focus is set to Node or XYZ to form a right handed orthogonal coordinate system.