


To aid in setting the various light locations, types, and parameters, an Apply preset lighting group list is provided at the top of the Light Source Editor dialog:
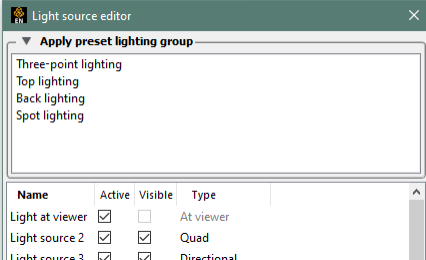
There are four presets that have been provided to set a few lights easily, based on your current view. Three-point lighting creates a Quad, Directional, and Spot light. The quad light is from the top left, the directional is horizontal from the right, while the spot light is horizontal from the left. The Top lighting preset creates two lights (Quad and Directional) above from the top and left. Back lighting creates two Quad light types from the top (behind and front right). Spot lighting creates a spot and directional light from top right aiming down, and direction light from the left.
To use these presets, manipulate your model to a particular view, then single left-click one of the presets to set the lights as such. The location of the lights are relative to your current view when you select them. To easily move those lights, you might adjust your view, and select the preset again to manipulate the location of the lights to a more desirable location.
Recognize that these are simply presets. They are shortcuts to define lights in those locations. You can manually adjust the light parameters to improve their location/type/intensity to suit your needs.
The preset application also makes the glyph of the light visible (so that you can see their position and potentially modify). You can turn off the visibility of the glyphs to remove their display from the viewport.
Note: One side effect of using the presets, is that the main light at the viewer has its
intensity turned down low (so that the other lights’ effects are prominent. If you
attempt to turn off the additional lights set from a preset action, you will need to adjust the
Intensity of the Light at viewer back to
1 to return to default lighting.
Preset lighting groups are preset conditions of multiple lights used to simplify the task of setting up multiple lights for the scene. Each preset consists of a combination of the activation of lights and the modification of the lights’ types, location, direction, and intensities. To use a preset, select one from the Apply preset lighting group list.
These presets are relative to the current camera position (for example, adjustment of the camera’s view of the scene and re-application of the preset will cause those lights to move). Selection of a preset group will apply/override the currently defined lights. Any current light definitions will be changed based on the number of lights and the light attributes defined for each preset in the group. All lighting attributes can be adjusted along with adding additional or deactivating certain lights. However, the next time you select a preset all lighting will be reset to the definition contained in the preset.
See Light Source Editor for a description of each lighting preset group.
Note: Each preset light group turns down the Intensity of the default light
at the viewer to a relatively small value (0.05).
The following light source options allow you to create your own light sources rather than using already-defined presets:
Active
Toggle on if you want the light source to cast light in the scene.
Visible
Toggle on if you want to see a glyph representing the light source in the scene.
Glyph Size
Sets the size of the glyph if the light source is visible.
Type
Set the light source type. The light source types are:
Directional
This light source is defined by a direction and does not attenuate with distance. You will still have the option to specify a Ray end location for the light, but this is used only for the purpose of specifying a direction - it has no effect on the lighting model. Directional lights often simulate the effect of sunlight, a light source that is effectively infinitely away from the scene.
Spot
This light source is defined as a location, direction, and an angle for the spot. The light attenuates such that the farther away the light is from the geometry, the less effect the light will have (distance squared attenuation).
Point
This light type emits from the light’s location in all directions. Light attenuates based on distance from the light source to the geometry (same attenuation as a spot light). You still define a light direction and ray end location, but these are used only for the purpose of defining the light attenuation distance.
Quad
This light type has light emitting from a quadrilateral area into the half space it faces. The light is defined as a location, direction, and X and Y sizes of the quad in the local model space. The light attenuates such that the farther away the light is from the geometry, the less effect the light will have (distance squared attenuation).
Intensity
Specifies the intensity of the light as a value between 0 to 1.
Color
Selecting the color swatch next to the Intensity slider will bring up a color chooser, allowing you to set the color of the light.
Casts shadows for raytracing
Toggle on if you wish this light source to cast shadows in ray traced image generation.
Location
The coordinate location in model space of the light source.
Get cursor tool position
To simplify source location setup, it is possible to use the current position of the cursor tool (which has options of picking, dragging, and editing via the transformation dialog) to specify either the light’s location or the ray end position.
Ray Normal Direction
The direction of the light ray. For a point light source, the ray direction is used only for the purpose of defining the Ray end location, which in turn defines the distance to the light source for light attenuation.
Ray End
The point the light is pointing towards and defines the light radius used for light attenuation.