


This section describes how to create custom user-defined tools as explained by EnSight Extension Mechanism in the Ansys EnSight Interface Manual. This section assumes familiarity with the Python language, as well as object-oriented programming. Custom tools have the same capabilities as the built-in tools because both are built on the same interface. By default, your custom tools will appear below EnSight's built-in list of tools in the user-defined toolbox.
EnSight includes two well-documented, example Python files to demonstrate the process of creating custom, user-defined tools. As an exercise to show how to customize EnSight, these two files can be moved from their existing location to a directory where they will automatically load into EnSight at startup and change EnSight's tool list.
System directory - Ansys installed tools
EnSight scans for Python tools in the
$CEI/ensight242/site_preferences/extensions/user_defined/Tools directory.
Note: Since EnSight caches the files in this directory in order to speed up the start up process, new tools put in this directory may not be recognized and loaded when you restart EnSight. In that situation, simply restart EnSight from the command line with no preferences and it will reload and recache the python files from this directory.
ensight
                                        -no_prefs
$CEI - python files developed by your company for all your users
EnSight scans the $CEI directory for subdirectories containing a file named product.xml. Python files are loaded in this directory according to the product.xml and internal parentage coding. Contact Ansys support for more details.
Local directory - python files for your own personal use
EnSight then looks in the user specific EnSight Defaults Directory. This directory differs on each platform:
Linux: ~/.ensight242/extensions/user_defined/Tools
Mac: ~/Library/Application Support/EnSight242/extensions/user_defined/Tools
Windows 10: C:\Users\username\.ensight242\extensions\user_defined\Tools
When EnSight finds a candidate Python file, it loads it into a private Python module and calls a factory function specified in the file. The factory function returns a list of objects that are registered with EnSight. The objects can be user-defined tools, menus and widgets, based on the extension class they subclass from. A registry of user-defined tools is maintained by EnSight. It is normally displayed as a tree-list in the noted in the previous section. Applications are free however to invoke any tool using its run method and tools that implement custom command language may be called directly from the command parser, even in batch mode.
In the next two sections, we walk through two simple examples of writing custom EnSight user-defined tools.
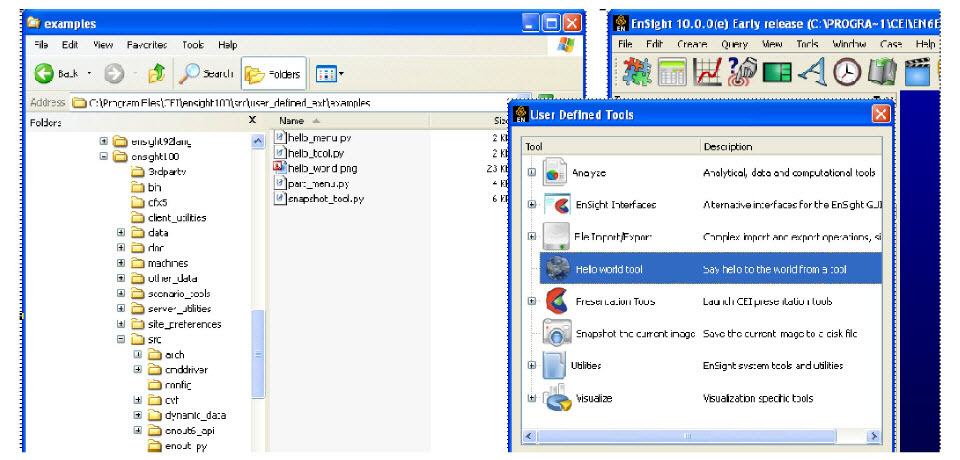
Shown below is perhaps the simplest example tool extension implementation. It can serve as a template for more useful tools. This example Python file is included with your EnSight installation in the following folder $CEI/ensight242/src/user_defined_ext/examples. Copy the entire folder to the extensions/user_defined subfolder under your user specific EnSight Defaults Directory (see above) and restart EnSight. The figure that follows shows the new tool item generated from this Python code, as well as the dialog it generates. It also illustrates the directory structure for placing the files into the user specific EnSight startup path.
Shown below is the commented
Python code. Notice in particular
the block of comment lines starting with #ENSIGHT_USER_DEFINED_BEGIN and ending with #ENSIGHT_USER_DEFINED_END. These specially formatted
Python comments are what EnSight looks for while scanning for
extensions at startup. They specify the name of the function to call
when this file is loaded. That factory function
is responsible for creating instances of the tool objects and
returning them to EnSight.
#
# This comment block is required to identify the file for loading at
# startup by EnSight. The function named by FACTORY= (in this case
# 'ctor' is called by EnSight on startup. Note: the file is loaded
# as a module in EnSight and the path to this file is added to sys.path.
#
#ENSIGHT_USER_DEFINED_BEGIN
#FACTORY=ctor
#ENSIGHT_USER_DEFINED_END
#
# Import the parent class for all user-defined tools and the generic dialog
#
from cei.qtgenericdlg import *
from ensight.core.tool_extension import tool_extension
#
# Define a tool class, a subclass of the tool_extension class
#
class hello_tool(tool_extension):
        #
        # Construct the menu and set up common information
        #
        def __init__(self,parent=None):
                tool_extension.__init__(self,"hello_tool",__file__,1.0)
                self.setText("Hello world tool")
                self.setDesc("Say hello to the world from a tool")
                self.setTooltip("Say hello to the world from a tool")
        if (parent): parent.addChild(self)
        #
        # We have a PNG icon in the same directory as this file
        #
        dir = os.path.dirname(__file__)
        self.setIcon(os.path.join(dir,"hello_world.png"))
   #
   # Method that is called when the tool is selected
   #
   def run(self):
        #
        # Do whatever operation this menu should do, replace with your own code
        # In the example, we use the "generic" dialog to display "Hello world!"
        #
        items = []
        items.append(['textval',ITEM_TEXT,"Hello world!","A tooltip..."])
        dlg = CeiQtGenericDialog(items,None,"Hello world","Ok",cancel=None)
        ret = dlg.doit()
        if (ret > 0):
                #
                # If the user pressed ok, do something...
                #
                pass
#
# Construct a list of menu objects to be added to the global list of
# user-defined tools
#
def ctor(parent):
    list = []
    obj = hello_tool()
    list.append(obj)
return listShown below is a more complex tool example. Again, it can be installed in the same manner as described above and the resulting tool is illustrated in the following image.
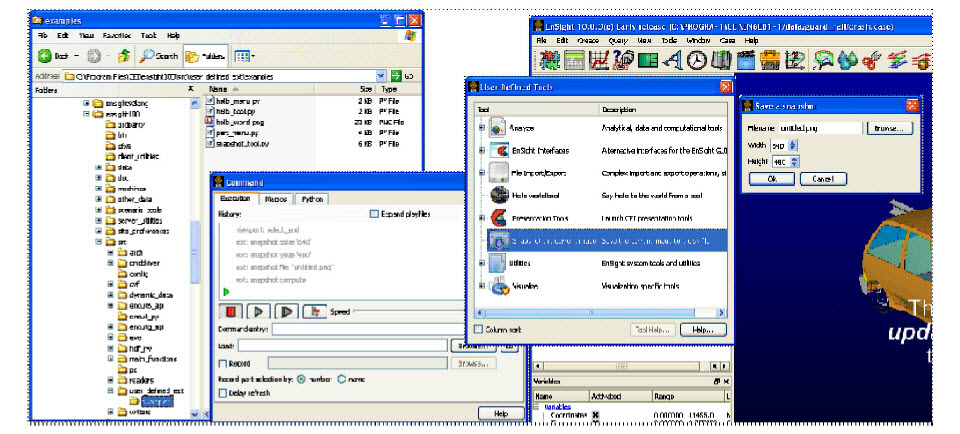
This example builds on the previous one. When the tool is invoked, it brings up a more complex dialog that prompts the user for information including integer parameters and a filename. If the 'Ok' button is clicked, it creates a snapshot of the current rendering and saves it to disk. More importantly, it generates custom command language (shown in the Command dialog window) that when executed in batch mode will perform the same operation. All user-defined extensions (tools, menus, and even "core") automatically extend EnSight command language in this fashion. The super-classes provide a scaffolding that makes it easy to enforce the separation between interface and function. For example, the tool Python file could easily be extended to provide an interface to the same functionality as a user-defined menu by adding a menu_extension subclass to the same file. The example uses an icon from the built-in EnSight icon resources. Finally, this example is "persistent", that is it stores state (in the case the values entered in the dialog) and uses it to repopulate the dialog. A major advantage of EnSight extensions is that they can store state and have both private data and method members.
The basic file structure is the same as before. There is a header block followed by the various class definitions followed by the factory function.
#
# This comment block is required to identify the file for loading at
# startup by EnSight. The function named by FACTORY= (in this case
# 'ctor' is called by EnSight on startup. Note: the file is loaded
# as a module in EnSight and the path to this file is added to sys.path.
#
#ENSIGHT_USER_DEFINED_BEGIN
#FACTORY=ctor
#ENSIGHT_USER_DEFINED_END
#
#
# Import the parent class for all user-defined tools, the ensight module
# and the generic dialog
#
from cei.qtgenericdlg import *
from ensight.core.tool_extension import *
import ensight
#
# Define a tool class, a subclass of the tool_extension class
#
class snapshot_tool(tool_extension):
        #
        # Construct the tool and set up common information
        #
        def __init__(self,parent=None):
                tool_extension.__init__(self,"snapshot",__file__,1.0)
                self.setText("Snapshot the current image")
                self.setDesc("Save the current image to a disk file")
                self.setTooltip("Save the current image to a disk file")
                if (parent): parent.addChild(obj)
                #
                # Create an icon for the menu (this is optional). In this case, we
                # access one of the icons embedded in EnSight itself. See the Qt
                # resource management documentation for details.
                #
                self.setIcon(":/ensight/image")
                #
                # This is where we store the current command language parameters
                # We start with some defaults...
                #
                self._params = {'file':'untitled.png','xsize':640,'ysize':480}
        #
        # A user-defined method that performs the desired operation taking its
        # parameters from a Python dictionary. This method can be called from
        # interactive operation or in batch, so it should not display anything.
        #
        def compute(self,params):
                #
                # Render and save an image to disk. This is only an example.
                # A deeper example can be found in the ensight.core.qtimageutils
                # module found in:
                # <install location>/ensight242/site_preferences/extensions/core/
qtimageutils.py
                #
                img = ensight.render(x=params['xsize'],y=params['ysize'])
                fname = params['file']
                #
                # The render method returns an EnVe image object, simplifying saving.
                #
                if (img.save(fname) == 0):
                        return True
                if (img.errstr().find("Unknown file format") >= 0):
                        fname += ".png"
                        if (img.save(fname) == 0):
                                return True
                return False
        #
        # Method that is called when the tool is selected interactively
        #
        def run(self):
                #
                # Do whatever operation this tool should do, replace with your own code
                # In the example, we use the "generic" dialog to prompt the user for
                # and image size and a filename.
                #
                items = []
                items.append(['file',ITEM_FILE,"Filename",
                        "Name of file to save",self._params['file'],OPT_FILE_SAVE])
                items.append(['xsize',ITEM_INT,"Width",
                        "Width of the image in pixels",self._params['xsize'],10,2048])
                items.append(['ysize',ITEM_INT,"Height",
                        "Height of the image in pixels",self._params['ysize'],10,1536])
                dlg = CeiQtGenericDialog(items,None,"Save a snapshot")
                ret = dlg.doit()
        #
        # If the user pressed ok, we will continue.
        #
        if (ret > 0):
                #
                # Build a dictionary of output values
                #
                for key in self._params:
                        self._params[key] = dlg.getValue(key)
                #
                # Try to perform the operation
                #
                if (self.compute(self._params)):
                        #
                        # The operation succeeded, so we need to record custom
                        # command language to place the operation into the journaled
                        # output.
                        #
                        self.cmdRecord("xsize '%d'" % self._params['xsize'])
                        self.cmdRecord("ysize '%d'" % self._params['ysize'])
                        self.cmdRecord("file '\""+self._params['file']+"\"'")
                        self.cmdRecord("compute")
        #
        # All extensions include the ability to record custom command language
        # and play it back. Remember that extensions should be able to play
        # back their operations in batch mode. This mechanism allows for an
        # extension developer to break interaction and the actual operation
        # into two parts.
        #
        # The cmdExec() method is passed all of the custom command language for
        # this tool. Here we use a trick where we assume that the recorded
        # command language takes the form of actual Python assignment statements.
        # We break up the passed line and use the Python 'exec()' method to
        # recover the information back into a dictionary.
        #
        def cmdExec(self,str):
                p = str.split("'")
                        try:
                                key = p[0].strip()
                                if (key == 'compute'):
                                        self.compute(self._params)
                                else:
                                        exec("d = "+p[1])
                                        self._params[key] = d
                        except Exception as e:
                                print("Error handling the command:{} {}".format(str,e))
#
# Construct a list of tool objects to be added to the global list of
# user-defined tools
#
def ctor(parent):
        list = []
        obj = snapshot_tool()
        list.append(obj)
return listThe example source code shown here is included in the
$CEI/ensight242/src/user_defined_ext/examples
directory, but many other examples exist. The source code to all of
the built-in tools is included in the $CEI/ensight242/site_preferences/extensions/user_defined
directory (perhaps most notably the QuickTools
subdirectory). Other example objects are included in $CEI/ensight242/site_preferences/extensions/user_defined/Tools/QuickTools/Examples.
There are a number of user-defined menu examples included as well.
While these may not be tools, the extension mechanisms for both
tools and menus share a large number of common features and
techniques often work in both. There are a pair of worked tools
examples located in the user-defined tool Advanced
Usage that demonstrate the ability
of all user-defined extensions to be able to create object
hierarchies and to include multiple objects inside of a single
Python module.
To get the most out of this mechanism, menu developers are encouraged to utilize Python scripts and convert command language scripts into Python using the provided tools. The Python interface is documented in the Interface manual Python EnSight module interface.