Creating and Editing a Solid

  1. Click Pull in the Edit group on the Design tab or press P.
    Hover over faces and edges in your design to preview the natural Pull direction. If your mouse is over multiple faces or edges, use the scroll wheel to preview the Pull direction for each one.
  2. Select the faces, edges, and points you want to pull to create 3D solids or surfaces.
    You can right-click in the Design window and select Anchor Pull Handle, then click to anchor the Pull handle on another object. This command is useful when you want to dimension a Pull from a different location than the center of a face.
    If the Pull arrow appears gray instead of yellow, then the object is locked and can't be pulled unless you unlock it. To unlock an object, right-click the object in the model tree and select Unlock.
  3. (Optional) Alt+click to select the face or edge that will drive the change.
    You can also select the appropriate tool guide, then click the face, point, or edge. The driving edge or face is shown in blue.
    If you want to use an annotation dimension, see Driving modification with annotation dimensions.
    Measurements can also be used to drive modifications:
    1. Enter the Pull tool
    2. Select a face, edge or vertex
    3. Enter the Measure tool (shortcut is "e") and measure any single object or measure between two objects
    4. Click in the Measurement results (hover over measurements to display purple box). Once selected, that single measurement will display on screen with arrows pointing to either object chosen for measurement.
    5. Click in the highlighted dimension box and modify the value for a one-time adjustment of the model or create a Measurement Group which can be modified at any time.
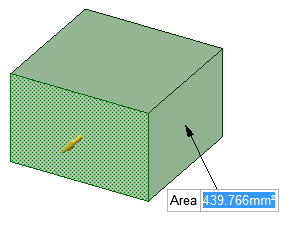
    6. Measurement groups can also be created from Area results. Modifying the group then adjusts the model to produce a desired area. For example, create a Measurement group for the area of a side of a box. While pulling the front of the box, you can enter a new area value for the side to complete the pull.
  4. (Optional) Select options from the Options panel, or right-click and select them from the mini-toolbar.
  5. Click and drag in the direction of the Pull arrow to create or edit a solid.
  6. If the correct pull arrow is not highlighted, press Tab or click the Pull arrow you want to use.
    • Press Shift to snap while pulling.
    • Press the spacebar or click a dimension to enter a value.
    • To dimension the pull, type the distance you want to pull and press Enter. You can also type a dimension in the dimension box in the mini-toolbar.
    • You do not have to click and drag (or even click near) the Pull arrow. In fact, you should move the cursor away from the arrow for more precise control of the pull. The only important input to the Pull tool is the direction in which you are moving the cursor. When you pull, contiguous solids are automatically combined.
    • If you want to pull in a head-on view, use the ruler at the bottom right corner of the Design window to pull instead of the Pull arrow. Slide the gray bar to the left to subtract material, and to the right to add material.
    • If you pull through another object in the same component, the smaller object is merged into the larger one, and receives the larger object's properties. If you pull multiple, touching surfaces, the smaller surfaces are merged into the largest one. Select the No Merge option if you don't want objects merged.
    • Hold the Ctrl key while pulling to create a copy of the object that is offset by the distance you pull. You can also hold Ctrl while revolving to create a copy of a surface. The influence of neighboring faces is taken into account to trim or extend the edges of the copied face, when appropriate. You can use the Up To tool guide with Ctrl to make a copy, and you can use the Both Sides option to make two copies that are offset in opposite directions from the original. You can also use the Up To tool guide to pull surfaces up to a reference edge.
    • Press Esc to cancel the Pull.
    See the topics in the Table of Contents under Designing > Editing > Pulling for the list of actions you can perform with the Pull tool.
Note: To do this faster:
  1. Select the faces, edges, and points you want to work with.

    In general, pulling a face increases the size of the solid, pulling an edge creates a surface, and pulling a point creates a line or curve.

  2. (Optional) Alt+click the face or edge that will drive the pull.

  3. Drag in the direction of the Pull arrow.