


The following example shows how to create and apply a boundary condition using a function representation.
The convection heat transfer coefficient from a fluid flowing over a flat plate is applied as a function boundary condition, using the correlation for laminar heat transfer coefficient. The figure below shows the flat plate with the applied boundary conditions.

The bottom of the plate is fixed at a constant temperature. The top of the plate, where the convection boundary condition is being applied, is split into two regimes:
Regime 1 is defined for X between 1
 X<5, and the convection heat transfer coefficient is given
by:
X<5, and the convection heat transfer coefficient is given
by:
h(x) = 0.332 * (kxx/x) * Re**(1/2) * Pr**(1/3)
Regime 2 is defined for X between 5 < X
 10, and the convection heat transfer coefficient is given by:
h(x) = 0.566 * (kxx/x) * Re**(1/2) * Pr**(1/3)
In the above equations, the Reynolds number Re is given by:
Re = (dens*vel*x)/visc
and the Prandtl number PR is given by:
Pr = (visc*c)/kxx
The properties of the fluid over the flat plate are:
Density (dens) = 1, thermal conductivity (kxx) = 10, specific heat (c) = 10, and viscosity (visc) = 0.01
The velocity of the fluid (vel) over the flat plate is equal to 100 for Regime 1 and 50 for Regime 2. Bulk temperature for the fluid for both regimes is 100 degrees.
Create a rectangle and assign element type PLANE55, define your material properties, and mesh:
/prep7
rect,1,10,,.5
et,1,55
!Define Fluid Properties
mp,KXX,1,10	!Thermal conductivity
mp,DENS,1,1	!Density
mp,C,1,10	!Specific heat
mp,VISC,1,0.01	!Viscosity
!Define Plate Properties
mp,kxx,2,10
mp,dens,2,10
mp,c,2,5
mat,2
esize,,25
amesh,all
Define the convection boundary condition as a function.
Select to bring up the function editor. The function boundary condition being applied is a multivalued function, its final value being dependent on the X location in the domain. In the Function Editor dialog box, click the radio button for "Multivalued function based on regime variable" and type xloc as the name of the regime variable in the text entry box. The name xloc appears as the name of the regime variable. To define xloc, select "X" from the drop-down box on the lower half of the dialog box. Your dialog box should look like this:

Define the equations for the heat transfer coefficient in the two regimes. Select the tab. Under this tab, you will define the equation for the first regime, 1
 X
X
 5. Type "1" and "5" in the Regime 1
Limits text entry boxes.
5. Type "1" and "5" in the Regime 1
Limits text entry boxes.For the sake of convenience, define those expressions in the equations that you will use more than once or that are part of a very long equation, and store them in memory.
In this example, expressions for the Reynold's number and Prandtl number are used repeatedly in both equations. They are good examples of expressions that can be stored and used throughout the function editor, in all regimes.
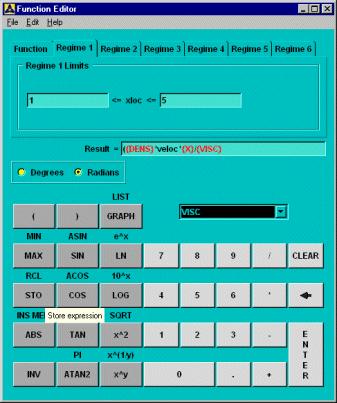
To store the Reynold's number, fill in the Result box as shown below. Select the primary variables DENS, X, and VISC (shown in {brackets}) from the drop-down list on the lower half of the dialog box. Use the keypad to insert the math functions such as * and /. Your dialog box should look like this:
Click , then on the number pad to store the expression in memory location 0.
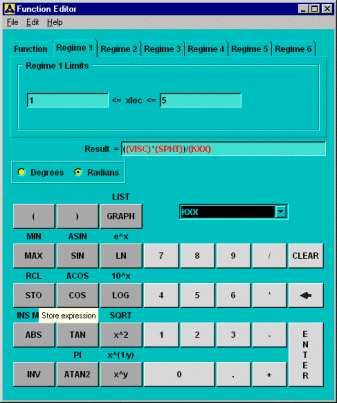
To store the Prandtl number, clear the Results box by clicking the button and then fill it again as shown below. Select the terms VISC, SPHT, and KXX from the drop-down list. Your dialog box should look like this:
Click , then on the number pad to store the expression in memory location 1.
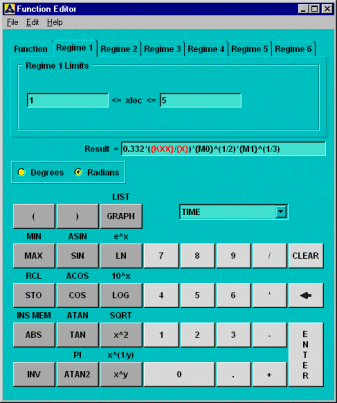
Define an expression for the heat-transfer coefficient for Regime 1.
Click to clear the contents of the text entry box. Type in the expression for the heat transfer coefficient for Regime 1 as shown below. Select the primary variables ({KXX} and {X}) from the drop-down list. The terms M0 and M1 are the terms you stored in memory earlier. To place them in the equation, click the button, and then , then and respectively.
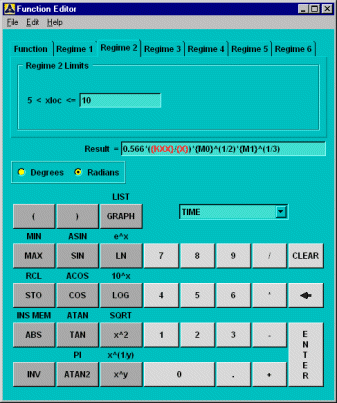
Define the equation for Regime 2.
Select the tab. First, enter "10" as the upper limit for the regime variable for which this equation is valid. Notice that the lower limit for this regime is already set as the upper limit from Regime 1. This feature ensures continuity between the regimes. Type in the expression for the heat transfer coefficient as shown below. You can use the same stored memory locations M0 and M1 to replace expressions for Reynold's number and Prandtl number, respectively. Your dialog box should look like this:
Optional: Enter comments for this function.
Select .
Save the function.
Select . Functions are saved with a .func extension.
You must save the function. After you have saved the function, you can then load it as a table parameter into Mechanical APDL.
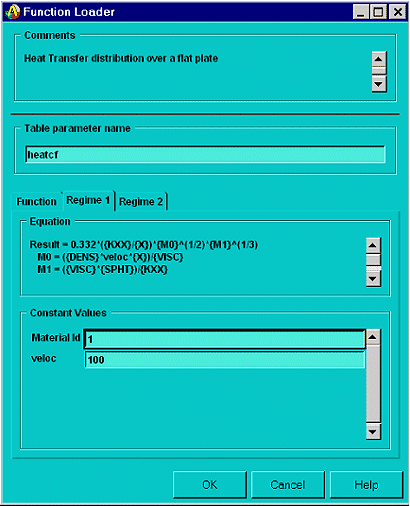
Load the function. Select . Select the .func file that you saved earlier. The Function Loader dialog box appears.
Provide a table parameter name that you will use when applying the function as a boundary condition.
Type "heatcf" for this example. (The parameter name cannot contain more than seven characters.) Provide values for any variables that you defined in the Function Editor.
Select the tab and enter 1 for the material ID (to obtain the material primary variables) and 100 for the velocity. (The Function Tool prompts you for the material ID only if you have used a material property in your expression.) Your dialog box should look like this:
Note: Only numeric data is supported for the constant values in the Function Loader dialog box. Character data and expressions are not supported as constant values.
Select the tab and enter "1" for the material ID and enter 50 for the velocity.
Notice that the button is not active until all required variables have been entered. Click when the button becomes active.
You can now finish the analysis. When you apply this function as a boundary condition, use the table name that you assigned earlier.
nsel,s,loc,y,0
d,all,temp,25
nsel,s,loc,y,0.5
sf,all,conv,%heatcf%,100   Apply the function as a boundary condition
finish
/solu
time,1
deltim,.1
outres,all,all
allsel
solve
finish
/post1
set,last
/psf,conv,hcoe,2,0.e+00,1
/replot	!show surface load symbols
finish