


Creating a Polarizer
This page shows how to create a polarizer thanks to the Speos features Material and UV Mapping.
To create a polarizer:
- From the Design tab, create the surface and the origin of the polarizer.
-
From the Light Simulation tab, create a material:
-
click Material
_Material.png) .
.
-
In the 3D view, click
_Simulation_Selection_Geometry.png) , select the
geometries on which to apply optical properties and click
, select the
geometries on which to apply optical properties and click _Validation.png) to validate.
to validate.
The selection appears in Geometries as linked objects.
-
Set Use Texture to True.
A surface layer is created under the material in the simulation panel and allows you to define the surface properties of the geometry.
_Mappinp_Texture_General.png)
-
click Material
- In the Simulation tree, open the Surface Layer.
-
In the surface layer, define the surface properties to be
applied on the geometry:
-
In File,
double-click in the field to browse and load a .polarizer material.
_Material_Surface_Layer_Surface_Properties_Type.png) Note: You can create a *.polarizer file with the Polarizer Surface Editor.
Note: You can create a *.polarizer file with the Polarizer Surface Editor.
-
In File,
double-click in the field to browse and load a .polarizer material.
-
Create a UV mapping:
-
click UV Mapping
_UV_Mapping.png) .
.
-
In the 3D view, click , select the geometry on which to apply the current mapping
and click to validate.
-
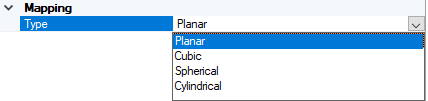
In the first UV map, select the mapping Type you need.
-
click UV Mapping