


Quick Sensitivity
Get a quick estimate of the sensitivity of the optical system.

Once all the tolerance operands have been defined, the Quick Sensitivity analysis may be performed to quickly estimate the sensitivity of an optical system. This tool is similar to the Tolerancing tool, but while the Tolerancing tool includes several controls to precisely calculate sensitivity, the Quick Sensitivity tool is instead streamlined for maximum speed.
This tool provides a sensitivity-only analysis with Paraxial Focus compensation.
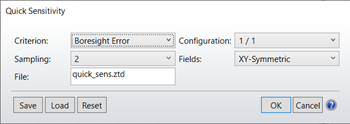
Settings:
Criterion: This control is used to specify what shall be used as the tolerance criterion. The options are:
RMS spot size (radius, x, or y): The best choice for systems which are not close to the diffraction limit; for example, systems with more than one wave of aberration. This is the fastest option. OpticStudio always uses a centroid reference for tolerancing.
RMS wavefront: The best choice for systems which are close to the diffraction limit; for example, systems with less than one wave of aberration. This is nearly as fast as RMS spot radius. OpticStudio always uses a centroid reference for tolerancing.
Boresight error: Boresight error is defined as the radial chief ray coordinate traced for the on axis field divided by the effective focal length. This definition yields a measure of the angular deviation of the image. OpticStudio models boresight error by using just one BSER operand (see the Optimization chapter for details on BSER). Boresight error is always computed at the primary wavelength in radians. Boresight error should only be used with radially symmetric systems. Note boresight error gives no indication of image quality; it is a measure of the deviation of the axis ray.
RMS Angular radial, x, or y aberrations. This tolerance criterion is best used for afocal systems (see "Afocal Image Space"). The angular aberrations are based upon the direction cosines of the output rays.
Sampling: Sampling is used to set how many rays are traced when computing the criterion. Higher sampling traces more rays, and gives more accurate results. However, the execution time increases. If the selected criterion is RMS spot or RMS wavefront, then the sampling value is an integer that refers to the number of rays traced along a radial arm of the pupil in the Gaussian quadrature technique (see "Selecting the pupil integration method" for a description of this technique). The number of arms is always twice the number of rays along each arm. Usually, a sampling of 3 or 4 is sufficient for quality optical systems. Systems with high amounts of aberration require higher sampling than systems with low aberration. The most reliable method for determining the best sampling setting is to run the analysis at a sampling of 3, then again for a sampling of 4. If the results change moderately, then use the higher setting. If they change substantially, check the next higher sampling setting. If the results change little, go back to the lower sampling. Setting the sampling higher than required increases computation time without increasing accuracy of the results.
Configuration: For multi-configuration lenses, this setting indicates which configuration should be used. Only the selected configuration will be considered, and the configuration number will be printed on the final report. If "All" is selected, then all configurations will be considered at once.
Fields: OpticStudio can use three different field settings:
Y-Symmetric: OpticStudio computes the maximum field coordinate, then defines new field points at +1.0, +0.7, 0.0, -0.7, and -1.0 times the maximum field coordinate, in the Y direction only. All X field values are set to zero. This is the default for rotationally symmetric lenses.
XY-Symmetric: Similar to Y-Symmetric, except there are 9 field points used. The 5 Y-Symmetric points are used, and -1.0, -0.7, +0.7, and +1.0 are added in the X axis direction only.
User Defined: Use whatever field definitions exist in the current lens file. This option is required when using vignetting factors, tolerancing multiple configuration lenses, or using tolerance scripts. It is also highly recommended when tolerancing non rotationally symmetric lenses or lenses with complex field weighting that user defined fields be used.
If user defined fields are used, no adjustment of the weights is performed. For the Y-Symmetric case, the center point has a weight of 2.0, all others have a weight of 1.0. For the XY-Symmetric case, the center point has a weight of 4.0, all others unity.
File: On this field you can specify the name of the ZTD file to be saved in your project's directory. This ZTD file stores all of the data created during a Tolerance run and can be read by the Tolerance Analyses.
Other buttons
There are also 5 buttons on the bottom of the dialog box:
Save: Save the currently selected options as a QS file within the Configs folder. The title of the QS file will be selected by the user.
Load: Restores Quick Sensitivity options from a previously saved file.
Reset: Restore the settings to the default values.
OK: Performs the Quick Sensitivity analysis using the current options.
Cancel: Exits the dialog box without performing the Quick Sensitivity analysis, restoring the previous settings.
Once all of the options have been selected, press OK to begin the Quick Sensitivity analysis.
Next: