


Installing and configuring Granta MI
Install and configure the required Granta MI software on the first node in the cluster.
- Review Software requirements to ensure all required software and databases have been installed and configured.
- Ensure you have completed the necessary SQL Server setup. You will need to provide your SQL login details.
- Ensure you have completed the necessary remote Elasticsearch instance setup. You will need to specify the URL and API key for your remote Elasticsearch instance.
- MI Selection Service must use the same port number on all cluster nodes.
Complete the steps documented in 'Setting up your Granta MI server' in the Granta MI installation documentation to install and configure Granta MI on the first node of your cluster, and then verify the installation.
-
To use MI User Manager or OpenID Connect protocol (OIDC) instead of Windows
Authentication for user authentication in your Granta MI cluster, follow the
steps below.
-
Open the MI Settings application, and edit the following settings to
replace the machine name part of the URL with a
[NODENAME]or[NODEFQDN]placeholder, whereNODENAMEresolves to the machine name, andNODEFQDNresolves to the Fully-Qualified Domain Name. If using HTTPS, you need to use whichever matches your HTTPS certificate.- On the Application Integration settings page, edit the
MI User Manager server access URL field
to replace the domain name part of the URL with
[NODENAME]or[NODEFQDN]. For example:https://[NODEFDQN]:9000/api - On the Service Layer settings page, edit the Service
Layer Proxy service configuration field to replace
the default
[NODENAME]placeholder text in the User ManagerbackendUrlproperty with[NODEFQDN]to match the name specified in your HTTPS certificate. You may find that clicking Format JSON below the edit panel makes the JSON easier to review and edit here.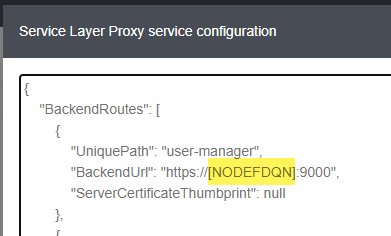
- On the Advanced settings page, edit the
Authentication.Parameter.ServiceUrl field
to replace the node name in the URL with
[NODEFQDN]. For example:https://[NODEFQDN]:9000/api.
- On the Application Integration settings page, edit the
MI User Manager server access URL field
to replace the domain name part of the URL with
-
Open the MI Settings application, and edit the following settings to
replace the machine name part of the URL with a