
Specifying Initial Mesh Settings in Q3D Extractor
Q3D Extractor automatically chooses which of two meshing approaches to take. Each solver predicts which one gives the best results, balancing mesh reliability, speed, quality, size and design characteristics. In some cases, however, you may wish to specify the initial mesh settings, including surface approximation and the meshing approach, for all objects.
If you apply separate surface approximation mesh operations to specific objects, the object settings take precedence over the general setting.
To specify initial mesh settings:
- Access the Initial Mesh Settings window one of two ways:
- Select Q3D Extractor > Mesh > Initial Mesh Settings...
- In the Project Manager, right-click Mesh, and select Initial Mesh Settings.
- From the Simulation tab of the ribbon, click Mesh Settings.
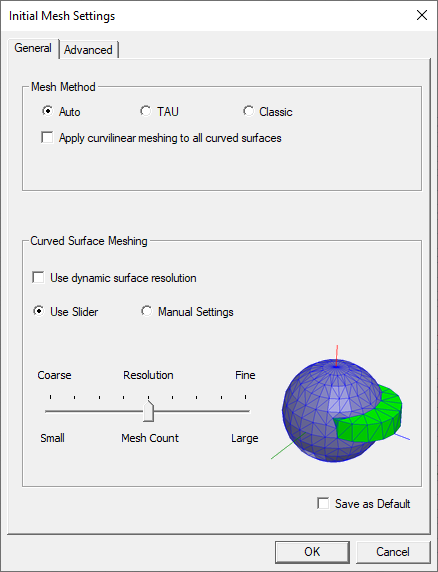
- The General tab contains Mesh Method options for:
- Auto – the solver automatically selects the mesher. This is the default setting.
- TAU – only specific curve faces will be remeshed (for example, equation-based axisymmetric faces). If a curve face connects to non-remeshed curve faces, the curve face will not be remeshed. If a curve face cannot be remeshed, faceting triangles will be used as the surface mesh. Mesh quality depends on how the faceting triangles are made. If the surface mesh is generated by TAU, it shows in the profile as Mesh TAU (Surface). This can fall back to Mesh TAU (Wrapper), which can fall back to the classic Mesh (Stitch). While the volume mesh (for DC RL) has an automatic fallback to classic, the surface mesh (for CG and AC RL) does not. In general, use TAU only when Auto/Classic fails.
- Classic – the standard mesher.
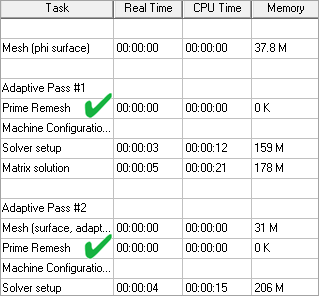
- Enable Ansys Prime – In order to improve the accuracy of CG or AC RL solutions, Q3D Extractor can make use of Ansys Prime meshing libraries to remesh existing meshes.
- Curved Surface Meshing options include:
- Use Dynamic Surface Resolution – specifies best-practice mesh operations over geometric models. This mesh operation supports 3D volume mesh and surface mesh in all products. Default mesh operations or user-defined mesh operations may or may not be replaced by the optimized mesh operations with model analysis. In general, large curve faces, curve faces with small gaps, or skewed cables get more smooth curvature representation while small curve faces, such as fillets and small curve objects, get relatively coarse triangulations so that overall element count is reduced.
- Use Slider – Drag the slider to select from the range of Course Resolution (with a Small Mesh Count) to Fine Resolution (with a Large Mesh Count. Here, "Mesh Count" refers to the number of elements comprising the mesh. The graphic on the right updates to illustrate your selection. See: Modifying Surface Approximation Settings.
- Manual Settings – Allows you to manually specify Surface Deviation, Normal Deviation, and Aspect Ratio.
- Surface Deviation – the distance between the true surfaces of the selected faces and the meshed faces.
- Normal Deviation – the angular distance between the normal of the true surface and the corresponding mesh surface.
- Aspect Ratio – determines the shape of the triangles. The higher the value, the thinner the triangles. Values close to 1 will result in well-formed, wide triangles.
- If desired, select Save as Default to keep your settings.
- If desired, use the Advanced tab to specify a Set Length for Model Resolution. This is for experienced users who have a good understanding of how particular values will affect their models. In general, the Auto setting provides good results.
- Use Flex Meshing for TAU Volume Mesh – enables a version of the TAU mesher that will rarely fail to generate a mesh. In most cases, the TAU Flex mesh is as accurate as traditional TAU or Classic meshes. However, for some complex models with bad translation or poorly defined surfaces that would fail to produce a strict mesh on all objects, relaxed tolerances will be applied. Review the mesh to evaluate whether it is acceptable for simulation. See: TAU Flex Meshing.
- Use Legacy Faceter for TAU Volume Mesh – By default, TAU uses the latest faceter to generate geometric models for meshing. Occasionally, the mesher may fail, and TAU will automatically fall back to use a legacy faceter to make a second attempt. In such cases, directly using the legacy faceter can get the mesh in the first attempt so total meshing time will be saved. The legacy faceter is not actively maintained. As such, this option should be used only as a last resort.
- Click OK to apply your choices.
The Initial Mesh Settings window appears, with the General tab selected.
To verify whether Ansys Prime remeshing was used during a simulation, check for lines labeled "Prime Remesh" in the Solution Profile:
When dynamic surface resolution is enabled, only Use Slider is permitted. Manual Settings will be unavailable.
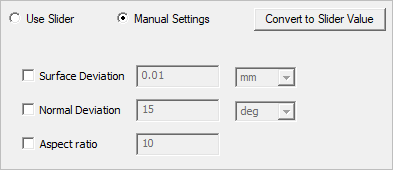
Use the check boxes to enable the fields and specify values:
Clicking Convert to Slider Value converts the manually entered values to an equivalent slider setting and returns the panel to the slider view.
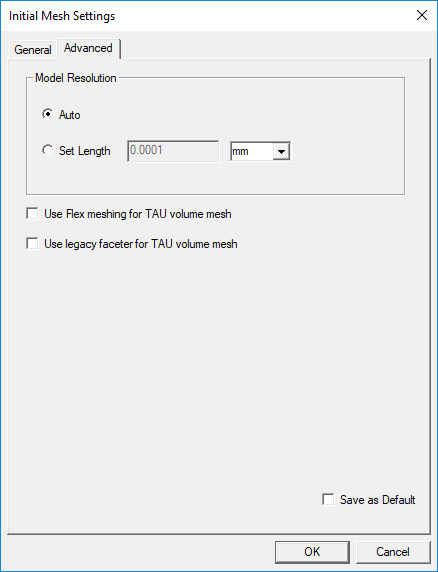
Additionally, the Advanced tab contains the following options:
The settings will be applied to the initial mesh generated.