
Integration with Microsoft Windows® HPC Scheduler
The Windows HPC scheduler is only supported on Windows. Jobs may be submitted by:
- Using the Windows HPC GUIs from Microsoft: Job Manager or Cluster Manager.
- Using the Windows HPC command line tools (job, and so on).
- Using Windows HPC specific settings from the Ansys Electromagnetics Desktop. The Desktop provides commands for Scheduler selection, Job submission and Job monitoring/control.
Before you can use Submit Job, select Tools > Job Management > Select Scheduler to select a scheduler.

This opens the Select Scheduler dialog box.
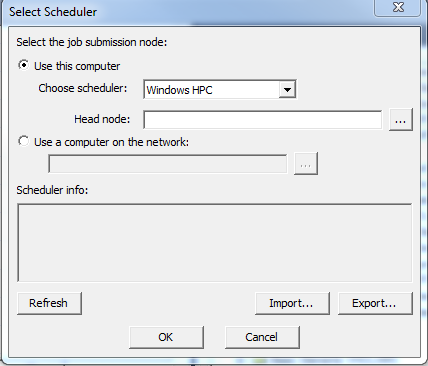
Specify the following parameter:
- Use this computer – Choose this option if scheduler commands are enabled on the post-processing node.
Select the scheduler from the Choose scheduler drop-down list. If Windows HPC Integration with the generic job submission GUI is not enabled, Windows HPC will not appear in the drop-down list.
Head node – This is the node on the cluster where scheduler commands are allowed to run.
- Use a computer
on network – Choose this option of if the cluster is configured in a manner that
disallows job submission from the post-processing node. Specify the desired
node name. Click
 to open a file browser dialog box.
After specifying the job submission node, click Refresh. This verifies that the head node can be contacted, and displays the scheduler name, a brief description (including the head node name), and the version of the Windows HPC head node.
Press Cancel to discard changes made in this dialog box. Press OK to verify that the head node can be contacted before accepting the changes. If no problem occurs, the dialog box closes. If there is a problem contacting the head node, the dialog box stays open and the changes are not accepted.
Once you select a scheduler, you can use the Tools > Job Management > Submit Job and Tools > Job Management > Monitor Jobs commands to open dialog boxes for job submission, monitoring and control.
The Ansys Electromagnetics Suite 2025 R1 release has been tested with the following versions of Windows HPC:
- Windows HPC Server 2008 R2
- Windows HPC Server 2012
General Guidelines for Submitting Ansys Electromagnetics Jobs
A job submitted to a Windows HPC Cluster is defined by its properties, as well as the task list and task properties. Priority, resource requirements, node preferences, and so on, come from job properties. In the case of Ansys Electromagnetics jobs, the task list consists of a single task. Properties of this task specify command line that runs Ansys Electromagnetics Desktop in non-graphical mode to perform analysis of an Ansys Electromagnetics project.
Specifying the Number of Compute Resource Units for HPC Jobs
Select Use automatic settings on the Compute Resources tab, or enter the number of tasks and total cores per machine, or individual nodes.
Ansys Electromagnetics Project File and Project Directory for use with Windows HPC Scheduler
Ansys Electromagnetics tools write their results to a subdirectory of the directory containing the Ansys Electromagnetics project file. The project directory must be accessible to all of the cluster hosts that may run Ansys Electromagnetics jobs. The user account for the job must have permission to read the project directory, and to create and modify files and subdirectories of this directory. The path name of the project file must be accessible to all cluster hosts using the same path name, which is generally expressed as a UNC path name.
Example:
The project file is on your workstation (with hostname user1_PC) in directory C:\user1\projects\new\project1.aedt, and the directory C:\user1\projects is shared with sharename projects.
Correct
When submitting the job, use the following path name to specify the project file:
\\user1_PC\projects\new\project1.aedt
Incorrect
If a local path name is used, the cluster hosts will not be able to find your project on the workstation:
user1_PC: ' C:\user1\projects\new\project1.aedt '
Related Topics
Integration With Microsoft Windows® HPC Scheduler