
Adding a DC Analysis
- Right-click Analysis in the
Project tree and select Solution Setup > Add DC, or on the menu bar, select Twin Builder > Solution Setup > Add
DC.
The DC Analysis Setup dialog box appears.
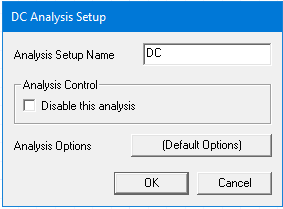
- A default name for the analysis appears
in the Analysis Setup Name field.
The default name is DC. If you specify additional solution setups, the default name increments by 1 (for example, DC1). You can change the name by typing in the text field. The name must begin with an alpha character and may contain only alpha, numeric, and underscore characters.
- In the Analysis
Control panel, select Disable this
analysis to exclude this analysis when analyses are run.
You can also right-click an analysis icon in the Project tree and select Disable or Enable. The icon is gray when the analysis is disabled.
- To choose solution options other than
the default options, click the button to the right of Analysis Options to open the Select
Solution Options dialog box where you can choose the desired
solution option for this analysis. The button name indicates the currently
selected option.
The Select Solution Options dialog box also lets you add, edit, clone, and remove solution options.
- Select OK
to close the DC Analysis Setup
dialog box.
The DC analysis setup appears in the Project Manager pane under the Analysis icon.
Related Topics
Viewing DC Bias Values in a Schematic
Setting the Active Analysis Setup
Disabling/Enabling an Analysis Setup