
Adding Combo Boxes to a Component Dialog Box
A combo box is a control element that allows a choice of entries from a predefined list. In the Component Dialog Wizard, combo boxes are used for the following model information:
- values of non-conservative input nodes
- units of non-conservative input and output nodes
- labeling of conservative and non-conservative pins
- free values
Note:
For more information on free values see Determining a Non-conservative Input Node's Value Using Free Values.
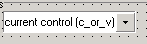
The following is an example of a combo box as it appears in the Component Dialog Wizard:
To create a combo box for selecting the value of a non-conservative input node:
- Select Controls > ComboBox from the Component Dialog Wizard menu bar.
- Click the component dialog box to place the combo box.
- Drag the combo box to its desired location on the component dialog box.
- Resize the combo box to its desired height and width.
- Right-click the combo box and select Properties. The Properties dialog box opens.
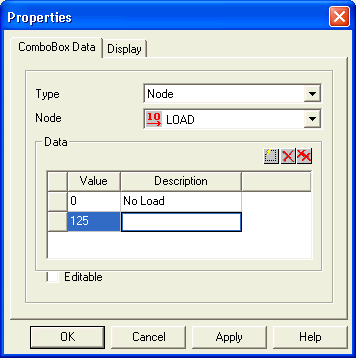
- Select Type > Node on the ComboBox Data tab.
- Select the name of the desired non-conservative input node from the Node list.
- Click
 to
create a predefined entry for the combo box.
to
create a predefined entry for the combo box.
- Enter the description that will be listed in the component dialog box into the Description field.
- Enter a value in the Value field that will be passed to the non-conservative input node when the corresponding description is selected in the component dialog box.
- Repeat steps 9 and 10 for the remaining predefined entries of the combo box.
- Select the Editable check box to make the contents of the combo box editable.
- Click OK.
To create a combo box for selecting the unit of a non-conservative node:
- Select Controls > ComboBox from the Component Dialog Wizard menu bar.
- Click the component dialog box to place the combo box.
- Drag the combo box to its desired location on the component dialog box.
- Resize the combo box to its desired height and width.
- Right-click the combo box and select Properties.
The Properties
dialog box opens.
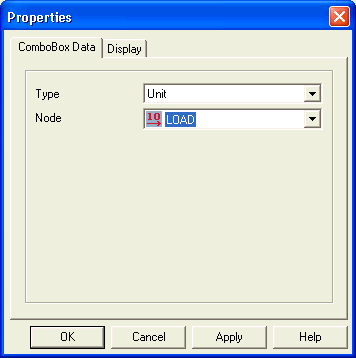
- Select Type > Unit on the ComboBox Data tab.
- Select the name of the non-conservative input node from the Node list.
- Click OK.
To create a combo box for selecting the labeling of a conservative or non-conservative pin:
- Select the Controls > ComboBox from the Component Dialog Wizard menu bar.
- Click in the component dialog box to place the combo box.
- Drag the combo box to its desired location in the component dialog box.
- Resize the combo box to its desired height and width.
- Right-click the combo box and select Properties. The Properties dialog box opens.

- Select Type > Display on the ComboBox Data tab.
- Select the name of the desired non-conservative or conservative node from the Node list.
- Click OK.
To create a combo box for entering a free value:
- Select Controls > ComboBox from the Component Dialog Wizard menu bar.
- You can also click Add Combobox on the Standard toolbar.
- Click in the component dialog box to place the combo box.
- Drag the combo box to its desired location in the component dialog box.
- Resize the combo box to its desired height and width.
- Right-click the combo box and select Properties. The Properties dialog box opens.
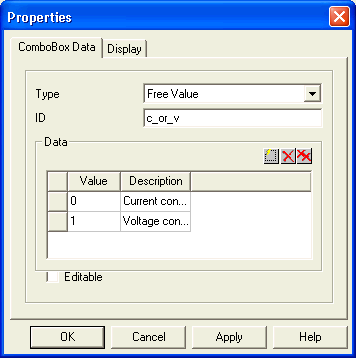
- Select Type > Free Value on the ComboBox Data tab.
- Type a valid node name for the free value
in the ID field.
Note:
Valid node names must start with a letter or underscore, and may contain any combination of uppercase and lowercase letters (A-Z, a-z), the numerals 0 through 9, and underscores.
- Click to
create a predefined entry for the combo box.
- Enter a description that will be listed in the component dialog box in the Description field.
- In the Value field, enter a value that will be passed to the free value when the corresponding description is selected in the component dialog box.
- Repeat steps 10 and 11 for the remaining predefined combo box entries.
- Select the Editable check box to edit the contents of the combo box.
- Click OK.