
Tuning a Variable
If you want to ensure that tuning does not resolve variations already solved by an optimization setup, you must check Save Fields and Mesh in the Options tab of that setup.
- Before a variable can be tuned, you must specify that you intend for it to be used during a tuning analysis in a Project or Design Properties dialog box.
- From the Maxwell 3D or Maxwell 2D menu, select Optimetrics
Analysis > Tune
 .
.
- Clear the Real Time option.
- If you want to see updates to an open Report plot while tuning a post processing variable, you must select the Browse available variations check box. Selecting Browse available variations disables the sweep check box, and the fields for minimum and maximum variable values. This feature lets you see the effect of changes to the post processing variables on plotted results.
- In the Sim. Setups column, select the solution setup you want Maxwell to use when it solves the specified design variation.
- In the Nominal text box for the variable you want to tune, type the value of the variable you want Maxwell to solve, or drag the slider to increase or decrease its value.
- Select the Sweep check box.
- In the text box below the Step value, type the starting value in the variable range.
- Type the step size, or difference between variable values in the sweep definition, in the Step text box. The step size determines the number of design variations between the start and stop values. Maxwell solves the model at each step in the specified range, including the start and stop values.
- In the text box just below the variable name, type a stopping value in the variable range.
- If you have cleared the Real Time check box, click Tune to apply the changes you have made to the variable values.
- Changing a variable value with the sliders of by typing in the text field enables the Save and Reset buttons.
- If you have changed one or more included variables, clicking Close on the Tuning dialog opens the Apply Tuned Variation dialog box. This lists the included variables and the values for each tuning. If you have tried multiple values, they are listed, and the current value is highlighted. Select another value to change the highlight. Click OK to apply the highlighted values to the design, or Don’t Apply to ignore the changes from the original variable values.
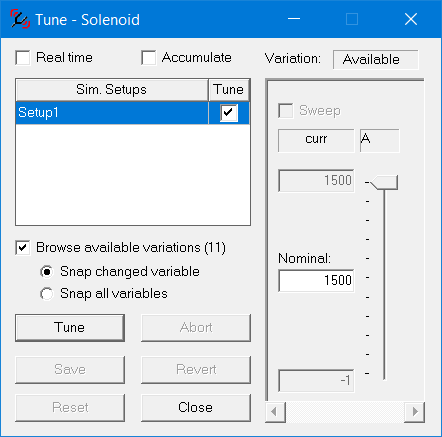
The Tune dialog box appears, listing the variables that have been included for tuning.
Clearing the Real Time option enables the Tune button. If this option is selected, a simulation begins immediately after you move the slider. Otherwise, you use the Tune button to apply the current values to a simulation.
Clearing Browse available variations enables the Sweep check box, the minimum and maximum fields, and changes the Nominal field to Step. See step 6.
Maxwell solves the analysis using the solution setup you select. If you select more than one, results are generated for all selected solution setups.
Checking the Tune box for a Sim Setup enables the Real Time check box, the Browse available variations check box, and the Snap radio buttons. Clearing the Tune box disables those selections.
Alternatively, if you want Maxwell to solve a range of values, specify a linear range of values with a constant step size:
Clicking Save opens a Save As dialog with a name field, and an Apply tuned values to design check box.
Clicking Reset changes the variable values back to what they were originally.
If you have applied variant values, you should see the new values listed in the relevant Design or Project Properties lists of variables and values, and if the changes affect plots or physical features of a model, those changes should also appear.
Click Cancel to close the dialog and go back to the Tune dialog.