
Submitting and Monitoring Jobs for Windows HPC
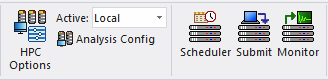
In order to submit jobs using Windows HPC, you must click Tools > Job Management > Select Scheduler or you select the Simulation tab of the ribbon, and click the Scheduler icon.
This opens the Select Scheduler window. Specify Windows HPC as the scheduler.
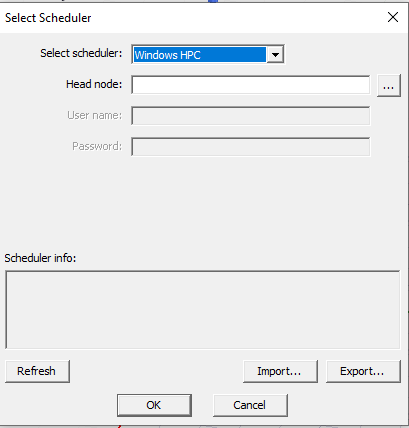
For Windows HPC, specify the head node of the cluster.
After specifying the cluster head node, you can click Refresh. This verifies that the head node may be contacted, and displays the scheduler name, a brief description (including the head node name), and the version of the Windows HPC head node.
Pressing Cancel discards changes made in this dialog box. Pressing OK verifies that the head node can be contacted before accepting the changes. If no problem occurs, the dialog will be closed. If there is a problem contacting the head node, the dialog will not be closed and the changes are not accepted.
After setting the job submission node, select Tools > Job Management > Submit Job... or Project > Submit Job... or [ProductName] > Submit Job... to open the Submit Job To: dialog box. You can also select the Simulation tab of the ribbon and click the Submit icon. You can also access Submit Job from the shortcut menus for the Project Name, Design name, Analysis Setup, or Optimetrics Setup.
The Submit Job To: window contains three tabs:
- Analysis Specification – specify the Product path, Project name, the setups, and analysis options such as batchoptions, or, for advanced users, Environment variables. If you select the Analysis or Optimetrics setup, the Analysis Specification is prepopulated.
- Compute Resources – this tab can be populated either by automatic settings, by predefined Analysis Configuration, or specifying parameters in the fields for resource selection, for job parallelization and enabled forms of parallelization.
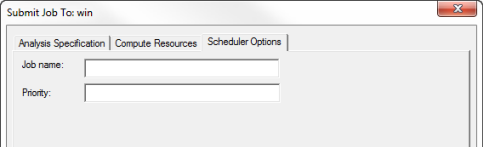
- Scheduler Options – contains fields for Job name and priority. The customization options shown by checking advanced are not used for Windows HPC.
In the Analysis Specification tab, enter the pathnames of the product path and of the project file in the “Project” edit box. These must be UNC paths that are accessible from each compute host used for Ansys Electromagnetics jobs. The Project can be an archive. The submission user must have permission to write to the directory containing the project file.

You can select which setups are analyzed in the Analyze Setups section of this window. There are radio buttons to select
- All setups in the project
- All setups in a specified design: you select the design from the drop-down menu.
- Single setup: If you select the Submit Job command from the shortcut menu, the setup name populates the field.
If you specify multiple setups, they will be processed sequentially in the order displayed in the edit box.
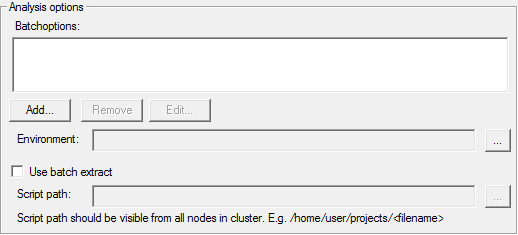
The Analysis options include
- Monitor job: You must enable this option to monitor the job from the user interface.
- Wait for license: whether to wait until a license if available before starting a simulation.
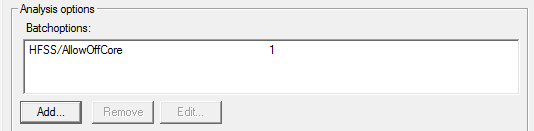
- Batch options: You can optionally specify -batchoptions in the text field. See detailed discussion of -batchoptions beginning under Running Maxwell from a Command Line.
The Add... button opens the Add Batchoption dialog box.
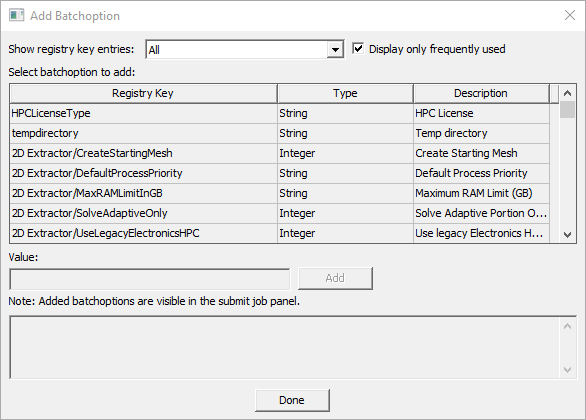
This dialog box provides access to all -batchoption commands. The drop-down menu lets you select specific categories, and you can choose to display only frequently used commands. You can edit and remove any batch options you specify.
Select a Registry Key in order to show the current Value for the type. The lower field explains the meaning of the Type Value.
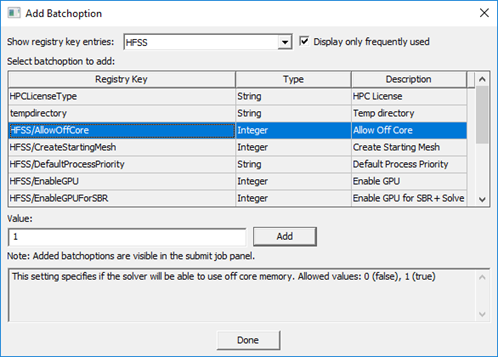
Any batchoptions for which you select Add will be visible in the Submit Job window.
If you have the Show advanced options box checked in the Submit Job window, the Environment field and the Use batch extract fields display.
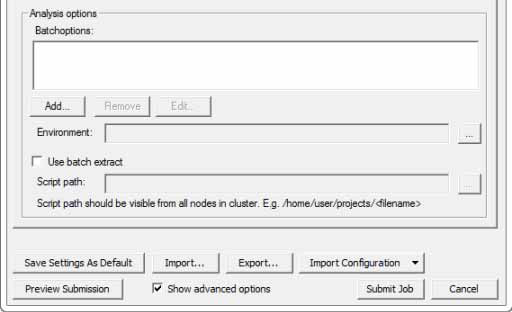
The Environment field lets you specify any Environment variables. Click the ellipsis button [...] to display the Additional Job Options dialog box.
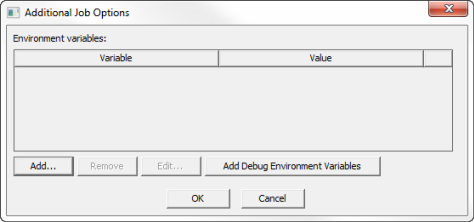
Click the Add... button to open the New Environment Variable dialog box.
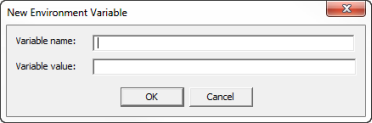
Here you can provide a Variable name and Variable value. Click OK to display the Variable in the Additional Job Options dialog box. Select a Variable to enables the Remove and Edit... buttons. You can also click Add Debug Environment Variables.
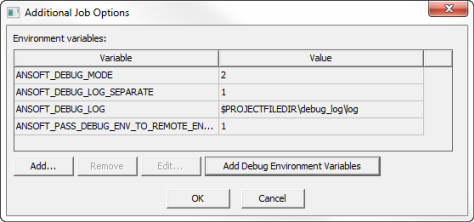
Any variables that you add will be displayed in the Environment field of the Submit Job window if you have also enabled Show Advanced options.
Use Batch Extract for Windows HPC
Selecting Show advanced options for Windows HPC also shows the Use batch extract field.
See the discussion on Running Maxwell from a Command line for a discussion of the solve information available through batch extract.
The Preview Submission button opens a window that shows the text commands that will be sent to the scheduler.
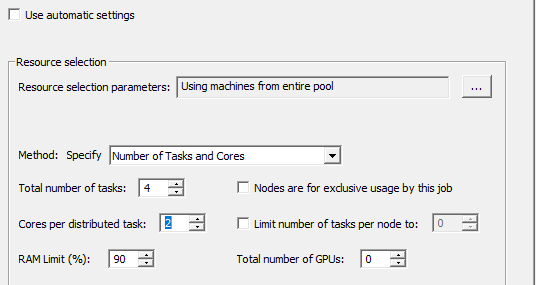
The following figure shows the Compute Resources tab of the Submit Job To window.

For Ansys Electronics Desktop configurations, the Submit Job window includes a Use automatic settings check box that simplifies the Compute Resources tab.
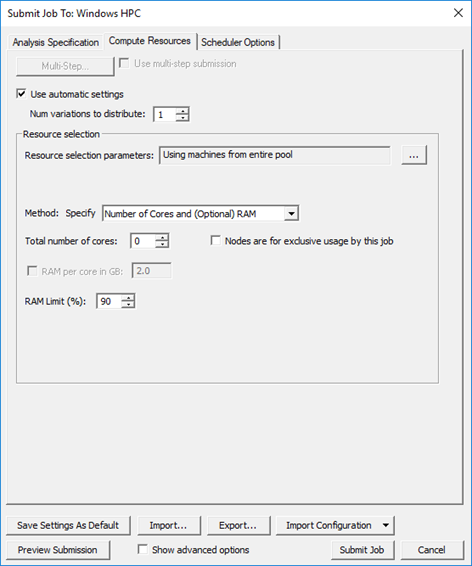
HFSS, HFSS-3D Layout, and Icepak have Use automatic settings selected by default. With Use automatic settings selected, the Job distribution field is removed. For Use automatic settings, you can specify Resource selection parameters. The ellipsis button [...] opens the Compute Resource Selection Parameters dialog box. If you do not specify any parameters, the default is Using machines from the entire pool.
The Method field of the Submit Job To window has a drop-down menu with two or three selections, depending on whether you select Use automatic settings.
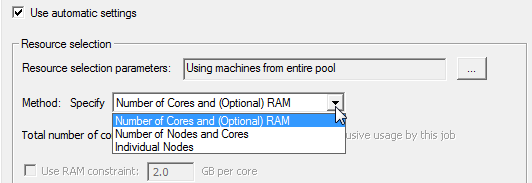
If you uncheck or cannot access Use automatic settings, these two Methods are listed:
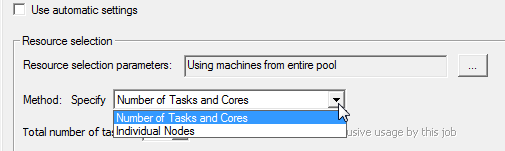
Each Method selection changes the available options listed:
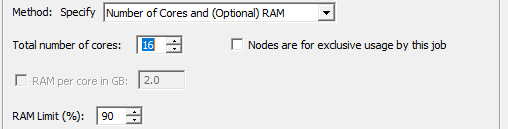
- Specify Number of Cores and (Optional) RAM
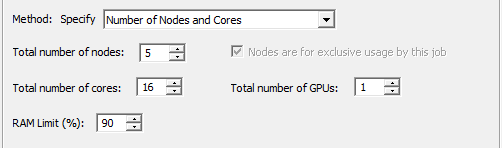
- Number of Nodes and Cores
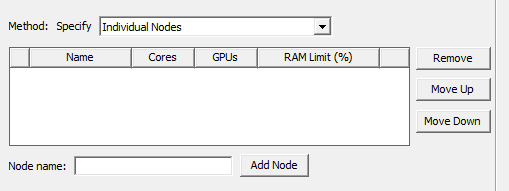
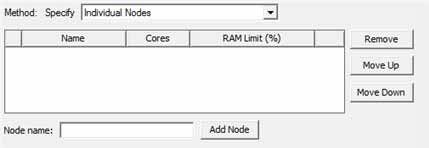
- Individual Nodes
- Number of Tasks and Cores (Use automatic settings
is unchecked for this option. Checking Use automatic settings means
that you do not have to specify tasks or core parameters):
Individual Node List
For Windows HPC jobs, you may either specify a node list, or specify job parallelization parameters, but not both.
If you select the Individual Nodes method, you may specify a node list, and the Job parallelization controls are disabled. In this case, the node list should only include cluster nodes that are valid for the job. For each node, you enter the node name and add the node. In the table, you can specify the number of cores and the RAM limit as a percentage. You can use the Remove, Move Up and Move Down buttons to edit and order the list.
Compute Resource Selection Dialog Box
By default, you can draw from the entire pool. You can also click the ellipsis button [...] to open a Compute Resource Selection dialog box.
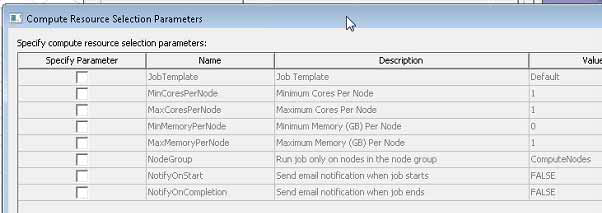
The resource selection parameters for Windows HPC jobs are
- JobTemplate: Job Template - The JobTemplate may limit the job parameters or specify defaults values for job parameters
- MinCoresPerNode: Minimum Cores Per Node
- MaxCoresPerNode: Maximum Cores Per Node
- MinMemoryPerNode: Minimum Memory (GB) Per Node
- MaxMemoryPerNode: Minimum Memory (GB) Per Node
- NodeGroup: Run job only on nodes in the node group
- NotifyOnStart: If True, send email notification when job starts. Email notifications must be configured and enabled for the cluster by the administrator. (The cluster head node must run Windows HPC Server 2008 or above.)
- NotifyOnCompletion: If True, send email notification when job ends. Email notifications must be configured and enabled for the cluster by the administrator. (The cluster head node must run Windows HPC Server 2008 or above.)
Job Parallelization
For Windows HPC jobs, you may either specify a node list, or specify the job parallelization parameters, but not both. The Job parallelization fields let you specify
- Total number of tasks: The number of nodes requested for the job is the total number of tasks divided by limit on the number of tasks per node, rounded up if it is not an integer.
- Cores per distributed task. This determines the amount of multiprocessing per task.
- Whether nodes are for exclusive usage by this job
- Whether to limit the number of tasks per node to a value. If the "Limit number of tasks per node" check box is not checked, then the job is submitted with a job unit type of "Core".
Job Distribution
- Single-level or two-level distribution (single level is the
default). Click Modify to display the Job Distribution dialog box and
select the Enable two level option if applicable and desired.
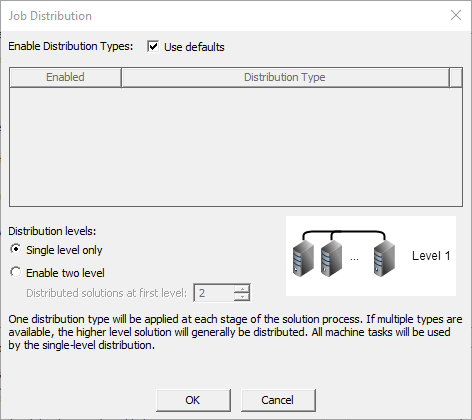
- Second-level distribution operates within DSO. If available and
enabled you can specify the number distributed solutions for level 1.
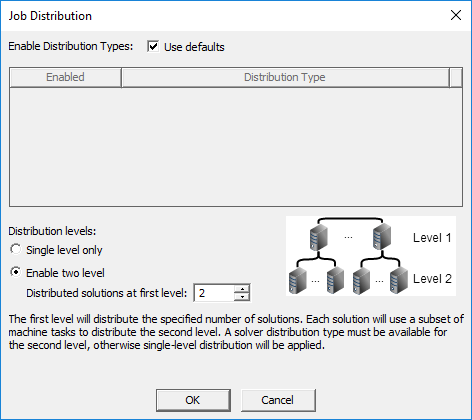
In response to a set of minimal constraints, the Scheduler may increase the resources assigned beyond the minimal values in order to meet the full set of requirements. For example, if you specify seven distributed engines, with two processors per engine, and also limit the number of engines per node to four, the scheduler may increase the number of cores used in order to meet the limit specified for engines per node. Notice that a preview of the Submit Job Results shows the number of resources assigned, and that the scheduler generated code includes an MPI specification.
Scheduler Options
The Scheduler Options tab provides for specifying the job name and/or the job priority. While the Show advanced options check box enables the display of Job submission options, no job submission options should be specified for Windows HPC.
Preview Submission
The Preview Submission button opens a window that shows a text description of the job to be submitted and the task used to start the product on one of the nodes.
The JOB PARAMETERS section contains information on parameter that apply to the job as a whole.
- The "Job resource parameters" section indicates whether the job has exclusive use of nodes, the job unit type, and the minimum and maximum number of units requested for the job, node group, and email notifications.
- The "Job attributes" section displays the job name and job priority.
- The "User Specified Compute Resource Attributes" displays the Resource selection settings.
The TASK PARAMETERS section contains information on parameters that apply to the Desktop task, which is the main task of the job.
- The "Desktop task resource parameters" section indicates the job unit type (which is the same as in the JOB PARAMETERS), and the minimum and maximum number of units requested for the Desktop task.
- The "Command Line section" displays the desktop task command line, including all arguments.
- The "Environment variables" section displays the environment variables that are set for the Desktop task; the same environment variables will also apply to all other tasks of the job.
- The "Working directory" section indicates the working directory in which the Desktop task will run.
Monitor Job
If you have checked the Monitor Job option on the Submit Job To window's AnalysisSpecification tab, you can invoke the Monitor Job window by clicking Tools > Job Management > Monitor Jobs... This window may also be brought up by checking the Begin monitoring this job now check box when a job is successfully submitting using the job submission window. For more details, see Monitor Jobs window.
Related Topics
Submitting and Monitoring Ansys Electromagnetics HPC Jobs
Specifying the Number of Compute Resource Units for HPC Jobs