Archiving Projects
Use the File > Archive... function to “bundle” a project – and any other files related to the project that you want to include – in an .mxwlz file or .zip format archive. You can include notes about the contents of the archive and specify whether to include results and solution files, or related external files. The Archive command attempts to automatically detect the necessary files for linked projects and automatically include them in the archive. For example, if a project linked to the main project also has linked or associated files, you can add them.
Archive File Types
Internally, project archive files are .zip files, and are compatible with any program that can read .zip files (for example, WinZip, 7Zip). The naming convention is that project archive files will have an extension that is unique for each product. The extension is generated by adding a 'z' to the project file extension (e.g..hfssz, .mxwlz). This extension will be displayed as the default when saving and restoring archive files. Note that .zip files are also included as a possible filter in file selection dialogs.
File Relocation Considerations
In a project to be archived, external files can be located anywhere on the user's system. One of the goals is for the restored project to be relatively self contained, and NOT to allow the restoration of an archived project to haphazardly write files anywhere on the restoring user's system.
To achieve this, it is sometimes necessary to change the location of files in the archived project such that the external files are now located in the project directory. At archive time, any external files not located in the project directory are relocated to the restored_files subdirectory of the project directory in the archived project. Any external files located in the user library or system library will be relocated to the personal library directory. Note that the project file that is written into the archive will be updated to refer to the files at the new locations, and the original project file will remain unaltered.
Archive Preview
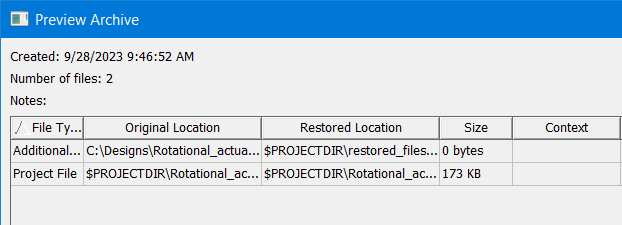
The Archive function includes a preview feature that lets you review the contents of a planned archive.
To archive the current project:
-
Click File > Archive...
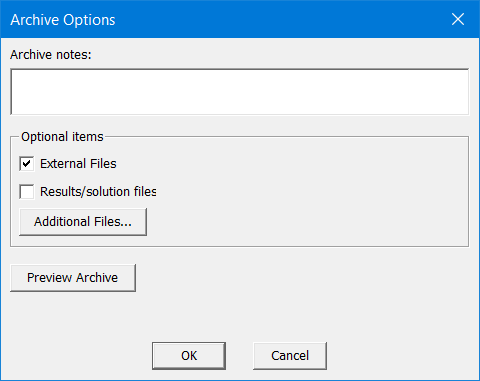
- Select any optional items, and make any desired archive notes in the text field.
- When you have made your selections for
optional items, you can select Preview Archive
to look at the archive contexts, and the locations where restoring from
the archive would place them.

- When you are ready to create the archive, close the preview, and specify the format you want to use, .mxwlz or .zip, and specify the archive location and name. Click OK to create the archive.
The Archive Options window opens.

Archive notes: you can specify notes that will be visible when previewing the archive. These notes can be viewed from the preview dialog without actually restoring the archive.
External Files: selecting this check box will cause all external files to be included in the archive. The External Files check box refers to any existing files associated with the project, such as linked files, or files added through the Project > Insert Documentation File command or Project > Data Set command.
Results/solution files: selecting this check box will cause the entire results directory to be included in the archive. This may greatly increase the size of the archive file.
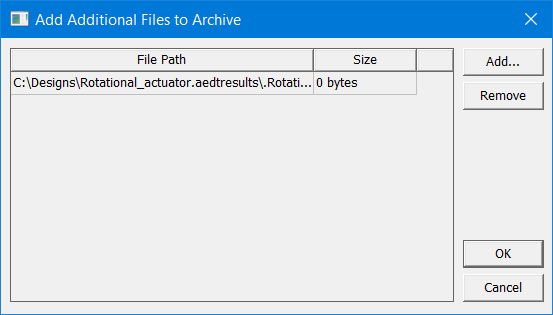
Clicking Additional Files... opens the Add Additional Files to Archive dialog.

Here, you can click Add... to open a file browser to locate any additional files (such as documentation files or datasets) you want to include in the archive. You can also select and then Remove any files listed, and OK or Cancel any proposed changes.
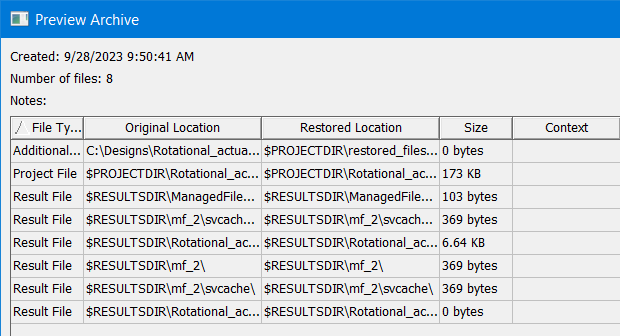
Check the Results/solution option if you want to archive those files. Below is a preview showing some included results files.

To read longer locations, you can drag the column headers to expand the columns. Use the scroll bar to view longer lists.
Previewing an archive before creating the archive can be helpful in order to see exactly what files will be included in an archive, as well as how those files are being relocated. Another purpose of previewing an archive is to view warnings and consider if any additional files need to be added to the archive.
The preview dialog also displays the archive notes, creation date, and the number of included files.
