
Creating 3D Independent and Dependent Boundaries
There are two ways to create 3D independent and dependent boundaries:
- Create a new band and change the entire band to an independent or dependent boundary
- Select one of the planar faces of an existing band in the coordinate window and assign the face to an independent or dependent boundary
The process of changing an entire band to an independent or dependent boundary is similar to creating a tool. When creating a new band or after creation of a band, you can assign the InfoCore property to 2 (for independent) or 3 (for dependent). After clicking OK, the band is changed to a face.
The process of assigning independent and dependent boundaries on an existing face follows:
- Click CreateUserDefinedPart in the history tree under the band for which you are assigning boundaries. Set the Fractions property of the band to an integer larger than 1 to make the band have a planar face.
- Click Edit > Selection Mode > Faces or right-click anywhere in the coordinate window to choose Selection Mode > Faces.
- Select a planar face of the band by right-clicking the face. Then select Assign Boundary > Matching > Independent (or Assign Boundary > Matching > Dependent after the Independent boundary has been set up). When assigning an independent boundary, an Independent Boundary window appears. Otherwise a Dependent Boundary window appears.
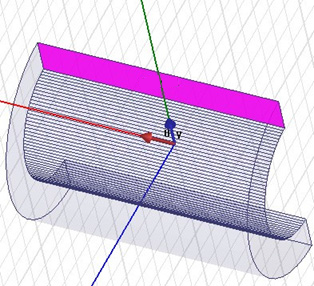
- Build up a tiny coordinate system of the
face by setting the U vector and V vector to indicate the direction of
the face. The U vector needs to be set using an arrow on the coordinate,
and then the V vector is set automatically on the face (you can choose
Reverse Direction of default V vector). Note that the U vectors
and V vectors of a related independent and dependent must have the same orientation.
- When creating a dependent boundary, you also need to set its independent boundary and its magnetic field strength (either Hm or –Hm).
- Click OK to finish independent or dependent boundary creation.
Set up U vector and V vector