
Adding QuickEye Setup in HFSS 3D Layout
- From the Project Manager window, expand the Project Tree and [Active Design Folder]. Then right-click Analysis and select Add Nexxim Solution Setup > Quick Eye Analysis to open the Quick Eye Analysis window.
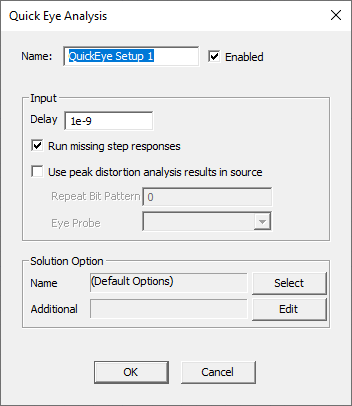
-
Type a Name (or accept the default name, e.g., “QuickEye Setup 1”).
-
Leave the Enabled area selected (default setting).
-
Set the Delay parameter to control the delay in applying the step response.
-
Run missing step response allows simulation to proceed when an External Step Response component is present in the design but no step response data file can be found.
-
Click the Use peak distortion analysis results in source check box to enable the worst-case bit pattern to be output on the source. Set the Repeat Bit Pattern field to the chosen number of repeats. When the Use peak distortion box is checked, the worst-case bits from Peak Distortion Analysis are output from all Eye Sources. Any bit patterns set in the sources is ignored. See Peak Distortion Analysis for details.
-
Specify the number of times to repeat the worst-case bit pattern
-
Select the Eye Probe that is to be the target for all Eye Sources. Optionally, use the fields in the Solution Option area to add VerifEye/QuickEye options.
-
Click Select on the Name field to open the Select Solution Options window.
-
To create a new option set, click New to open the Solution Options window.
-
Click the Name field to name the new option set.
-
Click the Eye Options area fields and check boxes to set any chosen options.