Zooming into a Rectangular Area
Zoom to expand a specified rectangular area to fill the view window, as follows:
- Use one of the following methods to begin the Zoom Area mode:
- Using the menu bar, click View > Interaction > Zoom Area.
- From the View ribbon tab, click Zoom Area:
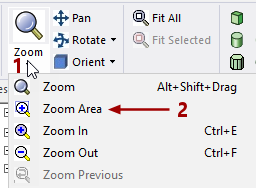
- From the Draw or Model ribbon tab, click Zoom > Zoom Area:
- Right-click in the Modeler window and choose View > Zoom Area from the shortcut menu.
- Click and drag the mouse to draw a rectangle enclosing the area that you want to zoom into.
- To end the Zoom Area mode, click the command again or press Esc.

When you release the mouse button, the rectangular area will come close to filling the display area of the window.
The absolute size of the zoomed geometry does not change, only the scaling of the model view is affected.
The rotate and zoom drop-down menu icons on the ribbon update dynamically to indicate the current rotate/zoom mode. These ribbon buttons are also "sticky." That is, the last active rotate or zoom mode becomes the button default until a different command is chosen or the application is restarted. Default commands are restored the next time you launch the Ansys Electronics Desktop program.
For 2D or 3D reports, axis labels and tick marks are adjusted after the zoom operation is complete.