
Working with Project Variables
Project variables are available across all hierarchical levels of a project. A project variable can be assigned to a parameter value
in the
The Project Variables menu item allows you to access three tabs:
- Project Variables – variables, which you define, that apply to the entire project.
- Intrinsic Variables – pre-defined variables that cannot be changed. See: List of Intrinsic Variables.
- Constants – pre-defined constants that cannot be changed. See: List of Constants.
Adding a Project Variable
To define a Project Variable:
- Access Project Variables one of three ways:
- Click Project > Project Variables.
- Right-click the project name in the Project Tree and select Project Variables.
From a menu in the lower left corner of the following Optimization dialogs: Parametric, Optimization, Sensitivity, Statistical, Design of Experiments, and Design Xplorer Setup. Click Edit Variables and from the menu select Edit Project Variables.
The Properties window appears, on the Project Variables tab.
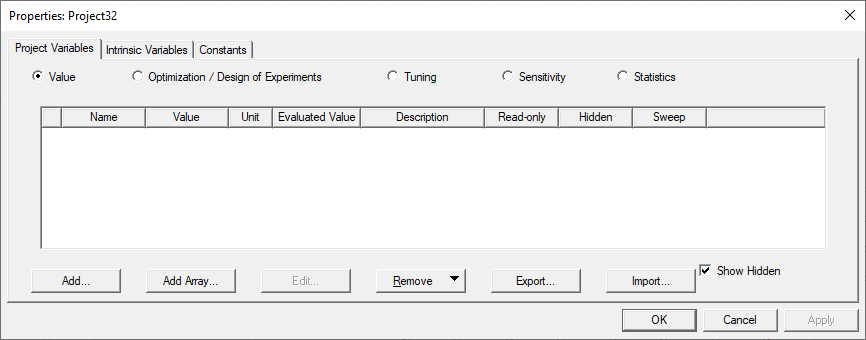
- From the Project Variables tab, click Add.
The Add Property dialog box appears.

- Enter information for the variable, as applicable:
- Name – project variable names must start with the dollar sign symbol ($), followed by a letter. The name can contain alphanumeric characters and underscores (_). You cannot use the names of Intrinsic Variables or pre-defined Constants.
- Variable Type – use the Variable, Separator, and ArrayIndexVariable radio buttons to select the variable type.
Your selection impacts which properties you can edit:
Variable Type
Editable Properties
Variable
Unit Type, Units, Value.
Separator
Name. A separator variable provides a bolded name for a blank line to facilitate grouping variables in variable lists.
Array Index Variable
Associate Array Variable, Value
Unit Type – for Variables, use the drop-down menu to select a type from the list (for example, Charge, Density, Energy, ...). “None” is the default.
When you select a Unit Type, the choices in drop-down menu for the Units text box adapt to that unit type. For example, selecting Length as the Unit Type causes the Unit menu to show a range of metric and english units for length. Similarly, if you select the Unit Type as Resistance, the Units drop down lists a range of standard Ohm units.
- Units – for Variables, use the drop-down menu to select a unit of measure.
- Value – for Variables and ArrayIndexVariables, enter a number, variable, or mathematical expression. The quantity entered will be the current
(or default) value for the variable.
If the mathematical expression includes a reference to an existing variable,
this variable is treated as a dependent variable. The units for a dependent
variable will automatically change to those of the independent variable
on which the value depends. Additionally, dependent variables, though useful in many situations,
cannot be the direct subject of optimization, sensitivity analysis,
tuning, or statistical analysis.
For ArrayIndexVariables, the index reference can be a constant (for example, 1), an index (for example, ii) or an expression (for example, ii + 1). This allows you to sweep the index and simulate for different values that are stored in the array variable itself. In particular, it also enables you to sweep different text strings. This allows you to set a property to different string values as the index is swept.
Warning:If you include the variable's units in its definition (in the Value text box), do not include the variable's units when you enter the variable name for a parameter value.
- Associate Array Variable – for ArrayIndexVariables, select an associated array from the drop-down list. You must have previously created an array.
- Click OK.
The new variable appears in the list. You can sort project variables by clicking the Name column header. Clicking once sorts them in ascending order, noted by a triangle pointing up. Clicking against sorts in descending order, noted by a triangle pointing down. Clicking a third time sorts in original order, with no triangle.
- If desired, use the check boxes to designate a variable as Read-only, Hidden, or Sweep.
- Read-only – when selected, the variable's name, value, unit, and description cannot be modified.
- Hidden – hidden variables do not appear in the Properties window unless Show Hidden is selected.
- Sweep – allows you to designate variables to include in solution indexing as a way to permit faster post-processing. Variables with the Sweep check box cleared are not used in solution indexing. If a solution exists, selecting or clearing a variable's Sweep setting produces a warning that the change will invalidate existing solutions. To continue, click OK to dismiss the warning.
- Click Apply to apply changes.
- Click OK to exit the window.
The new variable can be assigned to a parameter value in the project in which it was created. You can enable defined variables for Optimization/Design of Experiments, Tuning, Sensitivity, or Statistics. See: Optimetrics.
Importing and Exporting Project Variables
Once you have defined Project Variables, you can export them to a csv file, and import them to another project or design. If there are naming conflicts on import, these are flagged as errors. The Properties dialogs for and Project variables include Import... and Export... buttons.
When you click Export.... a dialog lets you name the file and select a location. When you Save, if the file exists, an overwrite prompt should pop up.
Deleting a Project Variable
To remove a Project Variable:
- Access Project Variables as described above.
The Properties window appears, on the Project Variables tab.
- Remove one or more variables:
- To remove a specific variable, select it and click Remove > Remove Selected.
- To remove all unused variables, click Remove > Remove All Unused.
- To force the removal of all unused variables, including those in the project's undo/redo history, click Remove > Force Remove All Unused.
Editing a Project Variable
To edit a Project Variable:
- Access Project Variables as described above.
The Properties window appears, on the Project Variables tab.
- Select the variable you want to edit and click Edit.
- Change the properties as desired and click OK.