
Modifying Vector Field Plot Arrows
To change the appearance of a vector field plot's arrows:

- Click
 Modify Plot Attributes or, in the Project Manager, right-click on Field Overlays and select Modify Plot Attributes. Alternatively, under Field Overlays in the Project Manager, right-click a subfolder (overlay type) heading and select Modify Attributes.
If you select Modify Plot Attributes, the Select Plot Folder dialog box appears. If you select Modify Attributes, the appropriate attributes dialog box appears, bypassing the Select Plot Folder dialog box. In this case, skip to step 3.
- Select the plot folder you want to modify, and then click OK.
All plots in the selected folder will be modified.
A dialog box with attribute settings for the selected folder appears.

- Click the Marker/Arrow tab.
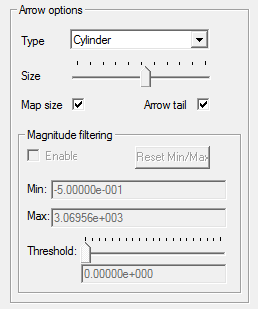
- Under Arrow Options, select one of the following arrow types:
Line
The arrows are displayed as 2D/flat.
Cylinder
The arrow tails are displayed as cylinders. The arrowheads are displayed as 3D/round.
Umbrella
The arrow tails are displayed as 1D lines. The arrowheads are displayed as 3D/round.
- Use the Size slider to increase (move to the right) or decrease (move to the left) the length and dimensions of the arrows. The arrows are resized relative to the size of the model geometry.
- Select Arrow tail to include tails on all arrows.
- Check Map size to scale the size of the arrows to the
magnitude of the field quantity being plotted.
If you uncheck Map size, the Magnitude filtering is enabled. You can specify the Min and Max magnitude filtering, or use a Threshold slider to set a threshold for plotting vectors. Vectors under the threshold or below the Min are not plotted.

The Reset Min/Max button lets you reset min/max to the current intrinsic values.
- Click the Plots tab.
-
- Select Uniform if you want the arrows to be spaced equally.
- Select Real time mode if you want the changes to take effect immediately
in the view window.
If this option is cleared, click Apply when you want to see the changes.
- Click Close to dismiss the dialog box.