


The Export Toolbox is a complete application that runs within Ansys Rocky and enables you to export simulation data using simple or advanced workflows.
The Export Toolbox was built to facilitate common situations related to the post-processing procedure:
Get previously set up export templates and use them for a new export
Save a new export template for later use
Export simulation data in the form of csv, txt, bin, stl or vtp data
Apply time filter or time statistics on data before writing the files
Run the post-processing in batch mode
The Export Toolbox can export all the options below:
STL: Exports the STL files for Geometries, Particles, Particle Group or User Processes
Properties: Exports the properties for CFD Coupling, Contacts, Geometries, Joints, Particles, Particle Group, SPH or User Processes.
Curves: Exports the curves for CFD Coupling, Contacts, Geometries, Joints, Motion Frames, Particles, Particle Group, Solver, SPH or User Processes.
Custom Input: Exports the custom input for Particles or its User Processes.
SimAI: This advanced workflow exports the data in the format for SimAI usage for Geometries or its User Processes.
Limitations: This script does not support handling plot windows in general
This is the overall appearance of the extension once launched:
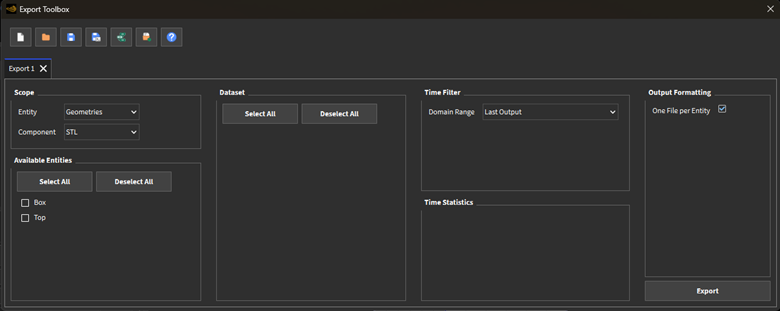
This extension menu has a few options: New export, Load template, Save template, Save for batch mode, Enable/Disable advanced workflows, Open working directory, Help, which are shown in the figures below:

New export: Creates a new export
Load template: Loads a previously saved export template
Save template: Saves the current export as a new template
Save for batch mode: Saves the current export for batch mode
Note: When Save for batch mode is used, the extension saves the template and links the script in the Run After simulation under Solver in the GUI. This way, it is only executed once the simulation finishes/stops.
Enable/disable advanced workflows: Enables or disables advanced workflows such as for Ansys SimAI
Open working directory: Opens the working directory
Help: Opens the documentation in Ansys Help
The following example shows the options assuming the user has picked Geometries and Properties under the Scope tab.
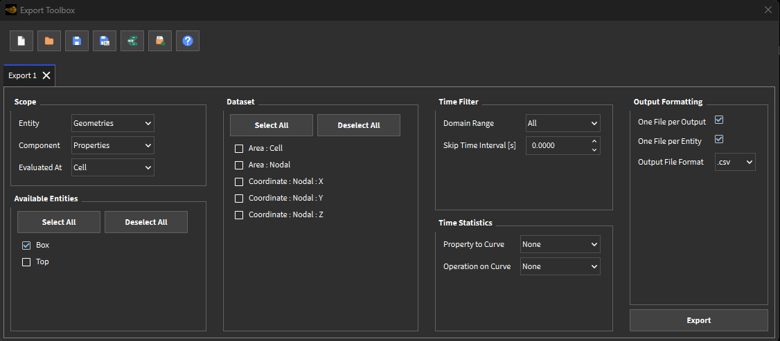
Table 4.1: Options.
| Name | Option | Description |
|---|---|---|
| Scope | Entity | The following options will be displayed if existent in the current project: CFD Coupling, Contacts, Geometries, Joints, Motion Frames, Particles, Particle Groups, Solver, SPH, User Processes. |
| Component | Based on the selected entity, the following options will be displayed, if compatible: STL, Properties, Curves, Custom Input. | |
| Evaluated At | Available for Properties of Geometries and Particle Group.The user can pick Cell or Node. Properties will be converted accordingly, if needed. | |
| Available Entities | Select/ Deselect All | Based on the Scope, the available entities from the project will be listed, if compatible with the upstream selections. |
| Dataset | Select/ Deselect All | Given the upstream selections, all available datasets will be displayed (e.g. Properties, Curves). |
| Time Filter | Domain Range | The user can choose one of the following options: All, Last Output, Time Range, Specific Time, After Time, Time Range Relative to Simulation End. |
| Skip Time Interval [s] |
The user can skip outputs as a multiple of the output interval. | |
| Initial [s] | When the Domain Range is set to Time Range, the user must set the initial time for the range. | |
| Final [s] | When the Domain Range is set to Time Range, the user must set the final time for the range. | |
| At Time [s] |
When the Domain Range is set to Specific Time, the user must set the time for the export. | |
| Range From End [s] | When the Domain Range is set to Time Range Relative to Simulation End, the user must set the time from the end to be considered. | |
| Time Statistics | Property to Curve | Converts the properties selected into curves, using one of the following options: Min, Max, Sum, Sum Squared, Average, Variance, Std. Deviation. |
| Operation on Curve | Converts the curves selected into single values or to another curve (for the case of Moving Average), using one of the following options: Min, Max, Average, Variance, Std. Deviation, Moving Average. | |
| Time Interval [s] | When the Time Statistics: Operation on Curve is set to Moving Average, the user must select the time interval for the moving average window. | |
| Output Formatting | One File Per Output | If checked, one file will be created per output selected. If not, all outputs selected will be added side by side on the same file. |
| One File Per Entity | If checked, one file will be created per entity selected. If not, all entities selected will be added side by side on the same file. | |
| Output File Format | For properties or curves, the user can select one of the following formats: csv, txt, bin. | |
| Release Time [s] | When the Scope Entity is set to Particles and the Scope Component to Custom Input, the user must set the release time for the export. | |
| Scale Factor for Particles [-] |
When the Scope Entity is set to Particles and the Scope Component to STL, the user must set the factor for the particle bed to be scaled. |
In oder to use the Export ToolBox, you need to extract the downloaded files into Rocky’s Scripts folder, which is usually located at:
Windows: C:\User<user_name >Documents\Rocky\Scripts
Linux: ~/.Rocky/Scripts
From the PrePost script panel, launch the Export Toolbox by clicking its Play script button.
From the Export Toolbox home user interface, define the export settings you intend to use.
Click the Export button once finished to have your files written
Tip: You can click Open working directory to find your files once finished.