


While toolbar examples in the Ansys ACT Developer's Guide show how to extend the interface of an Ansys product, they do not show how to perform meaningful operations. Here, the supplied extension DemoLoad shows how to add a button to Mechanical that adds a generic load to the project.
The file DemoLoad.xml follows.
<extension version="1" minorversion="0" name="DemoLoad">
  <guid shortid="DemoLoad">7dfd2b34-dfe1-469d-b244-1c7e5c222e54</guid>
  <script src="main.py" />
  <interface context="Mechanical">
    <images>images</images>
    <toolbar name="Loads" caption="Loads">
      <entry name="DemoLoad" icon="tload">
        <callbacks>
           <onclick>CreateDemoLoad</onclick>
        </callbacks>
      </entry>
    </toolbar>
  </interface>

  <simdata context="Mechanical">

    <load name="DemoLoad" version="1" caption="DemoLoad" icon="tload" color="#00FFFF">

      <callbacks>
        <getnodalvaluesfordisplay>GetNodalValuesForDisplay_DL</getnodalvaluesfordisplay>
        <getprecommands>GetPreCommands_DL</getprecommands>
        <getsolvecommands order="1">GetSolveCommands_DL</getsolvecommands>
      </callbacks>

      <property name="Geometry" caption="Geometry" control="scoping">
        <attributes selection_filter="edge" />
      </property>
      <property name="Text" caption="Text" control="text"></property>
      <property name="FileName" caption="FileName" control="fileopen"></property>
      <property name="SelectStatic" caption="Select (static)" control="select">
        <attributes options="Option 1,Option 2,Option 3" />
      </property>
      <property name="SelectDynamic" caption="Select (dynamic)" control="select">
        <callbacks>
          <onactivate>StringOptions_DL</onactivate>
        </callbacks>
      </property>
      <property name="Double" caption="Double" unit="Length" control="float"
default="1 [m]"></property>


    </load>

  </simdata>

</extension>
In this file, the element <script> references
the IronPython script main.py. The element
<interface> defines the toolbar and buttons.
The callback function CreateDemoLoad creates and adds the
load to the simulation environment.
The element <simdata> defines the load. The
attributes for the child element <load> provide the
name, version, caption, icon, and color that apply to the load. The attribute
color is defined in a hexadecimal format. This color
is used to contrast the load when it is displayed on the model. Its child
element <callbacks> defines three callbacks:
<getnodalvaluesfordisplay> and two occurrences
of <getcommands>.
The callback
<getnodalvaluesfordisplay>specifies the name of the function that is invoked when the load is displayed in the product.The two occurrences of the callback
<getcommands>specify the names of the functions that are invoked to insert specific solver commands in the solver input file.For the first occurrence, the attribute
locationis set topre, indicating that the solver commands defined in the functionGetPreCommands_DLare to be inserted before the standard loads and boundary conditions defined in the product. For the Ansys solver, the new commands are inserted in the context of the /PREP7 preprocessor after the mesh has been written.For the second occurrence, the attribute
locationis set tosolve, indicating that the solver commands defined in the functionGetSolveCommands_DLare to be inserted just before the SOLVE command. Consequently, the related function is responsible for generating the APDL commands that describe the load within the Ansys input file.
Note: For the callback
<getcommands>, the attributelocationcan be set to any of these values:init,pre,post,solve, andpreload.
In the callback definition, you define the properties to apply to the definition of the load. These properties are displayed in the Details view in Mechanical, where you provide the necessary values to complete the load definition. In the IronPython script, you see how the load's properties can be retrieved and modified.
The following figure shows how each property defined in the XML file appears in the Details view.
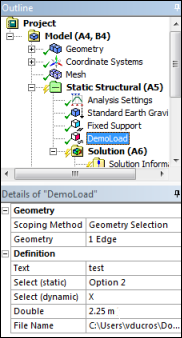
For the properties Select (static) and Select
(dynamic), the attribute control is set to
select.
The first property populates the list of options from the XML file.
The second property defines the callback
<onactivate>. This callback, which is invoked when the control is activated, populates the available options for the property. The definition for the second property provides full control of the options to expose in the drop-down menu and makes the list dependent on the current status of the project. Many different situations that can impact the content of the list can be addressed, as long as they are implemented in the callback<onactivate>.
The next property, Double, does not require the
definition of a specific callback. Instead, the attribute
unit is set to Length to
indicate that the property is a physical quantity. The attribute
default is set to 1 [m]. This
default value appears in the Details view each time a new
load is created.
The IronPython script main.py follows.
import os

def init(context):
    ExtAPI.Log.WriteMessage("Init DemoLoads...")

def CreateDemoLoad(analysis):
    analysis.CreateLoadObject("DemoLoad")

def StringOptions_DL(load,prop):
    prop.Options.Clear()
    prop.Options.Add("X")
    prop.Options.Add("Y")
    prop.Options.Add("Z")

def GetPreCommands_DL(load, solverData, stream):
    stream.Write("/COM, **************************************************" + "\n")
    stream.Write("/COM, Load properties from DemoLoad getcommands pre event" + "\n")
    stream.Write("/COM, Text Property = " + load.Properties["Text"].ValueString + "\n")
    stream.Write("/COM, SelectDynamic Property = " + load.Properties["SelectDynamic"].ValueString + "\n")
    stream.Write("/COM, SelectStatic Property = " + load.Properties["SelectStatic"].ValueString + "\n")
    stream.Write("/COM, Double Property = " + load.Properties["Double"].ValueString + "\n")
    stream.Write("/COM, **************************************************" + "\n")

def GetSolveCommands_DL(load, solverData, stream):
    stream.Write("/COM, **************************************************" + "\n")
    stream.Write("/COM, Load properties from DemoLoad getcommands solve event" + "\n")
    stream.Write("/COM, Text Property = " + load.Properties["Text"].ValueString + "\n")
    stream.Write("/COM, SelectDynamic Property = " + load.Properties["SelectDynamic"].ValueString + "\n")
    stream.Write("/COM, SelectStatic Property = " + load.Properties["SelectStatic"].ValueString + "\n")
    stream.Write("/COM, Double Property = " + load.Properties["Double"].ValueString + "\n")
    stream.Write("/COM, **************************************************" + "\n")

def GetNodalValuesForDisplay_DL(load, nodeIds):
    dval = load.Properties["Double"].Value
    coordselect = load.Properties["SelectDynamic"].ValueString
    mesh = load.Analysis.MeshData
    values = []
    for id in nodeIds:
        node = mesh.NodeById(id)
        dispval = float(0.0)
        if coordselect == "X":
            dispval = node.X * float(dval)
        elif coordselect == "Y":
            dispval = node.Y * float(dval)
        elif coordselect == "Z":
            dispval = node.Z * float(dval)
        else:
            dispval = float(0.0)
        values.Add(dispval)
    return values
The functions GetNodalValuesForDisplay_DL and
GetSolveCommands_DL are critical to the behavior and
application of the load. GetNodalValuesForDisplay_DL is
called each time the graphic is refreshed. The required input arguments are
load and nodeIds, where
load is the load object for the load and
nodeIds is a list of node identifiers.
In this script, load.Properties["Double"].Value queries
for the value of the property "Double". The argument
nodeIds contains a list of node numbers on which one
value has to be returned by the function. For every node in the list, the value
of the property "Double" is assigned in the values array
representing the output of the function. This output is subsequently treated by
the graphics engine of the product so that the visualization on the FE model is
available.
The function GetSolveCommands_DL is intentionally
simplified for this example. The prototype of this function is made of two input
arguments, the load object and the filename in which the new specific solver
commands are written. The output file is only a temporary file. The content is
rewritten in the final solver input file to ensure that the specific commands
related to the customized load are merged with all the other commands already
defined by the standard features of the product.
In the XML file, you can create a specific set of context menu options in the
element <callbacks> for the load. Each menu option
is defined in a child element <action>.
<callbacks>

    <ongenerate>generate</ongenerate>
    <oncleardata>clearData</oncleardata>

    <action name="a1" caption="Action 1" icon="update">action1 </action>
    <action name="a2" caption="Action 2" icon="update">action2 </action>

</callbacks>
The element <action> takes three
attributes:
The attribute
nameidentifies the action.The attribute
captionis the text to display in the context menu.The attribute
iconspecifies the name of the image file to display as the icon. You must place the BMP file that Mechanical requires in the directoryimagesspecified in the extension's XML file.
The element <action> defines the function to
invoke when the associated context menu option is selected.
The following figure shows two additional context menu options, and .
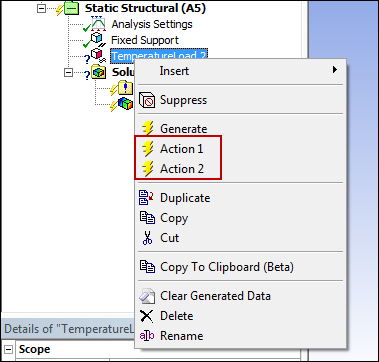
This figure also displays a context menu
option. This option derives from the standard action
generate provided by Mechanical. For this reason, the
declaration of the option differs from the
declaration of the options and
. The option
is always associated with the option
.
These options allow you to create a load that can mimic a standard imported load. The callback associated with the option replaces the standard function integrated in Mechanical.
The feature is activated when you define the callback
<ongenerate> for the load. The callback
<ongenerate> is invoked each time the
context menu option is selected. It is
also invoked during a solve if the state of the load is set to "not
solved."
As for the standard imported load object, the callback
<ongenerate> is called only if the mesh is
already generated.
<callbacks>

    <ongenerate>generate</ongenerate>
    <oncleardata>clearData</oncleardata>

    <action name="a1" caption="Action 1" icon="update">action1 </action>
    <action name="a2" caption="Action 2" icon="update">action2 </action>

</callbacks>
The associated IronPython code looks like this:
def generate(load, fct):
    pct = 0
    fct(pct,"Generating data...")

    propEx = load.PropertyByName("Expression")
    exp = propEx.Value
    if exp=="":
        return False
    try:
        vexp = compile(exp,'','eval')
    except:
        return False

    values = SerializableDictionary[int,float]()
    nodeIds = []

    propGeo = load.PropertyByName("Geometry")
    refIds = propGeo.Value
    mesh = ExtAPI.DataModel.MeshDataByName("Global")
    for refId in refIds:
        meshRegion = mesh.MeshRegionById(refId)
        nodeIds += meshRegion.NodeIds

    nodeIds = list(set(nodeIds))

    for i in range(0,nodeIds.Count):
        id = nodeIds[i]
        node = mesh.NodeById(id)
        x = node.X
        y = node.Y
        z = node.Z
        v = 0.
        try:
            v = eval(vexp)
        finally:
            values.Add(id,v)
        new_pct = (int)((i*100.)/nodeIds.Count)
        if new_pct!=pct:
            pct = new_pct
            stopped = fct(pct,"Generating data...")
            if stopped:
                return False

    propEx.SetAttributeValue("Values",values)
    fct(100,"Generating data...")

    return True

def clearData(load):
    ExtAPI.Log.WriteMessage("ClearData: "+load.Caption)
    propEx = load.PropertyByName("Expression")
    propEx.SetAttributeValue("Values",None)
The callback <ongenerate> takes two arguments:
the load object and a function to manage a progress bar. The function also takes
two arguments: the message to display and the value of the progress bar, which
is between 0 and 100.
During the process, the generated data is stored using an attribute on the
property Expression. For more information, see Extension Data Storage.
The callback <oncleardata> takes one argument:
the load object. This callback is invoked each time the mesh is cleared or when
the context menu option is
selected.