


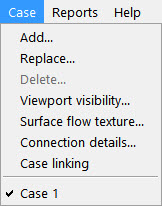
EnSight allows you to work concurrently with up to sixteen different sets of results data (computational or experimental). Each set of results data is read in as an EnSight Case. The Case Main Menu provides access to the mechanisms for manipulating cases, controlling their visibility and for setting up and monitoring their server connections.
|
Add... |
This menu option is used to add an additional case to the current EnSight session. Selecting it opens a dialog which allows one to specify a name and other options for the new Case. The name will appear in the list of active Cases at the bottom of the menu as shown above. Adding a Case actually starts a new EnSight Server and connects it to the EnSight Client. The File → Open... dialog will then open data files may be loaded for the new Case. The geometry from the new case will be added to the geometry already present in the EnSight Client. There are a number of options in the New case dialog illustrated below in the New Case Dialog section. The Open... dialog will then open and you can read and load data for the new Case. |
|
|
Replace... |
Replacing a Case causes all parts and variables associated with the active Case (selected at the bottom of the Case menu) to be deleted. The Server will be restarted and assigned the new Case name. Clicking the button opens a reduced version of the New case dialog which allows one to specify a name for the Case to be replaced and the server launch configuration. The dialog also allows the user to click on Keep currently loaded data and convert the operation into an Add case operation. The Open... dialog will then open and you can read and load data for the new Case (see the New Case Dialog section below). |
|
|
Delete |
Deleting a Case causes all parts and variables associated with the Case to be deleted and terminates the Server associated with the Case. Clicking the button opens a Warning dialog which confirms that the case selected at the bottom of the menu should be deleted (See Load Multiple Datasets (Cases)). |
|
|
Viewport visibility... |
The visibility of the parts from an individual EnSight case can be limited to specific Viewports. By default, the parts from all cases are visible in all viewports. This menu option allows you to select the specific viewport(s) that the geometry (parts) associated with the case will be visible. Parts associated with the selected Case will be visible in the green viewports and hidden in the back viewports. This operation simply sets the individual part viewport visibility flags for all the parts in the current case (see 5.1.1, Parts Quick Action Icons). |
|
|
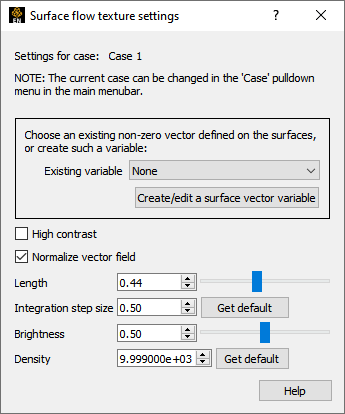
Surface flow texture... |
This selection pops up the Surface flow texture settings dialog. This allows the setting of the properties for use by the entire case on all Surface flows. See Surface Flow Visualization.
 |
|
|
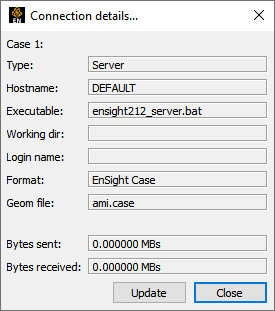
Connection details... |
Opens the Connection details... dialog which gives information about the connection and how many bytes have been transmitted.
 |
|
|
Case Linking |
A toggle indicating Case Linking status: on or off. If case linking is on, you can turn it off using this toggle. Once turned off, you can not toggle it back on in the current EnSight session. Case linking is optionally turned on at the load of the second case (See Compare Cases), and then applies linking to all subsequent cases. If case linking is not turned on before the second case is added, then it cannot be turned on during the rest of the EnSight session. The goal of linking all the cases is to quickly and uniformly perform the same operation over all of the cases. So transformations, part attribute changes, part and variable creation and query operations are performed automatically and uniformly across all of the loaded cases. When one case is changed, all are changed in the same way (See Compare Cases). |
|
|
Case 1, etc |
At the bottom of the Case menu, there is a list of the current cases. The current case is checked in the menu. Selecting another case from the bottom of this list makes that case the current case and the target of operations like the Delete... or Replace... from this menu or query operations. Only one case can be current. |
|
|
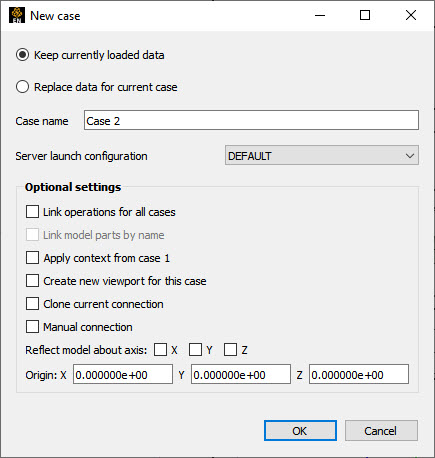
New case |
This dialog is used to determine the new parameters for a new case.
 |
|
|
Keep currently loaded data |
The new case can be added to the existing one. This does not unload the current one and starts up a new server to load the added dataset |
|
|
Replace currently loaded data |
This deletes the existing dataset and loads the new data in place of it |
|
|
Case name |
The name that will appear at the bottom of the Case menu. |
|
|
Server launch configurations |
Choose a launch configuration for the server. A server launch configuration is defined using the Case → Job Launch Settings... menu. |
|
|
Link operations for all cases |
The new dataset will have the context from the first case applied, show up in a new viewport with transformation linking turned on, and all subsequent operations on parts will be applied to all cases loaded. |
|
|
Link model parts by name |
Case linking by default uses the part order to determine which parts are linked together. If this toggle is turned on the model parts will be linked according to name instead of part order. You must of course still have the same part names in the dataset as defined in the first case. But the order of the parts may be different. |
|
|
Apply context from case 1 |
The new dataset can have the context of case 1 applied to it, which will cause it to basically inherit the positioning etc. of case 1. |
|
|
Create new viewport for this case |
The new dataset can be placed in a new viewport or added to the current |
|
|
Clone current connection |
Use the same parameters to start up the new server as the existing server used. This can be useful if one used a complicated set of options to start up the server for the original dataset and don't want to have to repeat them for this dataset. |
|
|
Manual connection |
Check this option to cause the EnSight client to look for a manual server connection. The client will wait for the (remote) server to be launched once is clicked. |
|
|
Reflect model about axis |
This option specifies that the dataset should be reflected over one or more axis when loaded. |
|
|
Origin |
Specify the origin of the data. |
|