


Adding a Surface Finish Symbol
- Select the type of symbol you want to use from the Surface Finish tool
 drop-down.Mouse over the faces of your design to preview the eligible annotation planes. If an annotation plane already exists, right-click and select Select New Annotation Plane to choose a different plane.
 - Select a symbol to edit it's parameters. Depending on the symbol Type and
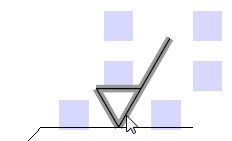
Template, different parameters will be available. The image below shows a
Material Removal Required type using the Standard Template.
- Click in a parameter block and enter text or symbols
You can press Tab to switch between the fields. Right-click and select
 from the mini-toolbar to insert a symbol.