


The procedure for how to configure SSH (using Putty) to SSH to Linux Nodes from Windows for Ansys Icepak is described in this section.
Download and install Putty, Puttygen, Plink, Pscp, Puttytel, from: http://www.chiark.greenend.org.uk/~sgtatham/putty/download.html.
Note: You should install the whole package at once, as opposed to installing each file individually.
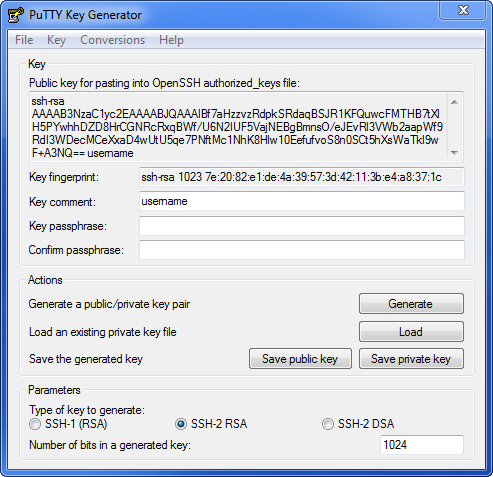
Choose the Start menu, All Programs, Putty, PuTTYGen to create a cryptographic key.
Click Generate, moving the mouse as instructed.
Change Key comment to include your Windows username.
Do not enter a Key passphrase.
Note: If your Linux/UNIX cluster uses OpenSSH you will need to convert the key to OpenSSH format. Check with your Systems Administrator. Choose the Conversions menu and choose Export OpenSSH key.

Choose Save private key file without passphrase to C:\temp\ssh-priv.ppk (or any directory that does not have spaces in the name, important for successful Ansys Icepak launch).
Click on the Save public key button to save a copy of the public key without a passphrase. This will save a local copy of the public key for future reference.
Open a SSH session to one of your cluster nodes, cd into ~/.ssh, and open the authorized_keys file in your favorite editor (for example, VI or EMACS).
Select all of the text in the edit box entitled Public key for pasting into OpenSSH authorized_keys file, copy it, and paste it into the edit session you opened in Step 8.
Save and close the edit session for the authorized_keys file.
Chmod 600 .ssh/ authorized_keys
Add and Modify the Windows environment variables by going into Control Panel, System Advanced, Environment Variables.
Append the PuTTY install directory to Path variable, for example, C:\Program Files\Putty. You must add this to the System Environment variable area.
Add a KEYPATH environment variable with full path to private key file, such as C:\temp\ssh-priv.ppk. You can use a user variable if the key file is used only by you. Use a system variable if other users are sharing the key file.
Testing the Key
As an initial test, run the following from the command prompt (quotes around %KEYPATH% are required):
plink -i "%KEYPATH%" username@linuxmachinename pwd
If plink prompts you to store the key in cache, select Yes.
If plink prompts you to trust key, select yes.
Note: Before configuring the Ansys Icepak launcher on Windows to submit jobs to the Linux/UNIX cluster, verify that you have tested the key using the above procedure and that the username and password are identical on the Windows machine and the Linux/UNIX machine(s).
All computers that you are trying to launch Ansys Icepak from Windows must be able to communicate with the Windows machine.
The first MPI process (rank 0) on the first Linux compute node needs to connect to Fluent to host the process on Windows. You may need to add all Fluent host processes in the Firewall exceptions on the WIndows client machine. These Fluent host processes include the following:
C:\Program Files\ANSYS Inc\v232\fluent\fluent23.2.0\win64\2d_host\fl2320.exe
C:\Program Files\ANSYS Inc\v232\fluent\fluent23.2.0\win64\2ddp_host\fl230.exe
C:\Program Files\ANSYS Inc\v232\fluent\fluent23.2.0\win64\3d_host\fl2320.exe
C:\Program Files\ANSYS Inc\v232\fluent\fluent23.2.0\win64\3ddp_host\fl2320.exe
Note: High speed/low latency network between Linux the compute nodes and Windows client is recommended, for example 1 Gb/s Ethernet LAN. VPN and WAN are not recommended.
If the Linux compute nodes are isolated in a private network, you must configure NAT (or ssh tunnel) to establish socket connection from Linux compute node to the Windows client.
Important: First test standalone Fluent to verify ssh via Putty is working correctly.
Launching Ansys Icepak from a Windows Machine and submitting to a Linux Cluster (or Linux Machines)
Launch Ansys Icepak by choosing the > Ansys Icepak
Click the Solve menu
 Settings
 Parallel to open the Parallel settings
panel.
Parallel to open the Parallel settings
panel.Under Configuration, select Job Scheduler and Use remote Linux nodes. The Linux Job Scheduler options appear.
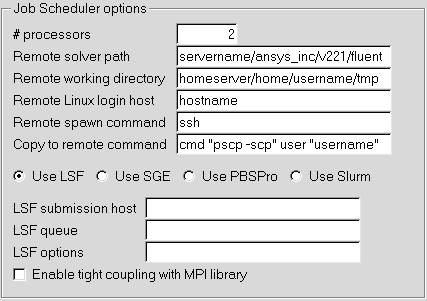
In the # processors field, enter the number of nodes.
In the Remote solve path field, enter the location of the Fluent installation on the Linux machine.
In the Remote working directory field, enter the home directory on the remote cluster. This will be used as a scratch area for temporary files that are created on the nodes.
In the Remote Linux login host field, enter the remote linux desktop/server for the login using the user's credentials.
In the Remote spawn command field, enter the protocol: rsh, ssh, or plink.
In the Copy to remote command field, enter the command options for copying files to the "Remote working directory" (if needed). The following is the syntax used to copy files to remote working directory:
CMD file1 file2 ... fileN
              USER@remote_cluster_head_node:remote_working_dir
where file1, file2, ..., fileN are Icepak generated files that must be copied to the remote working directory. remote_cluster_head_node and remote_working_dir are the entries from Step 6. For example, if you are using pscp (part of PuTTY tool), you can enter
cmd "pscp -i C:/users/joe/authenticate_key" user "joe"and Icepak will generate the copy command by replacing the CMD field with "pscp -i C:/users/joe/authenticate_key" and USER with "joe".
Select the Distributed Resource Management System you're using: LSF, SGE, PBSPro, or Slurm.
For LSF, specify the LSF submission host, LSF queue and enter LSF options. Optionally, select Enable tight coupling with MPI library. See Running Fluent Under LSF in the Ansys Fluent documentation for more information.
For SGE, specify the SGE qmaster and SGE queue.
For PBSPro, specify the PBS submission host.
For Slurm, specify the Slurm submission host, Slurm partition, and Slurm options.
Note: If the Submission host field is defined as "localhost" or left empty, the submission host is the same as the login node.