


All keyframe animation functions are controlled through the Feature Panel. You can define the transformations between keyframes, or you can create standard animations.
Click the Keyframe Animation icon in the Feature Icon Bar.

Set all viewing parameters to the desired location for keyframe 1.
Click to save the first keyframe.
Note: The toggle is automatically switched on when you begin saving keyframes.
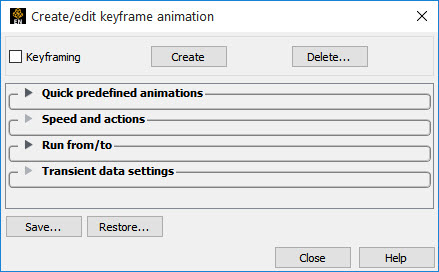
Change the viewing parameters to the desired location for keyframe 2.
Click again to save keyframe 2. You can play your animation at any time to check your results.
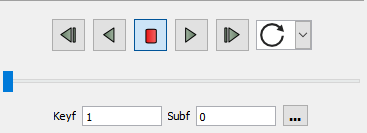
Click the button on the Keyframe Animation Player to play the animation.
Continue to change viewing parameters and click Create keyframe until you have saved all desired keyframes.
Caution: If you toggle-off the button, any keyframes currently defined will be deleted. If you wish to save a set of keyframes, click the button.
There are many ways to specify the desired transformations between keyframes. See the following articles for more information:
Click the Keyframe Animation icon in the Feature Icon Bar.
Set all viewing parameters to the desired location for keyframe 1.
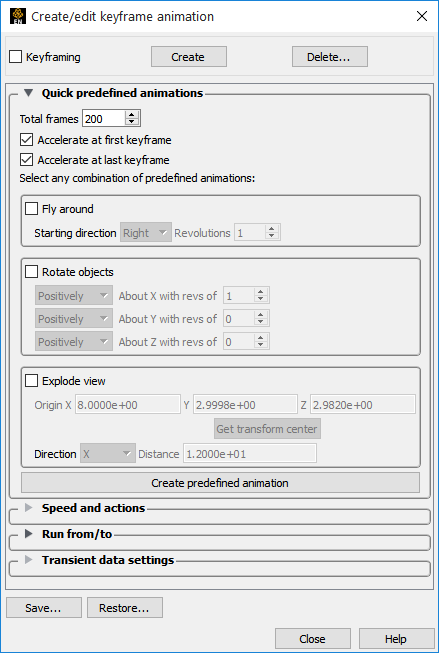
Turn down the Quick Predefined Animations to view the Keyframe Quick Animations settings.
In this turndown area you will be able to create keyframes which define transformations which will
fly the viewer around your model
rotate your model
create exploded views of your parts
Any one of these, or a combination may be used.
Set the number of frames which will be created.
Acceleration at the first and last keyframes that will be created is on by default. If you do not want to accelerate/decelerate toggle these off.
Toggle Fly around on if you wish to move the viewer (camera) in a circle.
You can choose Right (start the viewer moving to the right) or Left.
Specify the number of revolutions.
Toggle if you wish to rotate the scene.
You can rotate positively or negatively about all three axis. For each axis you set the number of revolutions.
Toggle if you want your parts to be translated in reference to an origin.
You can specify the origin or set the origin to the transformation center.
Direction sets the explode direction and can be one of:
X,Y,Z - translate in the coordinate direction.
XYZ - translate in the dominant coordinate direction.
Radial - translate in the direction from the origin specified through the part centroid.
The part that is farthest from the origin specified will be transformed Distance units.
Click to create the keyframes which will transform according to the selections made.
The following sections provide details on the animation control turndowns in the Keyframe Animation Feature Panel.
Speed/Actions
The Speed/Actions turn down exposes allowing you to set the number of sub-frames between each pair of consecutive keyframes as well as specify run such as acceleration and commands to execute:
Click on the Speed and Actions turndown to open the section.
Select the desired keyframe to edit: either enter the value or use the up/down buttons.
Enter the desired number of sub-frames between the keyframe selected in step 1 and the next (the default is 20).
If desired, set the number of frames to hold for the keyframe (default is 1).
If desired, enter EnSight commands to execute when the selected keyframe is reached. The command(s) will be executed before the frame is displayed.
If you added or changed the commands to be executed at a keyframe, click Update Commands.
If you want the transformation to accelerate out (or into) the keyframe, toggle on.
Continue by selecting a new keyframe to edit and click when done.
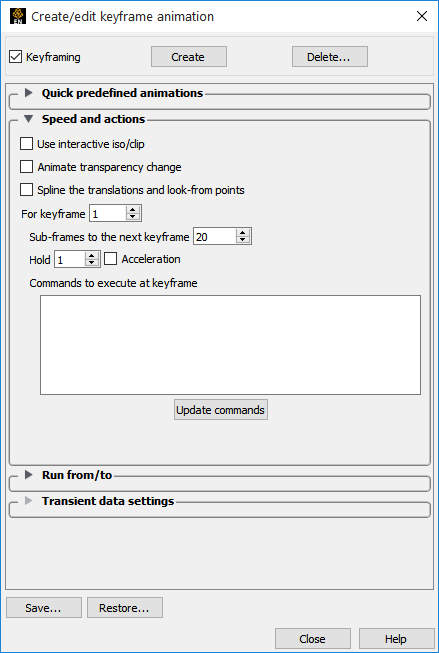
Use Interactive IsoClip
By turning this toggle on, any clip or isosurface interactively moved during the keyframe will animate
Animate Transparency Change
By turning this toggle on, transparency changes to parts during the definition of the keyframes will be part of the animation.
The number of sub-frames controls the speed with which objects transform between keyframes. More sub-frames yields slower motion.
You can insert any valid EnSight command to be executed at a keyframe. If
your command sequence is more than a few lines, it is best to save the sequence in a file and
just enter the command play: filename.
There is a special case of executing a command at a keyframe. If you insert the command shell: filename, The file filename (which is assumed to be a UNIX executable
command) will be executed after each sub-frame and each surrounding keyframe. In addition, if
you are saving animation frames to disk files, the name of the image file just written is passed
to the executable as the first argument. This capability can be used to post-process the image
files, for example to resize and re-sample an image or copy it to a different location. If this
capability is used, the shell: filename command must
be the only command specified.
Run From/To
The Run From/To turndown allows you to specify the range of keyframes to play.
Click on the Run From/To turndown to open the section.
If you wish to limit the animation playback to certain keyframes set the Run From and To fields. By default they are set to cover all of the keyframes you have created.
Transient
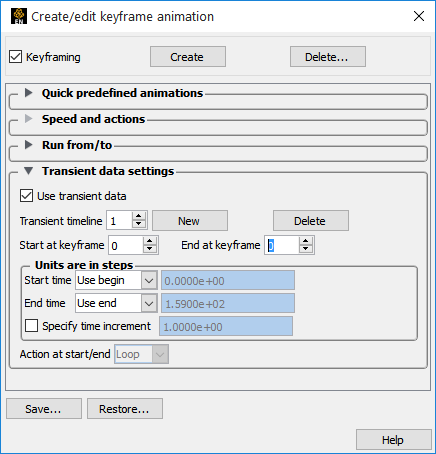
If you have transient data you can specify how it will be used during the keyframe animation.
Click on the Transient Data Settings turndown to open the section.
Toggle on if you want to use transient data during the animation.
Transient data does NOT have to be on (and should not) to play back a flipbook animation during the keyframe animation.
Timelines allow you to use transient data during each defined timeline.
If the timelines do not cover all of the keyframes you will have a portion of your animation with no transient data.
By default a single timeline exists which covers all of the defined keyframes. To create more timelines click New.
For each timeline you can specify the begin and ending time value (either step or simulation time - See Solution Time dialog).
Time will be interpolated such that the Start Time occurs at the Start At Keyframe and the End Time will occur at the End At Keyframe unless the Specify Time Increment is toggled on. If the Specify Time Increment is on each frame during the timeline is incremented by the time indicated.
If the Start Time or End Time is encountered before the Start At or End At Keyframes the transient data will either Loop (go back to the Start Time) or Swing (play in reverse).
Recording Your Animation
See How To Print/Save an Image for instructions on how to record the animation.
Save and Restore
A set of keyframes and related information can be saved to disk and later restored. To save keyframes:
Click Save... in the Feature Edit Dialog.
Enter the desired file name in the File Selection dialog and click .
To restore previously saved keyframes:
Click Restore... in the Feature Edit Dialog.
Enter the desired file name in the File Selection dialog and click .