Example 1: Creating a Box
- To add a ribbon button and start creating an extension, click
 Add button in the Extension Builder
Toolbar.
Add button in the Extension Builder
Toolbar. - In the Properties panel, enter your Tab name, Group name and Button name. For the purposes of this exercise, enter "MyTab," "MyGroup," and "MyButton," respectively.
- (Optional) To add help for your Tab name and
Button name, click F1
 .
Additionally, you can enter a tooltip for your button. To access
F1 help, hover over the extension elements in
Discovery and press F1. The
Button tooltip will appear when you hover over the button in
Discovery. See Help for more
information.
.
Additionally, you can enter a tooltip for your button. To access
F1 help, hover over the extension elements in
Discovery and press F1. The
Button tooltip will appear when you hover over the button in
Discovery. See Help for more
information. - You can either enter the directory path to an icon for your button or click
 to locate and add your icon.
 - Set Initial state to "Visible."
- Check User input required so you can add a tool for your ribbon button.
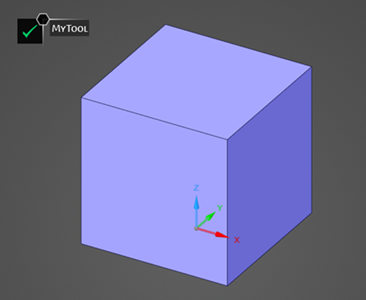
- For your Tool name, enter 'MyTool'.
- Check Add complete button to add a complete button and script for your tool. Optionally, you can check Close tool on complete to close your tool after it's executed.
In the Script editor, enter this script for your complete button. Note that when copying and pasting the code below, it should be on a single line, and any formatting or spacing issues should be removed. Comments should remain on separate lines.
# Create Box result = BlockBody.Create(Point.Create(MM(-10), MM(-10), MM(0)), Point.Create(MM(10), MM(10), MM(20)), ExtrudeType.ForceAdd) # EndBlock- After you have finished writing your script, click Create to apply it to your Complete button.
- Click Preview Extension
 to preview your work in
Discovery.
to preview your work in
Discovery. After clicking to Preview Extension, you should see that "MyTab," "MyGroup," and "MyButton" have been added to Discovery.
 and
and

To launch MyTool, click MyButton.
- Click Complete
 to activate your script and create a box.