


Creating an Engineering Notebook
- Go to File Menu > Settings > Customize > Ribbon Tabs.
- Click
 to expose the tab in the ribbon.
The icon will turn to
to expose the tab in the ribbon.
The icon will turn to  , indicating that it is now
available in the ribbon. Changes take effect immediately.
, indicating that it is now
available in the ribbon. Changes take effect immediately.
Launching Engineering Notebook
To launch Engineering Notebook click the Detail tab and then the Engineering Notebook ribbon button.
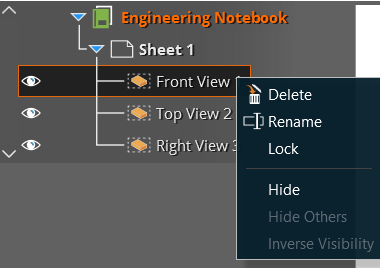
An Engineering Notebook containing front, top, and right-side views appears in the Design window, and the sheet appears in the structure tree. The views are added as nodes in the structure tree with visibility toggles for showing and hiding and a context menu for other view operations.
Modifying one view changes the related views as appropriate. You can navigate between sheets using the window tabs found at the lower-right of the Design window.
Using the Structure Tree Context Menu
Multiple visibility options give you control over what views you're seeing in the sheet. You can choose to Show or Hide an individual view through the context menu or by toggling the view icon in the structure tree. Other visibility options allow you to Hide Others or Inverse Visibility of the views in your sheet.
You can right-click the root node in the structure tree and select Add Sheet to add a sheet to your Engineering Notebook. New sheets are blank except for a trimetric view of the model in the upper right corner.