To split and partially remove a round:
- Click Rounds from the Remove
group on the Prepare tab.
Avoid splitting into
a round. Instead, split on either side of it. You may need to split and
partially remove one or more rounds before adjacent rounds can be removed,
especially when two or more rounded faces meet along an edge or vertex. The
rounded face is split and filled in the middle. To select faces or capping
faces, use the Faces tool.
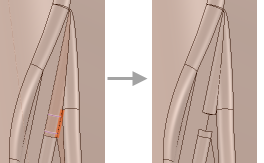
- Hover over one tangent edge of the rounded face to display the round's split
lines. These lines show you a visual indication of where the round will
split, as shown below. You can move the split lines by moving your
mouse.
- If necessary, from the Options panel, change the
Cap width option to adjust the percentage of the
round face that is removed.
-
To select faces or capping faces, use the
Faces tool.
-
Click the Complete tool guide.
Discovery removes the rounded faces you selected and
replaces them with a sharp edge.