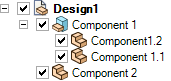
Adding a Bill of Materials to a Document

  1. Click the arrow next to the Bill of Materials tool in the Annotation group on the Detailing tab and select a type:
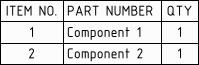
    • Top level: Creates a table that includes only parent components (or parts):

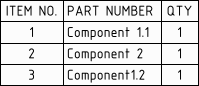
    • Parts only: Creates a table that includes all child components:

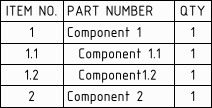
    • Indented: Creates a table that includes all components, with child components indented:

    The last type of BOM you created is remembered and will be automatically chosen if you click the BOM icon instead of the dropdown arrow.
  2. (Optional) If you created a view of a component on the drawing sheet, select the component on the Options panel to create a BOM for just that component.
  3. (Optional) Modify the Bill of Material's properties in the Properties panel.
    • The Hidden components option allows you to control whether or not hidden components will be included in the BOM.

    • There are many other options for controlling the cosmetics of the BOM.

  4. Click to place the Bill of Materials on the design, drawing sheet, or 3D markup slide. The table appears in gray until you place it, and it changes to black after it is placed.
    To cancel, press the Esc key before you click to place the table.
    The BOM appears in the model tree.
    You can copy and paste a BOM, and you can copy the contents from a BOM table and paste them into Microsoft Excel.