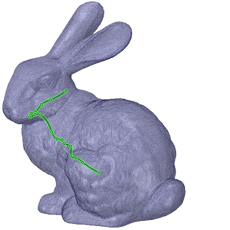
Inserting a Face Curve

  1. Click Face Curve in the Insert group on the Design tab.
  2. Click spots on the faces or edges of a part to draw the spline curve. Your spline can be drawn on one or more faces, but can only be drawn on one object.
    Face curves can also be sketched on mesh bodies by selecting facet points as spline points.
  3. Double-click to end the curve or close the curve by clicking on your beginning point.
    Now you are in editing mode and can change the curve as desired. The curve will not be applied to your design until you complete the operation.
  4. (Optional) Right-click a spot on the curve and select Add Face Curve Point to add a spline point.
  5. (Optional) Right-click a spline point and select Remove Face Curve Point to delete the point.
  6. (Optional) Drag points to change the curve.
  7. (Optional) Set the value for Periodic in the Properties panel:
    • True: If you change this property to True, the tangencies of the beginning and end of the curve will match to create a closed curve. If a curve is open and you set the property to True, the spline will be closed.

    • False: If you change this property to False, the end tangencies of a closed curve don't match. If a curve is closed and you set the property to False, the curve will become teardrop-shaped because the end points will no longer be tangent.

  8. Click the Complete tool guide or press Enter to apply the curve to your design.
Tip: You will get much more predictable results if the face to face boundaries you are drawing over are tangent. Click the edges (tangent or not) to place a point for more control over the intersection point at that boundary.