Creating a One- or Two-Dimension Linear Pattern

  1. Click the Linear tool in the Insert group on the Design tab.
  2. Select a protrusion, depression, body, sketch, points, axes, planes, origins, or 3D curves to be the first member (leader) of the pattern.
    The Direction tool guide is activated.
  3. Select a line, edge, axis, or a set of points to set the direction of the pattern.
  4. (Optional) Modify the Pattern options in the Options panel.
    • Pattern Type: One-dimensional or Two-dimensional.
    • Change X Count, or X Pitch values for One-dimensional patterns.
    • Change X, Y Count, or X, Y Pitch values for Two-dimensional patterns.
    As you switch between pattern types, or change pattern values, the pattern preview displays your changes in blue.
  5. Select the Create Pattern tool guide, or press Enter, to complete the pattern.

Example:
The image shows the preview for a two-dimensional pattern. For one-dimensional, only the X-direction is displayed. Clicking the arrows flips their direction 180-degrees.
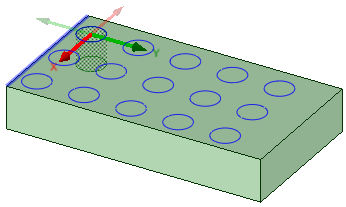
For through-all cuts, the preview is on the plane closest to the direction reference. For blind cuts, the preview is on the face of the selected pattern leader.

You can also create one-dimensional linear patterns on cylindrical faces as long as the pattern direction is either the cylinders axis or parallel to the axis.

To create a pattern of a pattern, follow the steps for the linear pattern, but select a member of a linear pattern as the first member of the pattern.